background image

-5-

Hold tool by insulated gripping surfaces

when performing an operation where the

abrasive wheels may contact hidden

wiring or its own cord. Contact with a “live”

wire will make exposed metal parts of the

tool “live” and shock the operator.
Wear proper apparel while using an

abrasive cut off tool. Face shield or at least

safety goggles, dust mask, leather gloves

and shop apron capable of stopping small

wheel or workpiece fragments.
This attachment is not intended to be

used with Wet Diamond Wheels. Using

water or other liquid coolants with this tool

may result in electrocution or shock. Use of

Dry Diamond Wheels is acceptable. 
Use only Type 1 abrasive cut off wheels

with the correct size arbor hole. Never

use damaged or incorrect wheel flanges

or round nut. Other types of wheels are not

intended to apply load on periphery and may

shatter. Wheels with arbor holes that do not

match the mounting hardware of the tool will

run eccentrically, vibrate excessively and will

cause loss of control.
Do not grind on the side of Type 1

abrasive cut off wheels. Side forces applied

to these wheels may cause them to shatter.
Do not use this attachment with

“Woodcarving” blade or standard wood

cutting toothed blades. These blades are

not intended for this tool and can create loss

of control during use.
Abrasive Cut Off Wheels must have a

maximum safe operating speed greater

than the “no load RPM” marked on the

attachment. Wheels running over the rated

speed can fly apart and cause injury.  
Before each use inspect the cut off wheel

for chips and cracks. Do not use a wheel

that may be damaged. Install a new wheel

if tool was dropped. When installing a

new wheel carefully handle individual cut

off wheels to avoid chipping or cracking.

Run the tool at no load for one minute,

holding the tool in the direction away

from people. Wheels with flaws will

normally break apart during this time.

Fragments from a wheel that bursts during

operation will fly away at great velocity

possibly striking you or bystanders.
Do not use a cut off wheel that is larger

than the maximum recommended size for

your tool, or worn down damaged wheels

from larger abrasive cut off tools. Wheels

intended for larger tools are not suitable for

the higher speed of a smaller tool, these

wheels may easily burst and the fragments

strike you or bystanders.
Position the cord clear of the spinning

wheel. Do not wrap the cord around your

arm or wrist. If you lose control and have

the cord wrapped around your arm or wrist, it

may entrap you and cause injury.
Keep your body positioned to either side

of the wheel, but not in line with the

wheel. It is important to support the tool

properly and to position your body such as to

minimize body exposure from the possible

wheel binding and the recoil of the tool.
Keep hands away from cutting area and

wheel. Keep your second hand on

auxiliary handle or the attachment. Hold

the tool firmly to prevent loss of control.

NEVER place your hand behind the wheel

since the tool may recoil over your hand.

Do not attempt to remove cut material

when wheel is moving. If both hands are

holding the tool, they cannot be cut by the

wheel
Do not “jam” the abrasive wheel into the

work, apply excessive pressure or

attempt to use large depths of cut while

using this tool. Let the rotating wheel do the

work, Abrasive Cut Off Tools are intended to

“cut” the material in a series of shallow depth

of cuts. See the instructions for depth of cut

later in this manual.
Avoid bouncing and snagging the wheel,

especially when working corners, sharp

edges etc. This can cause loss of control

and tool’s recoil.
Do not run the tool while carrying it at

your side. Accidental contact with the

spinning wheel could result in serious

personal injury.
Never lay the tool down until the motor

has come to a complete standstill. The

spinning wheel can grab the surface and pull

the tool out of your control.
Do not use the Zipmate near flammable

materials. Sparks from the wheel could

ignite these materials.
Never cut or attempt to cut magnesium

with this attachment. The dust generated

when cutting magnesium is highly flammable

and may be explosive under certain

conditions. 

RZ 2610954840 07-07  8/16/07  3:55 PM  Page 5

Summary of Contents for RZ10

Page 1: ...Version Version fran aise Versi n en espa ol See page 2 Voir page 20 Ver la p gina 38 1 877 ROTOZIP 1 877 768 6947 www rotozip com Call Toll Free for Consumer Information Service Locations Pour obten...

Page 2: ...e tools or pull the plug from an outlet Keep cord away from heat oil sharp edges or moving parts Replace damaged cords immediately Damaged cords increase the risk of electric shock When operating a po...

Page 3: ...replacement parts Follow instructions in the Maintenance section of this manual Use of unauthorized parts or failure to follow Maintenance Instructions may create a risk of electric shock or injury Ce...

Page 4: ...sitioned on the material improves the stability and control of your tool Some dust created by power sanding sawing grinding drilling and other construction activities contains chemicals known to cause...

Page 5: ...standers Do not use a cut off wheel that is larger than the maximum recommended size for your tool or worn down damaged wheels from larger abrasive cut off tools Wheels intended for larger tools are n...

Page 6: ...handles and position your body and arm to allow you to resist recoil forces Recoil forces can be controlled by the operator if proper precautions are taken When wheel is binding or when interrupting...

Page 7: ...ng from 0 setting Arrow Action in the direction of arrow Alternating current Type or a characteristic of current Direct current Type or a characteristic of current Alternating or direct current Type o...

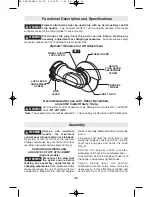
Page 8: ...pecifications refer to nameplate on your tool DEPTH GUIDE SHAFT LOCK DEPTH GUIDE BRACKET LOCK LEVER INTAKE AIR VENTS BUMP OFF SLIDE ON OFF SWITCH SPEED CONTROL DIAL Models RZ10 RZ20 only REMOVABLE HAR...

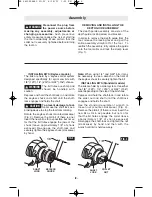
Page 9: ...vise to stop the tool from rotating Rotate the keyless chuck counter clockwise Fig 2 Remove the old bit if there is one insert the new bit as far as possible but not so far that the bit flutes engage...

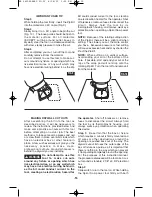
Page 10: ...d push handle until it snaps securely into place Your handle is equipped with a bit and collet storage area To open door pull tab on door downward away from tool To close door lift door upward toward...

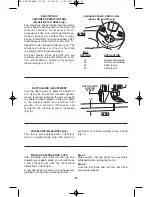
Page 11: ...able the depth guide to slide up or down to the desired depth of cut about 1 8 greater than material thickness and retighten the locking screw clockwise Fig 8 VARIABLE SPEED CONTROL DIAL Models RZ10 R...

Page 12: ...o make a cut out around a standard 2 1 8 x 3 3 4 electrical box Step 2 Slide switch to turn the tool on While holding the Spiral Saw power tool firmly with both WARNING IMPORTANT USER TIP Step 3 While...

Page 13: ...il the bottom corner is reached Step 6 Move the Zip Bit right and upward maintaining light continuous pressure toward the box Step 7 Round the right bottom corner and begin moving the bit upward while...

Page 14: ...ig 2 2 Rotate the keyless chuck counter clockwise until chuck it is completely open 3 Insert drive bit into the keyless chuck up to the flange and securely tighten chuck 4 Open locking lever and posit...

Page 15: ...the shaft lock engages and holds the shaft 2 Insert the 1 4 collet into the collet nut Loosely thread the collet nut onto the output shaft Fig 3 3 Insert drive bit into the collet until it stops and...

Page 16: ...guard lock lever is in the closed position and the guard is securely mounted to the attachment Use the allen wrench to adjust the guard adjustment screw 7 Maximum cutting depth is 11 16 Overtightenin...

Page 17: ...TION The wrenchless chuck has been properly lubricated and is ready to use If the chuck s jaws begin to stick during use the chuck requires lubrication To lubricate the chuck first remove debris from...

Page 18: ...essary for your tool must be used This will prevent excessive voltage drop loss of power or overheating Grounded tools must use 3 wire extension cords that have 3 prong plugs and receptacles NOTE The...

Page 19: ...iron pipe sheet metal stainless steel RZdia1 Dry Diamond Wheel For floor tile concrete stone ceramic tile and other very hard non metal material Sanding Discs Rotozip s sanding discs handle the most...

Page 20: ...N exposez pas le cordon la chaleur des huiles des ar tes vives ou des pi ces en mouvement Remplacez imm diatement un cordon endommag Un cordon endommag augmente le risque de choc lectrique Lorsque vou...

Page 21: ...entretien peut cr er un risque de choc lectrique ou de blessures Certains agents nettoyants tels qu essence t trachlorure de carbone ammoniac etc peuvent ab mer les pi ces en plastique 21 Consignes d...

Page 22: ...que pon age sciage meulage per age et autres travaux du b timent peuvent cr er des poussi res contenant des produits chimiques qui sont des causes reconnues de cancer de malformation cong nitale ou d...

Page 23: ...outil ni des meules ab m es et us es provenant d outils tron onner meule de dimensions sup rieures Les meules destin es aux outils plus gros ne conviennent pas la vitesse sup rieure d un outil plus p...

Page 24: ...es par l op rateur si des pr cautions appropri es sont prises Si la meule se coince ou si vous interrompez une coupe quelle qu en soit la raison enlevez doucement la meule de la pi ce tout en tenant...

Page 25: ...vitesse augmente depuis le r glage 0 Fl che Action dans la direction de la fl che Courant alternatif Type ou caract ristique du courant Courant continu Type ou caract ristique du courant Courant alter...

Page 26: ...TISSEMENT GUIDE DE PROFONDEUR BLOCAGE DE L ARBRE SUPPORT DU GUIDE DE PROFONDEUR MANETTE DE BLOCAGE VENTS D AIR D ADMISSION INTERRUPTEUR MARCHE ARR T COULISSANT AVEC ARR T PAR PERCUSSION CADRAN DE VITE...

Page 27: ...am tre de la queue de l embout Appuyez sur le blocage de l arbre et maintenez le enfonc puis tournez l crou de douille jusqu ce que le blocage de l arbre s enclenche et bloque l arbre Utilisez la cl l...

Page 28: ...qu ce qu elle s enclenche fermement sa place Votre outil est muni d un rangement douilles et embouts Pour ouvrir la porte du rangement tirez vers le bas sur le loquet de la porte pour l loigner de l o...

Page 29: ...l extr mit de la cl desserrer tourner gauche la vis juste assez pour permettre la base de glisser jusqu la profondeur de coupe d sir e environ 1 8 de plus que l paisseur du mat riau et resserrez le v...

Page 30: ...te sur l embout Zip en rotation teindre ensuite l appareil et le d gager du mat riau FIG 9 FIG 10 D COUPAGES DANS LES MURS SECS Apr s avoir assembl la m che dans l outil comme d crit pr c demment vous...

Page 31: ...le coin suivant Tournez le coin et exercez une l g re pression vers le bas et vers l int rieur jusqu ce que le coin inf rieur soit atteint tape 6 D placez l embout Zip vers la droite et vers le haut t...

Page 32: ...auxiliaire afin de mieux r sister au couple de r action ainsi qu aux rebonds L utilisation de l outil sans la poign e auxiliaire risque de causer une perte de contr le r sultant en d ventuelles bless...

Page 33: ...ge de l arbre et maintenez le enfonc puis tournez l crou de douille jusqu ce que le blocage de l arbre s enclenche et bloque l arbre 2 Ins rez la douille de 1 4 po dans l crou de douille Vissez l crou...

Page 34: ...de blocage du capot est en position ferm e et que le capot est fix fermement sur l accessoire Utilisez la cl Allen pour r gler la vis de r glage du capot 7 La profondeur de coupe maximale est de 11 1...

Page 35: ...serrant a t correctement lubrifi et est pr t l emploi Si les mors du mandrin commencent se coincer pendant l utilisation le mandrin doit tre lubrifi Pour cela retirez d abord les d bris de l int rieu...

Page 36: ...nt n cessaire votre outil Ceci pr viendra une chute excessive de tension une perte de courant ou une surchauffe Les outils mis la terre doivent utiliser des cordons de rallonge trifilaires pourvus de...

Page 37: ...er inoxydable RZdia1 Disque de tron onnage diamant sec Pour carreaux pour sol b ton pierre carreaux en c ramique et autres mat riaux non m talliques tr s durs Disques de pon age Les disques de pon age...

Page 38: ...das La entrada de agua en una herramienta mec nica aumentar el riesgo de que se produzcan sacudidas el ctricas No abuse del cord n Nunca use el cord n para llevar las herramientas ni para sacar el enc...

Page 39: ...ramienta debe ser realizado nicamente por personal de reparaciones competente El servicio o mantenimiento realizado por personal no competente podr a ocasionar un peligro de que se produzcan lesiones...

Page 40: ...toque la broca durante ni inmediatamente despu s de la utilizaci n Despu s del uso la broca est demasiado caliente como para tocarla con las manos desnudas Nunca deje la herramienta hasta que el motor...

Page 41: ...fuerzas laterales aplicadas a estas ruedas pueden hacer que salten en pedazos No utilice este aditamento con una hoja para tallar madera ni con hojas dentadas est ndar para cortar madera Estas hojas...

Page 42: ...mente retroceso dirigi ndose hacia el operador o alej ndose de ste seg n la orientaci n de disparo de avance o disparo inverso Las ruedas abrasivas tambi n pueden hacerse pedazos en estas condiciones...

Page 43: ...uaci n de 0 Flecha Acci n en la direcci n de la flecha Corriente alterna Tipo o una caracter stica de corriente Corriente continua Tipo o una caracter stica de corriente Corriente alterna o continua T...

Page 44: ...E EJE SOPORTE DE LA GUIA DE PROFUNDIDAD PALANCA DE FIJACI N ORIFICIOS DE ENTRADA DE AIRE INTERRUPTOR CORREDIZO DE ENCENDIDO Y APAGADO DIAL DE CONTROL DE VELOCIDAD Modelos RZ10 y RZ20 nicamente MANGO D...

Page 45: ...ave en el sentido contrario al de las agujas del reloj figura 2 Quite la broca vieja si hay una e inserte la broca nueva lo m s adentro posible pero sin que las estr as de la broca se enganchen en las...

Page 46: ...Brocas Zip de 1 8 0 125 de di metro la portaherramienta de 1 4 0 250 se usa con Brocas Zip de 1 4 0 250 de di metro y la de 5 32 0 156 con Brocas Zip de 5 32 0 156 Para cambiar la portaherramienta pr...

Page 47: ...meros de referencia del dial facilitan el cambio de posici n del control a la velocidad deseada Para obtener un mejor resultado le recomendamos que use solamente las posiciones 25 30 en el dial de con...

Page 48: ...rop sitos de este manual de instrucciones el procedimiento comentado ser hacer un corte de abertura alrededor de una caja el ctrica est ndar de 2 1 8 x 3 3 4 Paso 2 Deslice el interruptor para encende...

Page 49: ...hasta que llegue a la esquina de la parte inferior Paso 6 Mueva la broca Zip hacia la derecha y hacia arriba manteniendo una presi n ligera y continua hacia la caja Paso 7 D la vuelta a la esquina der...

Page 50: ...r para obtener un control m ximo de la reacci n del par motor o el retroceso El funcionamiento de la herramienta sin el mango auxiliar puede causar la p rdida de control de la herramienta lo que puede...

Page 51: ...osque de modo flojo la tuerca del portaherramienta en el eje de salida Fig 3 3 Introduzca la broca de accionamiento en el portaherramienta hasta que se detenga y apriete firmemente la tuerca del porta...

Page 52: ...lanca de fijaci n del protector est en la posici n cerrada y de que el protector est montado de modo seguro en el aditamento Utilice la llave Allen para ajustar el tornillo de ajuste del protector 7 L...

Page 53: ...mandril de apriete sin llave ha sido lubricado apropiadamente y est listo para utilizarse Si las mordazas del mandril empiezan a agarrotarse durante el uso el mandril requiere lubricaci n Para lubric...

Page 54: ...nta Esto evitar ca das de tensi n excesivas p rdida de potencia o recalentamiento Las herramientas conectadas a tierra deben usar cordones de extensi n de 3 hilos que tengan enchufes de 3 terminales y...

Page 55: ...hojas met licas acero inoxidable RZdia1 Rueda de Diamante Para baldosas de piso concreto piedra losetas de cer mica y otros materiales no met licos muy duros Discos de lijar Los discos de lijar de Rot...

Page 56: ...LE VENDEUR NE SAURAIT TRE TENU POUR RESPONSABLE DES INCIDENTS OU DOMMAGES INDIRECTS INCLUANT MAIS NE SE LIMITANT PAS AUX PERTES DE PROFITS CONS CUTIFS LA VENTE OU L USAGE DE CE PRODUIT CERTAINS TATS A...

Reviews: