background image

After  assembling  the  bit  into  the  tool  as
described earlier, it will be necessary to review
the instructions provided below and make some
practice cut-outs with this tool before attempting
an actual job. The best method is to take some
scrap  pieces  and  nail  or  screw  them  in  place
over wall studs which have an electrical box or
other feature in place. A few such exercises will
give you the necessary practice to make clean,
professional cutouts around whatever is behind
the drywall you are installing.

Do  not  attempt  to  use  this
tool  to  make  cut-outs

around  any  fixture  or  opening  which  has
live  electrical  wires,  or  on  any  wall  which
may have live electrical wiring behind it, as
the  bit  could  conduct  current  to  the  tool,
creating  an  electrocution  hazard  for  the
operator. 
Shut off breakers or remove fuses to
disconnect  the  circuit.  Always  hold  the  tool  by
its  thermoplastic  housing,  and  always  wear
eye protection when operating this device.

Step  1: Be  certain  that  the  box  or  fixture  is
firmly  mounted  and  all  wires  or  other
obstructions  around  the  opening  are  pushed
back  out  of  the  way.  The  bit  uses  the  outer
edge of the box or fixture as a guide, so it is
important  that  there  is  nothing  in  the  way
which can prevent it from guiding completely
around the opening. For the purposes of this
instruction  manual,  the  procedure  discussed
will be to make a cut-out around a standard 2
1/8" x 3 3/4" electrical box.

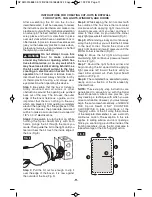
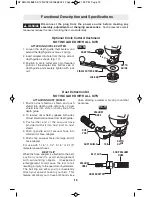
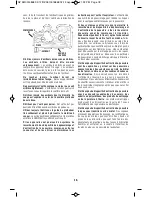
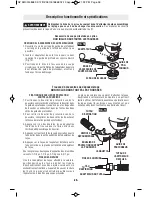
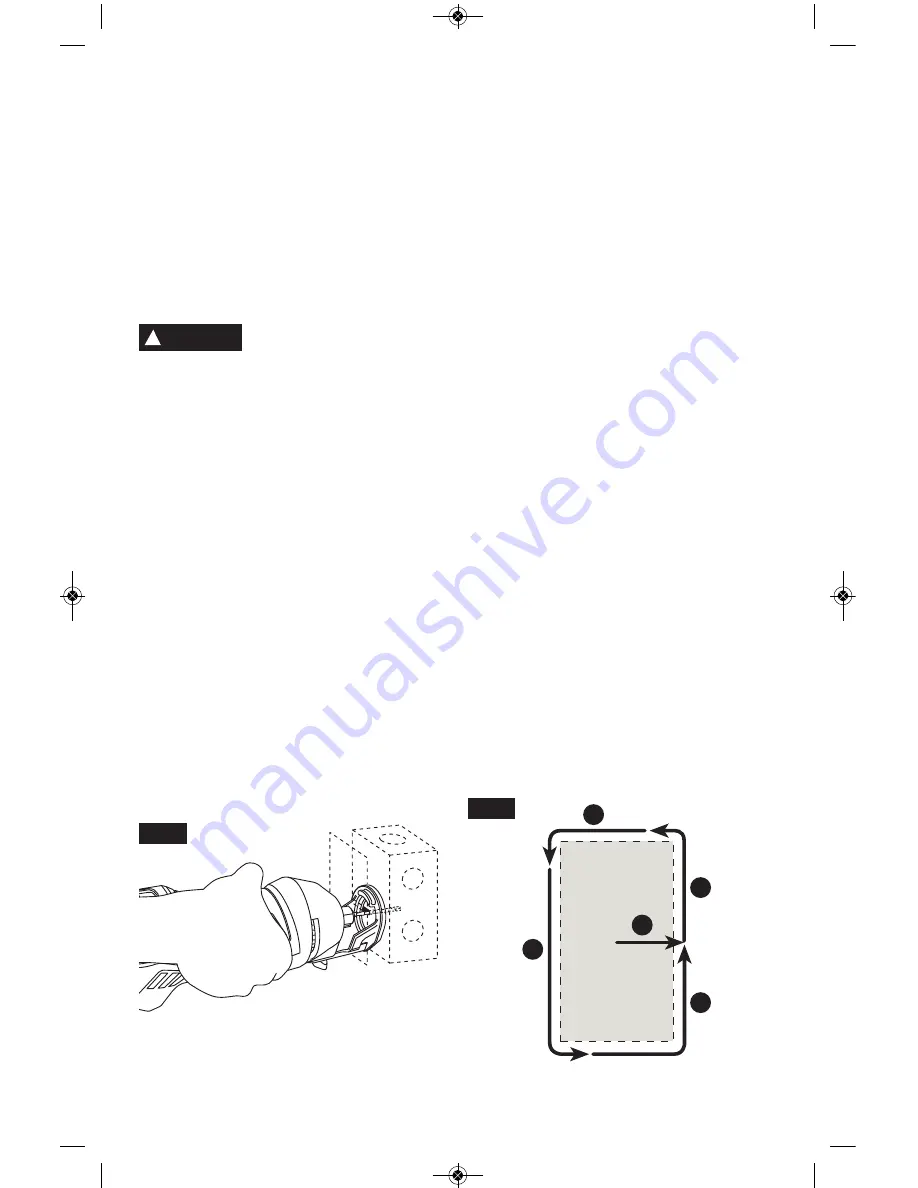
Step 2: Slide switch to turn the tool on. While
holding  the  Sprial  Saw®  firmly  with  both
hands,  plunge  the  bit  through  the  mark  you
made. Then guide the bit to the right until you
feel  and  hear  the  bit  touch  the  inside  edge  of
the box (Fig. 8).

Step  3:  Pull  the  bit  out  far  enough  to  slip  it
over  the  edge  of  the  box  so  it  is  now  against
the outside of the box (Fig. 9).

Step  4:  While  keeping  the  bit  in  contact  with
the  outside  of  the  box  move  the  tool  counter
clockwise  while  applying  light  inward  and
upward  pressure  until  you  feel  and  hear  it
come  to  the  corner.  As  you  round  the  corner
apply light pressure left and downward (Fig. 9).

Step 5: While moving slowly and continuously
along the top contour you will feel the bit come
to  the  next  corner.  Round  the  corner  and
apply light down and inward pressure until the
bottom corner is reached (Fig. 9).

Step  6:  Move  the  bit  right  and  upward
maintaining  light  continuous  pressure  toward
the box (Fig. 9).

Step  7:  Round  the  right  bottom  corner  and
begin  moving  the  bit  upward  while  applying
light  pressure  left  toward  the  box  until  you
meet  initial  upward  cut.  Push  Sprial  Saw®
switch to off (Fig. 9).

Step 8: The completed box, executed quickly,
neatly,  and  in  a  fraction  of  the  time  taken  by
other methods. 

NOTE: These  step-by-step  instructions  are
generalized  to  acquaint  you  with  the  Sprial
Saw’s®  operation.  After  some  practice,  you
may  develop  a  technique  with  which  you  are
more comfortable. However, you must always
begin the cut somewhat centrally, and MOVE
THE  Sprial  Saw®  ONLY  COUNTER-
CLOCKWISE  to  take  advantage  of  the
“hugging”  action  of  the  bit  along  the  contours
of  the  template.  Remember  to  use  a  smooth,
continuous  motion.  The  exception  to  this  rule
applies  to  cutting  window  and  door  openings.
Since you are tracing around the inside of the
framing  members,  move  the  bit  clockwise  to
take advantage of the bits “hugging” action.

!

WARNING

INSTRUCTIONS FOR CREATING CUT-OUTS IN DRYWALL

FOR OUTLETS, CAN LIGHTS, WINDOWS, AND DOORS

-11-

FIG. 8

3

4

5

6

7

FIG. 9

RZ 2610015858 02-12:RZ 2610015858 02-12.qxp  1/25/12  1:32 PM  Page 11

Summary of Contents for SS355

Page 1: ...ionnement s curit Instrucciones de funcionamiento y seguridad 1 877 ROTOZIP 1 877 768 6947 www rotozip com Call Toll Free for Consumer Information Service Locations Pour obtenir des informations et le...

Page 2: ...nal protective equipment Always wear eye protection Protective equipment such as dust mask non skid safety shoes hard hat or hearing protection used for appropriate conditions will reduce personal inj...

Page 3: ...port the workpiece to a stable platform Holding the work by your hand or against the body leaves it unstable and may lead to loss of control Always make sure the work surface is free from nails and ot...

Page 4: ...f there is a static discharge electric spark or excessive heat Do not use dust extraction where for operations where dust may include burning smoking or smoldering items like hot ashes or sparks Fire...

Page 5: ...these exposures varies depending on how often you do this type of work To reduce your exposure to these chemicals work in a well ventilated area and work with approved safety equipment such as those...

Page 6: ...que 1 2 3 Selector settings Speed torque or position settings I II III Higher number means greater speed Infinitely variable selector with off Speed is increasing from 0 setting Arrow Action in the di...

Page 7: ...tes that this tool is listed by the Intertek Testing Services to United States and Canadian Standards Symbols continued IMPORTANT Some of the following symbols may be used on your tool Please study th...

Page 8: ...rated speed of the accessory must be at least equal to the maximum speed marked on the power tool Accessories running faster than their RATED SPEED can break and fly apart NOTE For tool specifications...

Page 9: ...ould be handled with caution The 1 8 collet is used with 1 8 diameter bits the 1 4 collet is used with 1 4 diameter bits and the 5 32 collet is used with 5 32 diameter bits To change collets loosen th...

Page 10: ...XCEPT cutting around outlet boxes in drywall steer the tool in a clockwise direction with slow steady pressure to make the cut Step 5 After completing your cut turn off the tool and carefully remove i...

Page 11: ...e edge of the box Fig 8 Step 3 Pull the bit out far enough to slip it over the edge of the box so it is now against the outside of the box Fig 9 Step 4 While keeping the bit in contact with the outsid...

Page 12: ...BELT CLIP When the hose adapter is attached to the belt position yourself to avoid entanglement with surrounding objects Unexpected entanglement could cause the tool to fall resulting in injury to the...

Page 13: ...factory lasts for the life of the tool CARBON BRUSHES The brushes and commutator in your tool have been engineered for many hours of dependable service To maintain peak efficiency of the motor we reco...

Page 14: ...through even the toughest materials in seconds flat Drywall XBITS XB DW XB OWD Multipurpose XBITS XB MP Multipurpose Dust Management XBITS XB MPDM Floor Tile XBITS XB FT Floor Tile and Countertop XBI...

Page 15: ...15 RZ 2610015858 02 12 RZ 2610015858 02 12 qxp 1 25 12 1 32 PM Page 15...

Page 16: ...faites pour l ext rieur et r duisent le risque de choc lectrique S il est absolument n cessaire d utiliser l outil lectroportatif dans un endroit humide utilisez une alimentation prot g e par un disj...

Page 17: ...l accessoire de coupe risque d entrer en contact avec un fil cach Tout contact de l accessoire de coupe avec un fil sous tension risque de mettre aussi sous tension les parties m talliques expos es de...

Page 18: ...e avant de commencer travailler fr quemment pendant le travail apr s l ach vement du travail et avant de mettre l outil en marche Faites tr s attention quand vous liminez ou jetez de la poussi re car...

Page 19: ...ement les ressorts de rappel des capots de protection Certains agents de nettoyage tels que l essence le t trachlorure de carbone l ammoniaque etc risquent d ab mer les plastiques Risque de blessure p...

Page 20: ...vitesse de couple ou de position Un l ll lll nombre plus lev signifie une vitesse plus grande S lecteur variable l infini avec arr t La vitesse augmente depuis le r glage 0 Fl che Action dans la dire...

Page 21: ...l est approuv par Intertek Testing Services selon les normes des tats Unis et du Canada Symboles suite IMPORTANT Certains des symboles suivants peuvent tre utilis s sur votre outil Veuillez les tudier...

Page 22: ...um indiqu e sur l outil lectroportatif Les accessoires que l on fait tourner une vitesse sup rieure leur VITESSE NOMINALE peuvent se casser et voler en clats REMARQUE Pour sp cifications de l outil re...

Page 23: ...le sens horaire jusqu ce qu elle soit serr e fond Faites attention de ne pas d former le filetage de la vis serrage main Le guide de profondeur vous permet de contr ler la profondeur de la coupe Desse...

Page 24: ...e subir un choc lectrique Couper le courant alimentant ces fils l aide des fusibles ou des disjoncteurs Toujours tenir l appareil par son bo tier thermoplastique et toujours porter une protection des...

Page 25: ...bo tier de telle sorte qu elle soit en contact avec l ext rieur du bo tier Fig 9 tape 4 tout en maintenant l embout en contact avec l ext rieur du bo tier d placez l outil dans le sens antihoraire et...

Page 26: ...2 1 po PINCE DE CEINTURE Une fois l adaptateur du tuyau attach la ceinture positionnez vous de fa on viter les risques d enchev trement avec des objets avoisinants Un enchev trement inattendu risquera...

Page 27: ...s embouts X BITS ont t con us pour des professionnels s rieux Ils offrent une force et une vitesse sup rieures permettant de couper m me les mat riaux les plus durs litt ralement en quelques secondes...

Page 28: ...faut toujours d brancher l outil avant de le nettoyer ou de l entretenir Le meilleur moyen de nettoyer l outil est d utiliser de l air comprim sec Il faut toujours porter des lunettes de protection qu...

Page 29: ...r b r e P a n n e a u x d e m o u s s e G r a n i t e B o i s f r a n c S t r a t i f i s L a t t e s M t a l P a n n e a u x O S B P l t r e P l a s t i q u e C o n t r e p l a q u C a r r e a u x d...

Page 30: ...rd n de extensi n adecuado para uso a la intemperie La utilizaci n de un cord n adecuado para uso a la intemperie reduce el riesgo de que se produzcan sacudidas el ctricas Si es inevitable utilizar un...

Page 31: ...ue se mantenga la seguridad de la herramienta mec nica Normas de seguridad para la Spiral Saw Agarre la herramienta el ctrica por las superficies de agarre con aislamiento porque puede que el cortador...

Page 32: ...ecci n y extracci n de polvo aseg rese de que dichos dispositivos se conecten y utilicen de acuerdo con las instrucciones de la herramienta y la aspiradora El uso de recolecci n de polvo puede reducir...

Page 33: ...s de retorno de los protectores de seguridad podr an montarse incorrectamente Ciertos agentes de limpieza tales como gasolina tetracloruro de carbono amon aco etc podr an da ar las piezas de pl stico...

Page 34: ...de velocidad par motor o posici n I II III Un n mero m s alto significa mayor velocidad Selector infinitamente variable La velocidad aumenta desde la graduaci n de 0 con apagado Flecha Acci n en la di...

Page 35: ...ices ha catalogado esta herramienta indicando que cumple con las normas estadounidenses y canadienses S mbolos continuaci n IMPORTANTE Es posible que algunos de los s mbolos siguientes se usen en su h...

Page 36: ...a Los accesorios que funcionen m s r pidamente que su VELOCIDAD NOMINAL se pueden romper y salir despedidos NOTA Para obtener las especificaciones de la herramienta consulte la placa del fabricante co...

Page 37: ...uidado de no da ar las roscas del tornillo de apriete manual La gu a de profundidad le permite a usted controlar la profundidad de corte Afloje el tornillo de apriete manual gir ndolo en sentido contr...

Page 38: ...de 90 para empezar a cortar Fig 7 La gu a de la base debe quedar al ras con la superficie del material Todos los materiales deben cortarse avanzando hacia la derecha EXCEPTO al cortar alrededor de una...

Page 39: ...e la broca lo suficiente como para deslizarla sobre el borde de la caja de manera que ahora la broca se encuentre contra la parte exterior de la caja Fig 9 Paso 4 Al mismo tiempo que mantiene la broca...

Page 40: ...4 2 1 2 pulgadas de di metro CLIP DE CINTUR N Cuando el adaptador de manguera est sujeto al cintur n posici nese para evitar engancharse con los objetos circundantes Un enganche inesperado podr a hac...

Page 41: ...enta de la fuente de energ a antes de la limpieza o de la realizaci n de cualquier mantenimiento La herramienta se puede limpiar m s eficazmente con aire comprimido seco Use gafas de seguridad siempre...

Page 42: ...t n dise adas para los aut nticos profesionales Estas brocas ofrecen una resistencia y una velocidad extraordinarias para cortar a trav s de incluso los materiales m s dif ciles en unos segundos Broca...

Page 43: ...a m i n a d o s L i s t n M e t a l T a b l e r o d e h e b r a s o r i e n t a d a s O S B E n l u c i d o P l s t i c o s M a d e r a c o n t r a c h a p a d a M a t e r i a l d e s u p e r f i c i...

Page 44: ...TRE TENU POUR RESPONSABLE DES INCIDENTS OU DOMMAGES INDIRECTS INCLUANT MAIS NE SE LIMITANT PAS AUX PERTES DE PROFITS CONS CUTIFS LA VENTE OU L USAGE DE CE PRODUIT CERTAINS TATS AM RICAINS ET CERTAINE...

Reviews: