Assembly & Set-Up
3
7
Contents of Carton
•
One Log Splitter
•
One Operator’s Manual
•
One Engine Operator’s Manual
WARNING!
Use extreme caution when unpacking
this machine. Some components are very heavy and
will require additional people or mechanical
handling equipment.
NOTE:
Your log splitter is shipped with motor oil in the engine.
You MUST check the oil level before operating. Be careful not to
overfill.
NOTE:
All references in this manual to the left or right side of the
log splitter are from the operating position only. Exceptions, if
any, will be specified.
Loose Parts In Carton
•
Reservoir Tank
•
Engine-Pump Assembly
•
Wedge, Beam and Cylinder Assembly
•
Tongue Assembly
•
Wheels
•
Beam Support/Latch Bracket
•
Log Tray Brackets
•
Fenders
•
2 Hub Caps
Recommended Tools for Opening Crate
•
Safety glasses
•
Leather gloves
•
Wire cutters
•
Pry bar
•
Claw hammer.
Recommended Tools for Assembly
•
Standard Screw Driver
•
Standard Socket Set
•
Adjustable Wrench
•
Torque Wrench
•
Pliers
•
Side Cutters
•
Rubber Mallet
Assembly
Attaching the Fenders
1.
Remove all three self-tapping screws and the flat washer
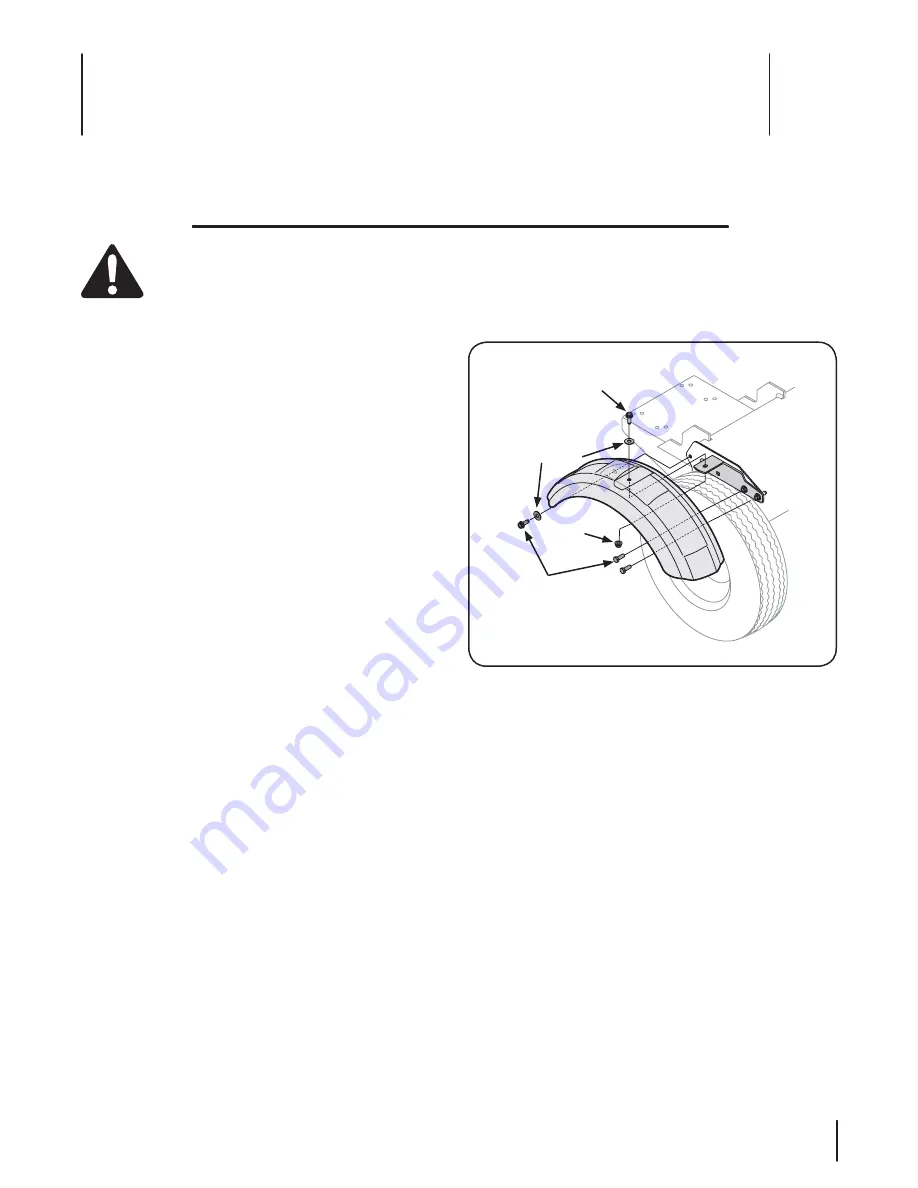
from one side of the reservoir tank. See Figure 3-1.
Self-Tapping
Screws
Flat Washer
Self-Tapping
Screws
Lock Nut
Figure 3-1
2.
Place the fender and the fender bracket up against the
reservoir tank and align with the holes.
NOTE:
The fender is pre-assembled to the fender bracket
by a self-tapping screw, flat washer and lock nut at the
factory.
3.
Secure the fender bracket to the reservoir tank with two
of the self-tapping screws removed in step one. See Figure
3-1.
4.
Secure the front of the fender to the reservoir tank using
the third self-tapping screw and flat washer removed in
step one.
5.
Tighten all the hardware.
6.
Install the second fender using the instructions above.
Summary of Contents for RM 33 LS
Page 22: ...Notes 10 22...
Page 23: ...23 Section 10 Notes...


