Section 10: Operator Screens
21822662
10-25
ADDING A BGM (BACKGROUND MUSIC) UNIT
STUDIO SOUND ONLY
Do not skip steps. All steps must be done to navigate properly through the menus. If you get lost, back through the menus by
touching: back, the back arrow, or Back to Peripheral Setup.
Step 1.
Set the Background Music Delay. The delay is the number of seconds that elapse before Background Music
plays. Time starts elapsing when the DLW-1 is at standby. To prevent background music between songs, set the
delay to 10 or more seconds.
•
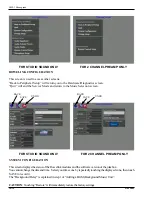
Push SERVICE SWITCH to enter Main Menu.
• Touch
Hardware/Diagnostics.
• Touch
Configure Hardware.
• Touch
System Configuration.
• Touch
box showing seconds of Background Delay.
• Touch
C to clear the present value, enter the seconds of delay you desire, and
touch
OK.
• Touch
SAVE arrow to record your changes
• Touch
BACK arrow to return to System Admin & Auditing.
Step 2.
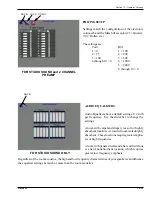
Plug a stereo BGM unit into the left and right Stereo A (BGM) Input, or Plug a mono BGM unit into the
Mono C (BGM) Input.
• Touch
Audio Modes to view Audio Modes, Input Select screen.
•
In the Background row,
Touch
the input you plugged the BGM unit into.
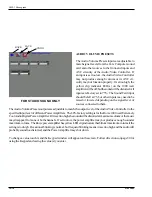
• Touch
Muting to view Audio Modes, Muting screen.
•
In the Background row, remove all check marks by
touching
them.
• Touch
SAVE arrow to record your changes
• Touch
BACK arrow to return to Hardware Setup.
Step 3.
If the BGM unit has tone controls, set them for a flat response. Adjust the phonograph to a comfortable
volume and listen to the Background Music. If the BGM unit has a volume control, increase it until the music starts
to distort, then reduce it a little ways past where it no longer distorts. If the BGM unit does not have a volume control,
and the BGM music sounds good (i.e. it’s stable and not distorted), then skip to step 4.
When the Audio/Video Controller, Preset Input is at factory setting, a BGM signal greater than 1.0 volt is too high
and may cause distortion. A signal less than 0.4 volt is too low and may cause unstable sound. If the BGM music
is distorted or if the music is not stable, adjust the input of the Audio/Video Controller as follows:
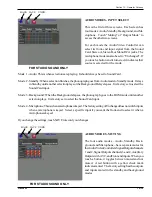
• Touch
Audio Volume Presets.
• Touch
the box (Stereo A, or Mono) you plugged the BGM unit into.
•
Touch
C to clear the present value. Enter a lower value if music is distorted. Enter a higher value if music
is not stable.
Touch
OK, then
Touch
SAVE arrow. If still distorted or not stable keep repeating “Touch C ,
enter new value,
Touch
OK, and
Touch
SAVE arrow” until its stable and not distorted.
• Touch
BACK arrow to return to Hardware Setup.
Step 4.
The factory settings configure the phonograph for independent volume adjustment of music played by:
customers, autoplay, and Background Music. You are adjusting the volume of: customer music when customer
music is playing, autoplay when autoplay music is playing, and Background Music when Background Music is
playing. If you want Background Music and autoplay music to have the same volume, then link them by doing the
following. Otherwise
touch
Quit.
• Touch
Remote Control Setup to view Remote Control Setup, Parameters screen.
• Touch
Linked Back Autoplay
• Touch
SAVE arrow to record your changes
• Touch
BACK arrow to return to Hardware Setup.
• Touch
Quit.
Summary of Contents for StarLink DLW-1
Page 8: ......
Page 22: ...DLW 1Phonograph 1 12 21822662 This page left intentionally blank...
Page 37: ...Section 3 Venue Installation 21822662 3 11 THIS PAGE INTENTIONALLY LEFT BLANK...
Page 39: ...Section 3 Venue Installation 21822662 3 13 THIS PAGE INTENTIONALLY LEFT BLANK...
Page 50: ...DLW 1Phonograph 4 4 21822662 This page intentionally left blank...
Page 72: ...DLW 1 Phonograph 5 22 21822662 This page intentionally left blank...
Page 90: ...DLW 1Phonograph 8 8 21822662 This page intentionally left blank...
Page 96: ...DLW 1 Phonograph 9 6 This Page Intentionally Left Blank...
Page 120: ...DLW 1 Phonograph 10 24 21822662 SPANISHUSERINTERFACE...
Page 128: ...DLW 1 Phonograph 10 32 21822662 This page left intentionally blank...
Page 130: ...11 2 21822662 This page intentionally left blank...
Page 139: ...11 11 21822662 This page intentionally left blank...
Page 141: ...11 13 21822662 7 8 Figure 11 3A Shell Assembly Internal View 1000 Watt 2 Channel Preamp...
Page 145: ...11 17 21822662 This page intentionally left blank...


