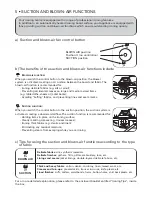
background image

Recommendations:

• Before you begin using the iron, or if you have not used any steam for a few minutes, press the

steam control button several times in a row, holding the iron away from your clothes.
This will enable any cold water to be removed from the steam-circuit.

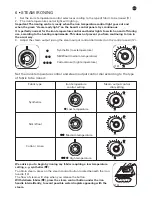
Iron temperature control setting:
- Start with any fabrics to be ironed at a low temperature (•), and finish with those which need

higher temperatures (• • • or Max).

- Mixed-fibre fabrics: Set the ironing temperature to the setting for the most delicate fabric.
- Woollen garments : Press the iron’s steam control button intermittently to produce short

bursts of steam, without placing the iron on the garment itself.

Steam output control dial setting:
- Thick fabrics: Increase the steam output setting.
- Low temperature ironing: Set the steam output control dial to the low position.  

Dry ironing: Do not press the steam control button under the iron handle.

• If you are using starch, it should be sprayed onto the reverse side of the fabric to be ironed. 

Ironing board cover:
We recommend ironing the ironing board cover with a very hot iron before you use it for the
first time. For perfect results every time, only replace with a Rowenta ironing board cover 
available from our authorised service dealers.

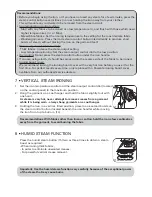
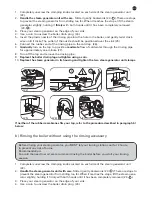
7 • VERTICAL STEAM IRONING

1.

Set the iron temperature control and the steam output control dial (located
on the control panel) to the maximum position. 

2.

Hang the garment on a coat hanger and hold the fabric slightly taut with
one hand.

As steam is very hot, never attempt to remove creases from a garment
while it is being worn - always hang garments on a coat hanger.

3.  Holding the iron in a vertical, tilted position, press in one second bursts on

the steam control button (located beneath the iron handle) while moving
the iron from top to bottom  (14).

Recommendations: With fabrics other than linen or cotton, hold the iron a few centimetres
away from the garment, to avoid burning the fabric.

(14)

8 • HUMID STEAM FUNCTION

Press the humid steam button (15) two or three times to obtain a steam
boost as required:
- When ironing thick fabrics,
- In order to eliminate unwanted creases,
- For powerful vertical crease removal.

Important: Use the humid steam function very carefully because of the exceptional power 
of the steam that may cause burns.

(15)

Summary of Contents for Pro Active IC7100

Page 1: ...instructions for use 032621 IC7100 50 03 ...

Page 2: ... tank 7 Iron power cord and steam cord storage space 8 Control panel 9 Steam generator screw clamps 10 Wheels rubber coated to protect delicate floors 11 Feet 12 Semi automatic opening lever use only to open the board 13 Board closing and height adjuster lever use this lever to close the board 14 Heated active ironing area with ironing board cover 15 Suction blower unit 12 6 7 13 ...

Page 3: ...when the ironing centre is switched on Suction function Inside the board the suction fan sucks air through the board Blown air function Inside the board the blower fan blows air through the board Board fan control button suction blown air c Iron d Steam generator Steam cord Soleplate temperature control dial Temperature control light Steam control button Humid steam button Screw clamps Boiler insi...

Page 4: ...ater tank in its housing pressing down until it clicks into place 5 98 cm 70 cm Suitable water Your steam generator has been designed to operate using untreated tap water However if your water is very hard mix 50 untreated tap water with 50 distilled water The ironing centre comes with a tester that can be used to test the hardness of the water Unsuitable water Do not add anything to the contents ...

Page 5: ...ning board 10 1 The green light on the control panel will start to flash and the boiler will heat up 10 2 When the green light stops flashing after approximately 2 minutes the steam supply is ready When you switch on your ironing centre the ironing board surface heats up automatically eliminating any risk of steam condensing Your ironing board s surface will reach its operating temperature in appr...

Page 6: ...you switch the control button to the suction position the suction system is activated creating a downward airflow The suction function is recommended for Holding items in place on the ironing surface Clearly marking creases e g trouser creases Ironing thick fabrics e g denim and linen Eliminating any residual moisture Preventing steam from escaping while you are ironing c Tips for using the suctio...

Page 7: ...l dial located on the control panel 12 Synthetics low temperature Silk Wool medium temperature Cotton Linen high temperature 11 12 Set the iron s temperature control and steam output control dial according to the type of fabric to be ironed Fabric type Synthetics Silk Wool Cotton Linen Iron temperature control setting Low temperature Medium temperature High temperature Steam output control dial se...

Page 8: ...the ironing board cover with a very hot iron before you use it for the first time For perfect results every time only replace with a Rowenta ironing board cover available from our authorised service dealers 7 VERTICAL STEAM IRONING 1 Set the iron temperature control and the steam output control dial located on the control panel to the maximum position 2 Hang the garment on a coat hanger and hold t...

Page 9: ...eam generator under the tap Do not place the iron on a metal rest as this could damage it Place it instead on the supplied rest plate which is fitted with non slip pads and is designed to withstand high temperatures a Removable water tank Empty and rinse the removable water tank 18 18 b Iron soleplate We recommend that you clean the soleplate using the Rowenta soleplate cleaning stick available fr...

Page 10: ...e it is essential to rinse out the boiler after every 10 uses If your water is hard you should rinse the boiler more frequently Never use descaling agents when rinsing out the boiler as they could damage it a Rinsing the boiler using the rinsing accessory For easier and more effective boiler rinsing we recommend using the rinsing accessory supplied with your ironing station 20 It will make rinsing...

Page 11: ...and remove the rinsing pipe 9 Replace the boiler drain plug and tighten using a coin 10 Replace the steam generator in its housing and tighten the two steam generator unit clamps 1 2 22 If neither of the rubber membranes fits your tap refer to the procedure described in paragraph b below b Rinsing the boiler without using the rinsing accessory Before rinsing your steam generator you MUST let your ...

Page 12: ...for a few seconds then completely empty it over a container or your sink 29 For best results we recommend that this operation is done twice 7 Replace the boiler drain plug and tighten using a coin 8 Replace the steam generator in its housing and tighten the two steam generator unit clamps 28 12 PUTTINGYOUR IRONING CENTRE AWAY 29 1 Switch off your ironing centre by pressing the main On Off O I swit...

Page 13: ...ontact with electrical cords with the hot iron soleplate Keep your ironing station out of the reach of children Never leave the appliance unattended while it is plugged into a power socket until it has cooled down approximately 1 hour after use Never unplug the appliance by pulling on the power cord Always unplug your appliance Before rinsing out the boiler Before cleaning it After each use Never ...

Page 14: ...fan unit does not make any noise SOLUTIONS Check that the appliance is correctly plugged in and press the main On Off O I switch on the control panel To switch the iron on again it is imperative that the iron is removed from its storage compartment first Decrease the steam output when iro ning at low temperature steam out put control dial on the control panel Wait for the iron temperature control ...

Reviews: