background image

23/36

GB

parties.

 Make sure that third 

parties  only  use  this  product 

after  receiving  the  requisite 

instructions.

Keep  away  from  children 

and 

safeguard 

against 

unauthorized use. 

Never leave 

the  appliance  unattended  if  it 

is either ready for operation or 

operating.  Do  not  let  children 

come close to the appliance. The 

use of this appliance by children 

is  prohibited.  Safeguard  the 

appliance against unauthorized 

use by third parties.

Always be aware of what you 

are doing and pay attention 

at all times.

 Do not carry out 

any work on this product if you 

are  inattentive  or  under  the 

influence of drugs, alcohol or 

medication.  Even  a  brief  loss 

of  concentration  when  using 

this  appliance  can  lead  to 

serious accidents or injuries.

Ensure secure wall mounting.


Make sure the appliance has a 

firm and secure wall mounting 

during installation. Only use the 

appliance in an upright position.

The appliance becomes very 

hot.

 Never touch the surface 

while  the  appliance  is  in 

operation.

Avoid  contact  with  hot 

parts. 

Do not touch hot parts 

on  the  appliance.  Note  that 

various components can store 

heat  and  can  therefore  also 

cause  burns  after  use  of  the 

appliance. 

WARNING:  Do  not 

cover. 

Never  cover  the 

appliance  so  as  to  avoid 

overheating. It is important to 

make  sure  that  the  air  inlet 

and  air  outlet  openings  are 

always freely accessible.

Look out for damage.

 Check 

the  appliance  for  any  signs 

of  damage  before  putting  it 

into  operation.  If  defects  are 

apparent on the appliance, it 

must not be put into operation 

on any account.

Do  not  use  sharp  objects.


Never  insert  sharp  and/or 

metallic  objects  inside  the 

appliance.

Do  not  misuse.

  Do  not  use 

the  appliance  for  purposes 

other than those intended in 

Summary of Contents for 1 03 03 0360

Page 1: ...1 03 03 0360 HBS 2000 2 1 DE GB BAD SCHNELLHEIZER 2000 W Originalbetriebsanleitung BATHROOM RAPID HEATER 2000 W Original Instruction Manual...

Page 2: ...2 36 DE DE GB BAD SCHNELLHEIZER 2000 W Originalbetriebsanleitung 3 BATHROOM RAPID HEATER 2000 W Original Instruction Manual 20...

Page 3: ...1 Auspacken des Lieferumfangs 10 3 2 Aufbewahren der Originalverpackung 10 3 3 Montage an der Wand 11 4 Betriebsanleitung 12 4 1 Ger te bersicht 12 4 2 Inbetriebnahme und Bedienung 13 4 3 Abschalten d...

Page 4: ...Auf den folgenden Seiten erhalten Sie wichtige Hinweise die Ihnen eine optimale und sichere Nut zung Ihres Bad Schnellheizers erlauben Lesen Sie deshalb diese Bedienungsan leitung genau durch bevor S...

Page 5: ...t dass die Kinder berwacht sind oder dass sie Anweisungen ber die Sicherheitsma nahmen erhal ten und auch die m glichen Gefahren verstanden haben Kinder zwischen 3 und 8 Jah ren d rfen den Netzstecker...

Page 6: ...enn Sie unaufmerk sam sind bzw unter Einfluss von Drogen Alkohol oder Me dikamentenstehen Bereitsein Moment der Unachtsamkeit beim Gebrauch dieses Ger tes kann zu ernsthaften Unf llen und Verletzungen...

Page 7: ...aufweist Wenden Sie sich bei einer Besch digung des Netzkabels unbedingt an das ROWI Service Center Wenn das Netzkabel besch digt ist darf dieses nur vom Hersteller einem bevollm ch tigten Service Fa...

Page 8: ...en mind 100 cm ein Desweiteren muss ein Mindestabstand von mind 60 cm zur Dusche und oder Badewanne eingehalten werden Die Montage des Ger tes an der Decke ist untersagt 1 3 Spezifische Sicherheits hi...

Page 9: ...Um bereits im Vorfeld m gliche Gefah ren auszuschlie en wurden vom Her steller serienm ig die folgenden Sicher heitseinrichtungen installiert berhitzungsschutz Wird die maximal zul ssige Ger tetem pe...

Page 10: ...iher Germany Telefon 49 7253 93520 0 Fax 49 7253 93520 960 info rowi de www rowi de Tab 1 Technische Daten 2 5 Untersagte Anwendungs bereiche X Decken Sie das Ger t niemals ab solan ge es betrieben wi...

Page 11: ...nnen X Halten Sie die vorgeschriebenen Sicher heitsabst nde und Montagema e ein X Dieses Ger t darf in Badezimmern und Feuchtr umen betrieben werden Ausgenommen davon sind die Berei che Volume 1 und 2...

Page 12: ...der Markierung mit einem Durchmesser von 6 mm und einer Tiefe von ca 55 mm in das zuvor mar kierte Bohrloch 7 H ngen Sie nun das Ger t wieder an der Aufh ngung auf und fixieren es mit einer Schraube...

Page 13: ...in den Stand by Modus zur ckzukehren berpr fen Sie nach Einschalten des Ger tes ob der L fter einwandfrei funk tioniert und der Motor nicht brummt Wird das Ger t 1 Minute lang nicht bedient wird die B...

Page 14: ...liche Uhrzei ten voreingestellt Folgende Modi k n nen hierbei festgelegt werden Komfort Modus Sobald die Raumtemperatur unter 10 C f llt geht das Ger t automatisch an und heizt bis 35 C erreicht sind...

Page 15: ...PRO und w hlen mit oder das Pro gramm AU aus b Halten Sie die Taste P PRO f r 3 Se kunden gedr ckt bis PROG im Dis play erscheint c W hlen Sie mit der Taste C M den gew nschten Tag aus d W hlen Sie mi...

Page 16: ...nur Originalteile ver wendet werden d rfen Wenden Sie sich ggf an das ROWI Service Center siehe Kapitel 6 5 4 Fehlersuche und Reparatur ST RUNG Ger t startet nicht M gliche Ursache Abhilfe Kein Strom...

Page 17: ...Reparaturen oder Repara turversuchen durch nicht von ROWI autorisierte Personen und oder Un ternehmen X Normaler betriebsbedingter Ver schlei X Reinigung von Komponenten X Anpassung an national unter...

Page 18: ...spra che mit dem ROWI Service Center sen den Sie das Ger t frei Haus bis 30 kg an folgende Adresse ROWI Schwei ger te und Elektro werkzeuge Vertrieb GmbH Service Center Augartenstra e 3 76698 Ubstadt...

Page 19: ...eutschland erkl ren hiermit dass dieses Produkt mit den folgenden Harmonisierungsvor schriften bereinstimmt Niederspannungsrichtlinie 2014 35 EU Elektromagnetische Vertr glichkeit 2014 30 EU RoHS Rich...

Page 20: ...acking the scope of supply 27 3 2 Keeping the original packaging 27 3 3 Montage an der Wand 27 4 Operating Instructions 28 4 1 Appliance overview 28 4 2 Start up and operation 29 4 3 Switching off the...

Page 21: ...important information allowing you to use your bathroom rapid heater optimally and safely Therefore read through these operating instructions carefully before putting the heater into operation for th...

Page 22: ...3 and 8 years may not connect the power plug setandcleantheappliance orcarryoutmaintenancework CAUTION Some parts of the product can become very hot and cause burns Particular caution is called for i...

Page 23: ...nting Make sure the appliance has a firm and secure wall mounting during installation Only use the appliance in an upright position The appliance becomes very hot Never touch the surface while the app...

Page 24: ...fully rolled out Never wind the power cable around the appliance Make sure that the power cable does not come into contact with hot surfaces Route the cable so that nobody can trip over it Only use or...

Page 25: ...less improper use or use other than that intended can result in hazards to the life and limb of the user or third parties or damage to the appliance itself and or other tangible assets A bathroom fast...

Page 26: ...fficiency 38 0 Heat output Nominal heat output Pnom 2 0 kW Minimum heat output Pmin 1 0 kW Maximum continuous heat output Pmax c 2 0 kW Auxiliary current consumption Nominal heat output elmax 0 045 kW...

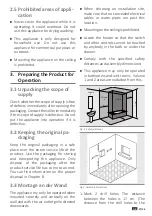
Page 27: ...sporting the appliance Only dispose of the packaging after the product service life has come to an end You can find information on the proper disposal in Chapter 8 3 3 Montage an der Wand The applianc...

Page 28: ...ust be attached for a secure hold Turn this downwards for the purpose Draw a marking through the hole onto the wall Mounting bracket Lower fastening Fig 4 Attachment 6 Unhang the appliance again and d...

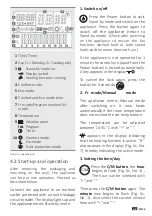
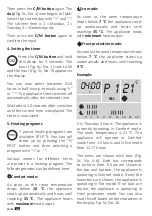
Page 29: ...appliance return to Stand by mode Check after switching on the appliance to ensure the fan functions without fault at both speed levels and the motor does not hum If the appliance is not operated for...

Page 30: ...on as the room temperature drops below 10 C the appliance starts up automatically and heats until reaching 35 C The appliance heats with maximum heat output Eco mode As soon as the room temperature dr...

Page 31: ...button and select the AU program with or b Keep the P PRO button pressed for 3 seconds until PROG appears in the display c Select the desired day with the C M button d Select the desired program with...

Page 32: ...ugged into the socket Check the power supply voltage The appliance is not switched on Press the Stand by button The room temperature is above the temperature set at the thermostat Increase the tempera...

Page 33: ...bH Claims extending beyond the free fault rectification e g damage compensation claims are not covered by the scope of the warranty 6 2 Processing If problems occur during operation of your ROWI produ...

Page 34: ...cal or municipal administration 20 PAP Pay attention to the identification of the packaging materials for waste separation these are marked with abbreviations a and numbers b denoting the following 1...

Page 35: ...for standby and off mode electric power consumption Applied harmonised standards EN 55014 1 2017 EN 55014 2 2015 EN 61000 3 2 2014 EN 61000 3 3 2013 EN 50564 2011 EN 60335 1 2012 A11 2014 EN 60335 2 3...

Page 36: ...bsanleitung 0520_103030360_0720_1 1 ROWI Schwei ger te und Elektrowerkzeuge Vertrieb GmbH Augartenstra e 3 76698 Ubstadt Weiher GERMANY Telefon 49 7253 93520 0 Fax 49 7253 93520 960 E Mail info rowi d...

Reviews: