28/40
4. Now put the radiator on its feet.
P
Do not position the appliance directly below a wall socket.
P
Mounting the appliance on the ceiling is prohibited.
P
Only use the appliance with the wheels fitted.
Assembling the wheels
1. Place the appliance upside down. Ensure a clean, scratch-proof base when doing so.
2. Screw the attached wing screws of the mounting brackets downwards. Then fit one
mounting bracket between the first and second heating rib and the other mounting
bracket between the last two heating ribs.
3. Then take the 2 metal plates with the attached wheels and place these through the rel
evant mounting brackets
4. Screw the wing screws correspondingly onto the mounting bracket again, to make
sure the wheels are held firmly.
3. Operating Instructions
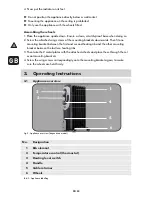
3.1 Appliance overview
Fig. 2: Appliance overview (depends on model)
No. Designation
1
Rib element
2
Temperature control (thermostat)
3
Heating level switch
4 Handle
5
Cable retainer
6 Wheels
Tab. 2: Appliance labelling
4
1
2
3
5
6
GB
Summary of Contents for HOR 1500/7/3 Basic
Page 38: ...38 40 Notice...
Page 39: ...39 40 Notice...


