background image

21/40

Dear customer,  

 
We are pleased that you have chosen a quality product made by ROWI and would like 
to thank you for recognizing the high standard of our company and our products. The fol-
lowing pages contain important information allowing you to use your thermal wave heater 
optimally and safely. Therefore read through these operating instructions carefully before 
putting the heater into operation for the first time. Keep the operating instructions within 
convenient access for later consultation during every use. Keep all documents provided 
along with the appliance in a safe place. 
 
We hope you enjoy using your new thermal wave heater 


Your ROWI GmbH


  Explanation of Symbols 


Attention danger! 


The safety rules marked with this symbol must be strictly observed at all times. 
Failure to observe these rules can cause serious and extensive harm to health as 
well as immense material damage.  


Important note! 


This symbol denotes important information that must be strictly observed for fault-
free operation of the appliance. Only in this way can potential malfunctions be 
avoided.  


Important information! 


Here you can find explanatory information and tips to help you use this appliance 
optimally. 
 
To prevent the heater from overheating, the heater must not be covered. 


These operating instructions have been authored with the utmost care. However, we reserve the right to optimize  
and adapt these instructions at any time. Figures can deviate from the original.

GB

Summary of Contents for HWH 1000/3/1

Page 1: ...HWH 1000 3 1 HWH 2000 3 1 Artikel Nummer 1 03 03 0148 1 03 03 0149 Bedienungsanleitung DE Operating Instructions GB...

Page 2: ...OWI GmbH Symbolerkl rung Achtung Gefahr Die mit diesem Symbol gekennzeichneten Sicherheitsvorschriften sind unbedingt zu beachten Die Missachtung kann schwerwiegende und weit reichende gesund heitlich...

Page 3: ...verursachen Besondere Vorsicht ist geboten wenn Kinder und schutzbed rftige Personen anwesend sind Kinder oder Drittbenutzer unterweisen beaufsichtigen Dieses Ger t kann von Kindern ab 8 Jahren sowie...

Page 4: ...ieferumfanges 10 2 2 Aufbewahren der Originalverpackung 10 2 3 Vorbereitende Ma nahmen 11 3 Betriebsanleitung 12 3 1 Ger te bersicht 12 3 2 Inbetriebnahme und Bedienung 12 3 3 Abschalten des Ger tes 1...

Page 5: ...1000 3 1 W rmewellenheizung 1000 W HWH 2000 3 1 W rmewellenheizung 2000 W Artikel Nummer 1 03 03 0148 1 03 03 0149 Einschl gige EG Richtlinien EG Niederspannungsrichtlinie 2006 95 EG EG Richtlinie Ele...

Page 6: ...ngsgem e Verwendung Dieses Ger t ist nach dem Stand der Technik und den anerkannten sicherheitstechnischen Regeln gebaut Dennoch k nnen bei unsachgem er oder nicht bestimmungsgem er Verwendung Gefahre...

Page 7: ...nkrechter Position stehen 1 5 Technische Daten Modell HWH 1000 3 1 Art Nr 1 03 03 0148 Netzanschluss 220 240 V 50 Hz Max Heizleistung 1000 W Heizstufen 3 Stufen 300 700 1000 W Raumheizverm gen ausgehe...

Page 8: ...Sie daf r Sorge dass Dritte dieses Produkt nur nach Erhalt der erforderlichen Anweisungen benutzen Seien Sie stets aufmerksam und achten Sie immer darauf was Sie tun F hren Sie keine Arbeiten an diese...

Page 9: ...nden Sie sich bei einer Besch digung des Netzkabels unbedingt an das ROWI Service Center Netzkabel nicht zweckentfremden Ziehen Sie das Ger t nicht am Kabel und benutzen Sie es nicht um den Stecker au...

Page 10: ...igen Teppich P Stellen Sie das Ger t so auf dass der Netzstecker jederzeit frei zug nglich ist P Betreiben Sie das Ger t nur mit vollst ndig ausgerolltem Netzkabel Wickeln Sie das Netzkabel niemals um...

Page 11: ...it Hilfe der im Lieferumfang enthaltenen Schrauben an das Heizger t fest 3 Stecken Sie die Rollen an die St tzf e in dem Sie diese leicht hineindr cken Wandmontage optional Beachten Sie beim Anbringen...

Page 12: ...alle Teile montiert sind siehe Kapitel 2 3 kann das Ger t in Betrieb genommen werden Gehen Sie dabei wie folgt beschrieben vor 1 Vergewissern Sie sich dass der Heizstufenschalter siehe Abb 2 Nr 3 auf...

Page 13: ...gew nschte Raumtemperatur erreicht drehen Sie den Temperaturregler soweit gegen den Uhrzeigersinn zur ck bis Sie ein deutliches Klicken h ren Die rote Kontrolllampe erlischt Ein integrierter Thermost...

Page 14: ...bgek hltem Zustand P Vor jeglichen Arbeiten am Ger t Netzstecker ziehen P Reinigen Sie das Ger t nur mit einem trockenen weichen Tuch Verwenden Sie auf kei nen Fall scharfe und oder kratzende Reinigun...

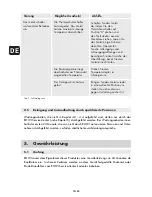
Page 15: ...gestellte Material oder Produktionsfehler vom ROWI Service Center kostenlos behoben Das Ger t schaltet w hrend des Betriebes ab Die Thermoschutzschalter hat ausgel st Das Ger t hat die maximal zul ssi...

Page 16: ...spr che die ber die kostenlose Fehlerbeseitigung hinausgehen wie z B Schadensersatz Anspr che sind nicht Bestandteil des Gew hrleistungsumfanges 5 2 Abwicklung Sollten beim Betrieb Ihres ROWI Produkte...

Page 17: ...Service Center senden Sie das Ger t an folgende Adresse ROWI Schwei ger te und Elektrowerkzeuge Vertrieb GmbH Service Center Augartenstra e 3 76698 Ubstadt Weiher 5 3 Die Online Registrierung Service...

Page 18: ...mer 1 Unterer Halterahmen 4 03 03 1554 2 Hintere Geh useabdeckung 4 03 03 1555 3 Abstandshalter 4 03 03 1556 4 St tzfu 4 03 03 1557 5 Abstandshalter 4 03 03 1558 6 Linke Geh useabdeckung 4 03 03 1559...

Page 19: ...chbar sind Weitere Informationen hierzu erhalten Sie beim ROWI Service Center 7 Entsorgung Die Verpackung sowie s mtliche Verpackungsmaterialien bestehen aus umweltfreund lichen zu 100 recyclingf hige...

Page 20: ...rfen ausschlie lich von einem autorisierten Kundendienst durchge f hrt werden Um Ihren Garantieanspruch geltend zu machen ist der Original Verkaufsbeleg mit Verkaufsdatum beizuf gen Von der Garantie a...

Page 21: ...al wave heater Your ROWI GmbH Explanation of Symbols Attention danger The safety rules marked with this symbol must be strictly observed at all times Failure to observe these rules can cause serious a...

Page 22: ...be very hot and cause burns Special care is required when children and vulnerable persons are present Instruct supervise Children and third users This unit can be used by children from 8 years and per...

Page 23: ...9 2 1 Unpacking the scope of supply 29 2 2 Keeping the original packaging 29 2 3 Preparatory measures 29 3 Operating Instructions 31 3 1 Appliance overview 31 3 2 Starting use 31 3 3 Switching off the...

Page 24: ...1 Thermal Wave Heater 1000 W HWH 2000 3 1 Thermal Wave Heater 2000 W Article number 1 03 03 0148 1 03 03 0149 Relevant EC directives EC Low Voltage Directive 2006 95 EC EC Directive concerning Electr...

Page 25: ...Area of application and intended use This appliance is constructed according to the state of the art and the recognized technical rules of safety Nevertheless improper use or use other than that inten...

Page 26: ...position 1 5 Technical data Model HWH 1000 3 1 Art No 1 03 03 0148 Power supply 220 240 V 50 Hz Max Heat output 1000 W Heating levels 3 levels 300 700 1000 W Room heating capacity assuming a room hei...

Page 27: ...d parties only use this product after receiving the requisite instructions Always be aware of what you are doing and pay attention at all times Do not carry out any work on this product if you are ina...

Page 28: ...and do not use it to pull the plug out of the socket Protect the cable from heat oil and sharp edges Only use original accessories For your own safety only use accessories and addi tional devices tha...

Page 29: ...ake sure that the power cord does not come into contact with hot surfaces Route the cable so that nobody can trip over it P Do not use this heater with a program switch time switch or any other device...

Page 30: ...supporting feet by gently pres sing them in Wall mounting optional Ensure a minimum distance of 60 cm to the floor when mounting the appliance 2 Drill the holes 8 mm and approx 35 mm deep into the wal...

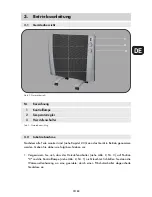
Page 31: ...liance can be put into operation Proceed as follows for this 1 Make sure the heating level switch see Fig 2 No 3 is at position 0 and the pilot lamp see Fig 2 No 1 is not lit Then connect the thermal...

Page 32: ...e control back anticlockwise until you hear a distinct click The red pilot lamp goes out An integra ted thermostat now automatically switches the appliance on and off thereby ensuring a more or less c...

Page 33: ...g cleaning P Always clean the appliance while cool P Pull out mains plug before any work P Only clean the appliance with a dry soft cloth Never use sharp and or abrasive cleaning agents 4 3 Maintenanc...

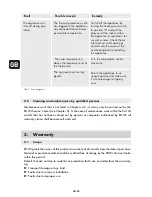
Page 34: ...not due to material or production faults are excluded from the warranty e g P Transport damage of any kind P Faults due to incorrect installation P Faults due to improper use The appliance swit ches o...

Page 35: ...incorrect operation Therefore first consult the oper ating instructions in the event of a malfunction Chapter 4 2 contains corresponding information on troubleshooting 2 Service Form To make the servi...

Page 36: ...sible on the outside of the transport packaging P Return appliance Send the appliance to the following address only after consultation with the ROWI Service Centre ROWI Schwei ger te und Elektrowerkze...

Page 37: ...icle number 1 Lower holding frame 4 03 03 1554 2 Rear housing cover 4 03 03 1555 3 Spacer 4 03 03 1556 4 Supporting foot 4 03 03 1557 5 Spacer 4 03 03 1558 6 Left housing cover 4 03 03 1559 7 Right ho...

Page 38: ...rts are not available from ROWI or cannot be replaced individually Further information can be obtained from the ROWI Service Center 7 Disposal The packaging and all packaging materials are made from e...

Page 39: ...epairs may only be carried out by an authorized customer service In order to assert the guarantee claim the original sales receipt with sales date must be enclosed The following are excluded from the...

Page 40: ...Originalbetriebsanleitung 0714_103030 148 149_1 1 Contact ROWI Schwei ger te und Elektrowerkzeuge Vertrieb GmbH Augartenstra e 3 76698 Ubstadt Weiher Germany www rowi de...

Reviews: