18
User
Manual
5.4 Configuration
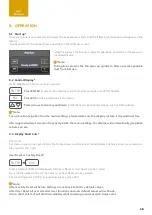
Home Screen
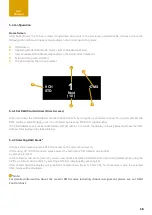
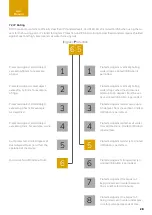
After boot process the fixture is ready for operation and starts in the previously enabled mode. At home screen the
following information will appear, depending on the current operating mode:
A
DMX Adress
B
Operating Mode (DMX Mode, Quick Light or Standalone Mode)
C
Next available DMX address depending on the fixtures DMX footprint
D
External Data protocol (DMX).
E
The dot indicates the active protocol
5.4.1 Set DMX Start Address (Direct Access)
At Home Screen the DMX address can be changed directly by using the up and down arrows. During this process the
DMX address starts blinking, once it´s confirmed by pressing ENTER it stops blinking.
If the DMX address will not be confirmed by ENTER within 10 seconds, the display will jump back and show the DMX
address from before and stops blinking.
5.4.2 Selecting DMX Mode*
At home screen please press ENTER to access to the main menu (level 1).
While using UP / DOWN arrows, please select the menu item “DMX Mode” and confirm
by pressing ENTER.
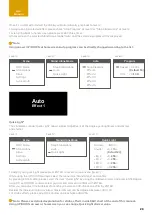
In the following sub-menu (level 2), you can now choose between 8 different DMX operating modes while using the
UP/Down arrows and confirm by pressing ENTER or jump back by pressing ESC.
After confirmation the display will jump back to main menu (level 1). Press ESC for homescreen, here the selected
DMX mode will be displayed.
*Note:
For detailed information about the several DMX modes including channel assignment please see our DMX
Control chart.
.
User
Manual
9 CH
STD
Next
( 10 )
•DMX
1
B
A
C
D
E

