2A3/4
3-3-44
Main charger front housing
Charger spring
Main charger rear housing
Charger terminal
Charger spring
Charger wire retainer pin
Projection
Not more than 2 mm
13
±
2 mm
Projection
Charger terminal
Charger wire
retainer pin
Not more than
2 mm
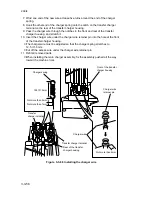
Figure 3-3-51 Installing the charger wire
6. Wind the new tungsten wire at least five turns around one end of the charger spring
and trim the end.
∗
The width of the coiled charger wire and the cut end must be within 2 mm.
7. Hook the other end of the charger spring onto the charger terminal of the main
charger rear housing.
8. Pass the wire through the notch in the charger wire retainer pin and stretch it taut.
∗
The charger wire must be adjusted so that the charger spring stretches to
13
±
2 mm and the spring end aligns with the rib on the main charger rear
housing.
9. Hook the charger wire onto the projection on the main charger front housing.
10. Insert the charger wire retainer pin into the projection on the main charger rear
housing to secure the charger wire.
11. Cut off the excess wire under the charger wire retainer pin.
∗
The cut end of the charger wire must protrude less than 2 mm.
12. Refit the main charger front and rear lids.
13. Refit all removed parts.
Summary of Contents for Ri 4230
Page 3: ...SERVICE MANUAL Ri 4230 5230 ...
Page 13: ...4230 5230 S M MCA THEORY AND CONSTRUCTION SECTION I I Theory and Construction Section ...
Page 14: ...1 1 5 2A3 4 CONTENTS 1 1 Specifications 1 1 1 Specifications 1 1 1 ...
Page 100: ...4230 5230 S M MCA ELECTRICAL SECTION II II Electrical Section ...
Page 119: ......
Page 138: ......
Page 159: ...4230 5230 S M MCA III Set Up and Adjustment Section III SET UP AND ADJUSTMENT SECTION ...
Page 448: ...2A3 4 3 6 3 25 Toner scatters at the leading edge of the image See page 3 6 17 ...

