2A3/4
3-3-82
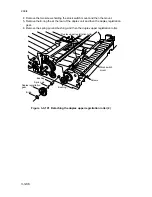
4. Remove the four screws and the duplex unit from the rails.
5. Remove the two screws holding the duplex cover and then the cover.
6. Detach the 6-pin connector of the side registration section and the 3-pin connector
of the side registration home position switch, and unlock the edging.
7. Remove the paper tapping guide by gently bending it and taking out of the hole in
the machine rear first.
8. Remove the four screws holding the side registration section and slide off the
section toward the machine right.
9. Remove the two screws holding the duplex paper conveying upper cover and then
the cover.
3-pin connector
Duplex paper
conveying upper
cover
Paper tapping guide
Side registration
section
Screw
Screws
Screw
Screws
Screws
Duplex cover
6-pin
connector
Figure 3-3-96 Detaching the duplex cover and side registration section
Summary of Contents for Ri 4230
Page 3: ...SERVICE MANUAL Ri 4230 5230 ...
Page 13: ...4230 5230 S M MCA THEORY AND CONSTRUCTION SECTION I I Theory and Construction Section ...
Page 14: ...1 1 5 2A3 4 CONTENTS 1 1 Specifications 1 1 1 Specifications 1 1 1 ...
Page 100: ...4230 5230 S M MCA ELECTRICAL SECTION II II Electrical Section ...
Page 119: ......
Page 138: ......
Page 159: ...4230 5230 S M MCA III Set Up and Adjustment Section III SET UP AND ADJUSTMENT SECTION ...
Page 448: ...2A3 4 3 6 3 25 Toner scatters at the leading edge of the image See page 3 6 17 ...


