background image

MM79 010710 

Page 2 

1.2 

IMPORTANT NOTES 


         Slimline Standard Mk2 


CAUTION  –  THIS PACKAGE WEIGHS 16Kgs –  assess the load before you move it and note any other handling 
information on the packaging. If you think the load is beyond your safe capability, DO NOT PUT YOURSELF AT RISK! 
Seek assistance from other person(s) and/or use appropriate handling equipment. IT’S YOUR BODY – LOOK AFTER IT! 


  This appliance is for DECORATIVE PURPOSES ONLY and is manufactured to the requirements of the current issue of EN 509. 


This appliance is for use on PROPANE GAS (G31) ONLY, at a supply pressure of /- 1mbar.


  This appliance 

MUST

 be installed by a REGISTERED INSTALLER.  Failure to do so may lead to prosecution. 


  Ventilation for this appliance must be fitted in accordance with the rules in force and checked regularly for obstructions. 

If the appliance is installed in GREAT BRITAIN, additional ventilation is 

NOT 

normally required. 

If the appliance is installed in IRELAND, a minimal cross sectional area of 100cm

2

 is required. 


  Any permanent flue restriction must be removed and any variable dampers locked fully open or removed. If the flue has been 

used previously for solid fuel, it MUST be swept PRIOR to installation. 


  If  soot accumulation becomes  excessive, the fuel effect pieces should be removed from the appliance for cleaning.    Cleaning 

should be carried out in a sufficiently ventilated area or in the open air, by gently brushing with the pieces held away from your 
face so that you avoid inhaling the dust. THE USE OF A NORMAL VACUUM CLEANER IS NOT RECOMMENDED as dust may 
be blown back into the room. 


  This appliance has a naked flame and a fireguard to the current issue of BS 8423 - 2002 should be used for the protection of 

children, the elderly and the infirm. 


  Care must be taken on the selection of wall coverings within close proximity of the appliance as some vinyl and embossed 

materials may become discoloured by convected heat. Soft furnishings must be kept clear from the radiant heat of the appliance 
and from impinging the hearth area. Combustible materials must not be put on or left in the hearth area nor should the coal bed 
be used to burn rubbish or other materials. 


  This appliance uses fuel effect components, gaskets and insulation material containing Refractory Ceramic Fibre, (RCF), which 

are man-made vitreous silicate fibres. 

Excessive

 exposure to such material may cause temporary irritation to the eyes, skin and 

respiratory tract. Consequently, it makes sense to take care when handling these articles to ensure that the release of dust is kept 
to a minimum. 


  This appliance is fitted with an ODS, a spillage monitoring system which operates if the evacuation of products is interrupted (i.e. 

blocked or incorrect flueing). If the appliance repeatedly `

goes out

 it may indicate a problem and the installer or specialist should 

be consulted before further use. 


  The minimum temperature rating of any back panel or hearth must have a minimum fire resistance rating of CLASS 0 (100

o

C). 


  If any home improvements, e.g. double glazing, are carried out after this appliance has been installed, you should contact your 

Registered Installer and have the operation of the flue checked. 


1.3 

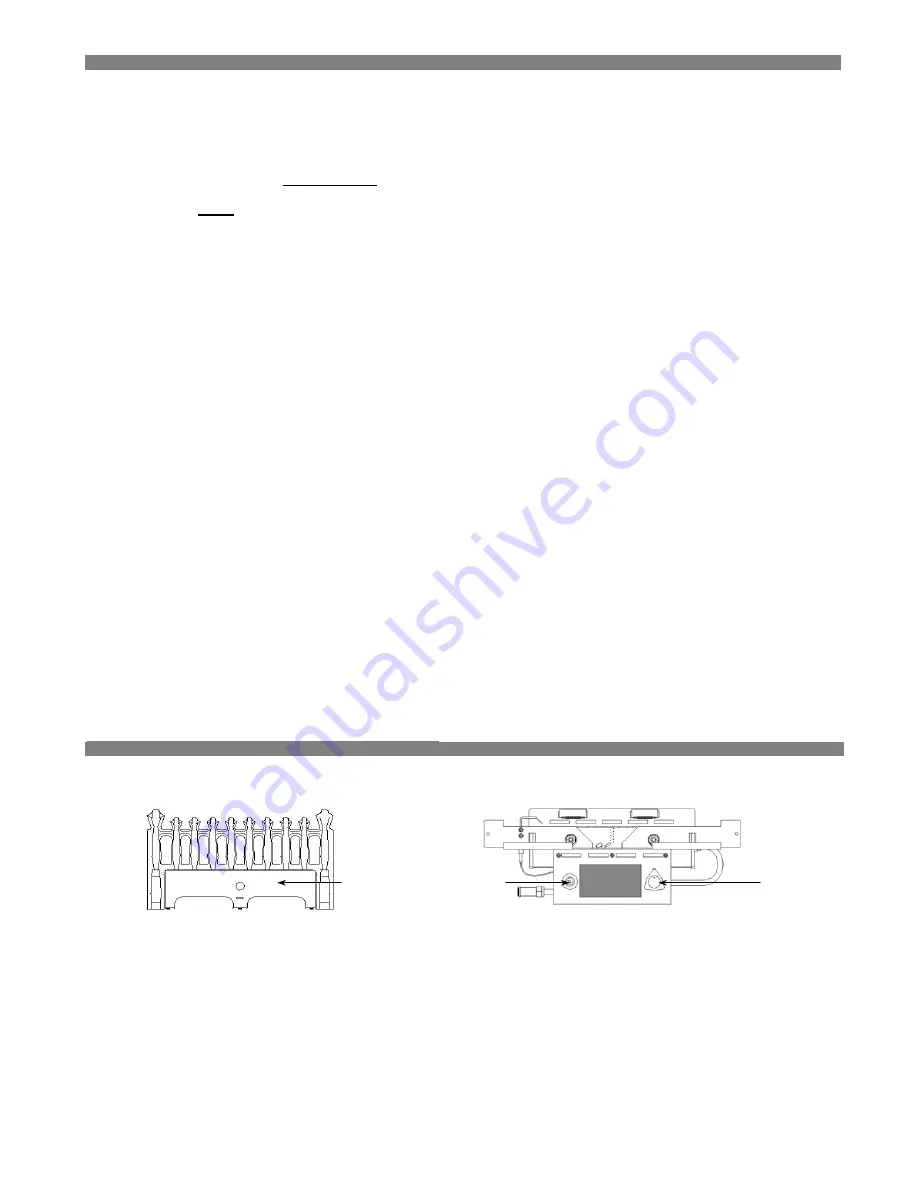
LIGHTING AND EXTINGUISHING THE APPLIANCE 

 
1.  Remove the fret (Fig. 1), to gain access to the controls (Fig. 2). 


2.  Press and turn the gas control anti-clockwise to the `IGN’ position. Keep the control fully depressed. 
3.  Press and release the piezo button until the main burner behind the simulated front coal has lit. 
4.  Once lit, keep the gas control depressed for a further 15 seconds. 
5.  Release the gas control and check that the main burner has remained alight. 
6.  Press and turn the gas control anti-clockwise to the required setting. Replace the fret (controls cover). 
7.  To turn the appliance off, depress and turn the gas control clockwise from any position to the `OFF’ position. 
8.  In the event of the piezo button failing, the appliance may be lit by placing a lighted taper or match at the main burner while 

depressing the gas control in the `IGN’ position. 


IMPORTANT


After turning off or if the appliance goes out for any reason, wait for three minutes before attempting to relight. 

Fret 

Gas Control 

Piezo Button 

Fig. 1 

Fig. 2 

Summary of Contents for Mk 2

Page 1: ...E GAS G31 ONLY at a supply pressure of 37mbar Please hand this booklet to the user and advise to keep in a safe place G C No 32 187 41B Important Notice Before disposal of the outer packaging please enter the product code purchase and installation details in section 1 1 of this booklet 0102 095 51642 Slimline Std Mk2 LPG ...

Page 2: ... 2 1 Important notes 2 2 Statutory requirements 2 3 Technical data 2 4 Installing the appliance Ventilation 2 4 1 Flue 2 4 2 Clearance to sides and shelves 2 4 3 Hearth Clearances 2 4 4 Fitting the appliance in position 2 4 4 1 Restrictor plate 2 4 4 2 Fitting the firebox in the opening 2 4 4 3 Connecting the gas supply 2 4 4 4 Checking the appliance setting pressure 2 4 4 5 Checking the correct o...

Page 3: ...llation Details Date of installation ______ ______ ______ Installed by _____________________ Registration number _____________________ Telephone number _____________________ Appliance Details Serial number _____________________ located on rating label Product Code _____________________ located on white label on outer carton It is advisable to have all the above information available if assistance ...

Page 4: ...iance and from impinging the hearth area Combustible materials must not be put on or left in the hearth area nor should the coal bed be used to burn rubbish or other materials This appliance uses fuel effect components gaskets and insulation material containing Refractory Ceramic Fibre RCF which are man made vitreous silicate fibres Excessive exposure to such material may cause temporary irritatio...

Page 5: ...ration purposes only Place 3 large and 2 small coals pebbles on top of the simulated front one in each groove Allow the coals pebbles to rest on the support shelf Place 3 large coals pebbles on the upper tier of the support shelf Fig 5 Place 4 small coals pebbles between the 5 coals pebbles located on top of the simulated front Allow the coals pebbles to rest on the 3 large coals pebbles located o...

Page 6: ...white card supplied in the IFU kit Any part of this appliance is guaranteed against the manufacturer s defective workmanship or faulty materials for a period of twelve months from the date of purchase Any such part will be replaced free of charge on receipt of the purchaser s address at the cost of postage only Please take time to fill in section 1 1 of this booklet for your future reference ...

Page 7: ...ense to take care when handling these articles to ensure that the release of dust is kept to a minimum This appliance is fitted with an ODS a spillage monitoring system which operates if the evacuation of products is interrupted i e blocked or incorrect flueing If the appliance repeatedly goes out it may indicate a problem and the installer or specialist should be consulted before further use The ...

Page 8: ...required 600mm 505mm Depth is 130mm w out cable fixing 160mm with cable fixing Minimum height of opening is 555mm Minimum width of opening is 410mm Forward projection is 50mm w out front fret 85mm with front fret Injector 044 341 196 120M Gas Control MP 21301A Main Burner Aeromatix AC03 211657 Thermocouple T100 927 400 Ignition Single spark electrode direct to main burner Gas Connection 8mm OD res...

Page 9: ...ictor plate MUST ONLY BE USED ON THIS FLUE TYPE Fig 9 600mm 600mm 500mm 410mm 555mm Hatched area must be non combustible and flat to ensure a seal around the appliance Fig 10 The area beneath the metal flue box must be a non combustible material 25mm thick Class 2 A twin walled metal flue box manufactured to the current issue of BS 715 with a twin walled 125mm diameter flue and a minimum effective...

Page 10: ...PLIANCE Hearth clearances A non combustible hearth with a minimum thickness of 12 5mm and having a perimeter of 50mm above floor level is required to discourage placing carpets or combustible materials close to the hearth The width must be a minimum of 150mm either side of the fireplace opening and a depth of 300mm from the front face of the fire opening Fig 14 790mm 150mm Add 12 5mm to clearance ...

Page 11: ... and right hand side of the burner Lift and pull forward Fig 15 2 4 4 1 INSTALLING THE APPLIANCE Restrictor plate A restrictor plate is supplied with the IFU kit This restrictor is for use when installing the appliance into a CLASS 1 FLUE ONLY The restrictor plate MUST NOT BE USED ON CLASS 2 AND PRE CAST FLUES The restrictor plate is fixed to the flue outlet using the two screws provided in the IF...

Page 12: ... cable and carefully push the firebox into a central position in the opening Thread each end of the wire cable through the adjusting screw and then through the retaining bush Adjust the cable and tighten the retaining bush to ensure that a good seal is made between the firebox and back panel Fig 17 OPTION 1 WALL FIXING Offer the firebox into the opening Mark the holes provided indicated by the fou...

Page 13: ...CE Checking the correct operation 1 Remove the fret Fig 20 to gain access to the controls Fig 21 2 Press and turn the gas control anti clockwise to the IGN position Keep the control fully depressed 3 Press and release the piezo button until the main burner behind the simulated front coal has lit 4 Once lit keep the gas control depressed for a further 20 seconds 5 Release the gas control and check ...

Page 14: ...ration purposes only Place 3 large and 2 small coals pebbles on top of the simulated front one in each groove Allow the coals pebbles to rest on the support shelf Place 3 large coals pebbles on the upper tier of the support shelf Fig 24 Place 4 small coals pebbles between the 5 coals pebbles located on top of the simulated front Allow the coals pebbles to rest on the 3 large coals pebbles located ...

Page 15: ...h the gas control in the HIGH position Check for satisfactory clearance of combustion products by inserting a lighted smoke match into the opening 20mm down from the edge of the canopy 80mm from either side and 45mm back from the front edge Fig 26 The majority of smoke must be drawn up into the flue If this does not occur allow a further 10 minutes and repeat the test Should spillage still occur e...

Page 16: ... when handling these articles although CROSSLEE recommend you follow the normal hygiene rules of not smoking eating or drinking in the work area and to always wash your hands before doing so 3 2 SERVICING COMPONENTS BELOW THE BURNER To gain access to the components below the burner remove the fibre components and the burner unit from the firebox CLEANING OR REPLACING THE INJECTOR Fig 28 Unscrew th...

Page 17: ...ed 0102 089 54421 1 10 Restrictor Elbow c w Pressure Test Point 0102 078 00041 E61 962 1 11 Bundy Pipe Tap Injector 0102 078 02331 E86 794 1 12 Heat Shield 0102 075 32541 E86 795 1 13 Stainless Steel Baffle 0102 075 32471 E86 796 1 14 Thermocouple c w Nut Manuf No T100 927 400 0102 078 02351 E86 797 1 15 Electrode 0102 078 02421 E86 798 1 16 Front Retaining Bracket 0102 075 33451 2 17 Baffle Space...

Page 18: ...res or technical information please contact us at Crosslee PLC Halifax West Yorkshire HX3 8DE Telephone Fax Customer Service 01422 203963 01422 204767 Service Engineer REPAIRCARE 0844 8797422 Calls cost 5p per minute from a UK BT landline Charges from mobile and other network providers may vary ...

Page 19: ...MM79 010710 Page 17 ...

Reviews: