ROYAL ENFIELD WORKSHOP MANUAL
Section P1 Page 4
8. Repairs
In the event of damage to the fairing, small
repair kits consisting of a quantity of resin,
catalyst and glass fibre are available from our
Service Department. Instructions for carrying
out minor repairs are issued with this kit.
9. Reassembly of the
Fairing
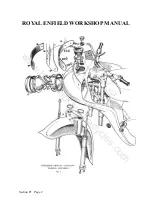
If these have been removed replace the two
bottom fairing attachment studs, also fit the
rubber sleeve to the down tube. Next raise the
fairing over the fork cover tubes, locating the
bottom attachment plates on each leg shield
over the attachment studs.
Incline the fairing outwards and thread the
light and switch leads through the strut tube
aperture, and the speedometer cable through the
smaller hole below it. The fairing can then be
pushed towards the forks until the strut tube,
complete with buffer assembly, has entered the
aperture and is positioned between the strut tube
attachment plates. Fit the stud through the buffer
assembly and attachment plates and secure
washers and nuts to either end.
Complete the fairing assembly to the
machine by fixing the attachment cap over the
attachment stud rubber. Compress these parts
together and secure with the attachment clip.
The exhaust system may now be fitted.
10
.
Reassembly of Mudguard, Fork Legs
and Wheel
Fit the two sealing washers to the fork cover
tubes, not forgetting the small sealing washer for
the fork crown extension tube on Early Models.
Raise the mudguard, and thread the cover tubes
(and the fork crown extension when fitted)
through their respective holes. Line up the
mudguard bracket holes with the fork crown clip
bolt holes and fit the bolts, washers and nuts
finger tight. (On Early Models fit the fork crown
extension stud and washer.)
Slide the fork legs up into the fork head.
Centralise the fork leg top with the cover tube,
and push up to the full extent. Fit and tighten the
plug screws in the fork head.
The fork crown clip bolts may now be
tightened.
Replace the wheel and connect up the brake
cable at both ends.
Do not forget to readjust
the brake.
11.
Reassembly of Headlamp
Thread the red earth wire, the blue and red,
and the blue and white main bulb wires from the
dipper switch, and one green and brown pilot
lamp wire, through the hole in the lamp body
shell. Fit the body shell rubber washer between
the fairing and the lamp body shell rim, and line
up the holes in the shell rim, the washer and the
fairing aperture rim. Secure with the four screws
and locking plates, keeping the threaded plate at
the bottom.
Connect the blue and red and the blue and
white wires to the main bulb wires in the back of
the light unit. Push the green and brown lead
into the pilot lamp socket and the single red
earth wire from the main harness into the socket
on the main bulb fitting.
The light unit may now be pushed over the
three adjusters, after first slackening them. Turn
the light unit in a clockwise direction to secure.
Afterwards tighten all the adjusters as far as
possible.
Place the rubber ring over the light unit, with
the face marked "BACK" facing the light unit
rim. Locate the spigot plate, situated on the top
underside of the rim, with the slot in the lamp
body shell. Press the rim downwards and screw
in the pin at the bottom of the rim.
Finally, adjust the aim of the light beam by
turning the adjuster screws in a clockwise
direction from the rear as neccessary. Do not
turn them further than required, not more than
two screws will need adjusting.
12. Reassemble of Ammeter, Headlamp
Switch and Speedometer
Insert the ammeter into the off-side hole in
the fairing, turn up under the fairing the small
tabs on the ammeter, and fit the rubber ring,
pushing it up as far as possible. Connect up the
two wires with the tab washer type connections
to the ammeter terminals.
Push the switch up from the underside of the
fairing, place in position the switch plate and
secure with the nut. Finally, put on the small
washer and the switch knob, and secure with the
screw.
Push the speedometer into the fairing from
above, and secure the bracket with the nuts and
washers from below. Fit the speedometer drive
and lamp.
13. Reassembly of Windscreen
Put the female screws, with their plain steel
and rubber washers, into the back plate and
windscreen, and line up with the holes in the
fairing. Be sure to use the shortest male screw
for the centre countersunk hole, and the two
longest for attaching the number plate.
www.hitchcocksmotorcycles.com
Summary of Contents for 350 BULLET 1956
Page 7: ...ROYAL ENFIELD WORKSHOP MANUAL w w w h i t c h c o c k s m o t o r c y c l e s c o m ...
Page 57: ...ROYAL ENFIELD WORKSHOP MANUAL w w w h i t c h c o c k s m o t o r c y c l e s c o m ...
Page 69: ...ROYAL ENFIELD WORKSHOP MANUAL w w w h i t c h c o c k s m o t o r c y c l e s c o m ...
Page 77: ...ROYAL ENFIELD WORKSHOP MANUAL w w w h i t c h c o c k s m o t o r c y c l e s c o m ...

