WORKSHOP MANUAL BULLET
Page 29
Inspect the bearings before assembly. The bearing should spin smoothly. Rotated dry, it may appear
to be slightly noisy but there should be no signs of corrosion, nor must there be any appreciable radial
slackness. The outer race of the roller bearing must be preferably smooth and bright with no evidence
of cracks or pitting. The individual rollers must show no signs of wear and should rotate smoothly in
the cage. It is recommended to replace with new bearings, once they are removed from the crankcase.
Reheat the crank cases to reassemble the bearings in the crankcase. Assemble the ball bearing in
the D/S crankcase after fitting the circlip. Locate the other circlip, distance tubes outer and inner and
then assemble the roller bearing outer race.
Ensure that the bearings are seated properly in the crank case and the outer roller race is flush with
the crank case.
5. Replacement of the Cam Idler Spindles
When wear is noticed or step formation seen on the spindle, it should be replaced. To remove the
cam spindle, heat the crankcase and tap the spindles out from inside.
To remove the idler pinion spindles, heat the crankcases as before, hold the spindles in a vice and
tap the crankcase lightly with a nylon/wooden hammer.
To replace the cam spindles, locate the spindles in respective holes in the timing side crankcase and
drive the spindles in home with a small hammer (1/2 lb.) and a drift. Make sure that the spindles are
upright and parallel to each other.
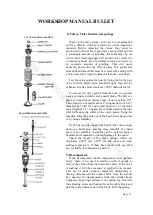
TIMING SIDE ROLLER BEARING ASSEMBLY
DRIVING SIDE BEARING ASSEMBLY
CONNECTING ROD
6. Connecting Rod
Wear in the hardened steel big end bush will be shown by a formation of a ridge
round the centre of the bearing surface corresponding with the oil groove in the white
metal floating bush. If this wear is excessive the connecting rod should be replaced.
Excessive wear on the small end of the connecting rod can be easily seen. The
gudgeon pin will show a rocking motion if wear is excessive.
www.hitchcocksmotorcycles.com
Summary of Contents for 350 BULLET 1989
Page 9: ...WORKSHOP MANUAL BULLET Page 9 w w w h i t c h c o c k s m o t o r c y c l e s c o m ...
Page 17: ...w w w h i t c h c o c k s m o t o r c y c l e s c o m ...
Page 34: ...WORKSHOP MANUAL BULLET Page 34 w w w h i t c h c o c k s m o t o r c y c l e s c o m ...
Page 37: ...w w w h i t c h c o c k s m o t o r c y c l e s c o m ...
Page 41: ...WORKSHOP MANUAL BULLET Page 41 w w w h i t c h c o c k s m o t o r c y c l e s c o m ...
Page 58: ...WORKSHOP MANUAL BULLET Page 58 w w w h i t c h c o c k s m o t o r c y c l e s c o m ...
Page 69: ...WORKSHOP MANUAL BULLET Page 69 w w w h i t c h c o c k s m o t o r c y c l e s c o m ...
Page 73: ...w w w h i t c h c o c k s m o t o r c y c l e s c o m ...
Page 77: ...w w w h i t c h c o c k s m o t o r c y c l e s c o m ...
Page 103: ...w w w h i t c h c o c k s m o t o r c y c l e s c o m ...
Page 105: ...w w w h i t c h c o c k s m o t o r c y c l e s c o m ...
Page 107: ...WORKSHOP MANUAL BULLET Page 107 w w w h i t c h c o c k s m o t o r c y c l e s c o m ...
Page 108: ...WORKSHOP MANUAL BULLET Page 108 w w w h i t c h c o c k s m o t o r c y c l e s c o m ...
Page 109: ...WORKSHOP MANUAL BULLET Page 109 w w w h i t c h c o c k s m o t o r c y c l e s c o m ...
Page 110: ...WORKSHOP MANUAL BULLET Page 110 w w w h i t c h c o c k s m o t o r c y c l e s c o m ...
Page 111: ...WORKSHOP MANUAL BULLET Page 111 w w w h i t c h c o c k s m o t o r c y c l e s c o m ...
Page 113: ...WORKSHOP MANUAL BULLET Page 113 w w w h i t c h c o c k s m o t o r c y c l e s c o m ...

