ROYAL ENFIELD WORKSHOP MANUAL
SECTION K2
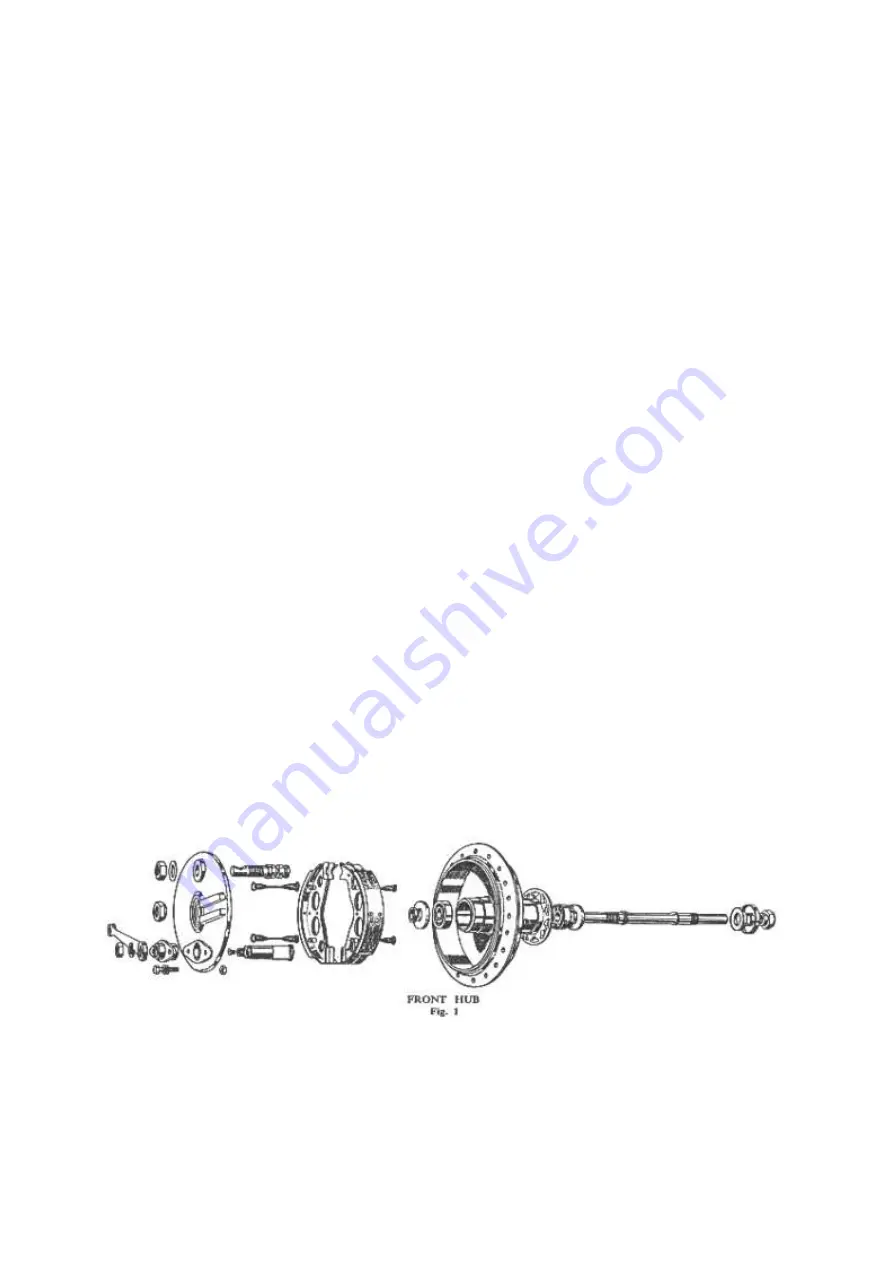
Front Wheel
With Single 6 in. Brake
Fitted to 250 Clipper, Model S, G, J and J2.
Also 350 + 500 Bullet, and 500 Twin up to the end of 1954
1. Removal from Fork
To remove the front wheel from the fork,
place the machine on the centre stand (in the
case of the spring frame models) with
sufficient packing (about 2 in.) beneath each
side of the stand to lift the wheel clear of the
ground when tilted back on to the rear
wheel. In the case of Models S, G and J
place the machine on the rear stand and
place a suitable box or block beneath the
crankcase to lift the front wheel clear of the
ground. Slacken the brake cable adjustment
and disconnect the cable from the handlebar
lever and
from the operating cam lever on
the hub. Unscrew the four nuts securing the
fork bottom tube lug caps (Part No. 38593)
and allow the wheel to drop forwards out of
the front fork. Make sure that the machine
stands securely on the rear wheel
and centre
stand-if necessary place a weight on the
saddle or a strut beneath the fork to ensure
this.
2. Removal of Brake Cover Plate Assy.
Lock the brake "on" by pressure on the
operating lever and
unscrew the cover plate
nut. The cover plate assembly can then be
withdrawn from the brake drum.
3. Removal of Brake Shoes and Springs
This is best done by unscrewing the
pivot pin locknuts and the operating lever
nuts after which the assembly of brake
shoes, return springs, pivot pin and
operating cam can be removed from the
cover plate by light blows with a hammer
and drift on the ends of the pivot pin and the
operating cam. The return springs can then
be unhooked from the spring posts in the
brake shoes thus allowing the whole
assembly to fall apart.
4. Replacing Brake Linings
Brake linings are supplied either in pairs
ready drilled complete with rivets (Part No.
37786BX) or ready fitted to service
replacement brake shoes (Part No. 38042).
When riveting linings to shoes secure the
two centre rivets first so as to ensure that
the lining lies flat against the shoe. Standard
linings are Ferodo MR41, which are drilled
to receive cheese headed rivets.
5. Removal of Hub Spindle and Bearings
To remove the hub spindle and bearings
having first removed the
brake cover plate,
unscrew the retaining nut and remove the
dust excluder from the non-brake side of the
hub. Now remove the felt washers and the
distance washer from the brake side and hit
one end of the spindle with a copper
hammer or mallet, thus driving it out of the
hub bringing one bearing with it and leaving
the other in position in the hub. Drive the
bearing off the spindle and insert
Section K2 Page 1
www.hitchcocksmotorcycles.com
Summary of Contents for 500 TWIN 1949
Page 7: ...ROYAL ENFIELD WORKSHOP MANUAL w w w h i t c h c o c k s m o t o r c y c l e s c o m ...
Page 51: ...ROYAL ENFIELD WORKSHOP MANUAL w w w h i t c h c o c k s m o t o r c y c l e s c o m ...
Page 63: ...ROYAL ENFIELD WORKSHOP MANUAL w w w h i t c h c o c k s m o t o r c y c l e s c o m ...
Page 69: ...ROYAL ENFIELD WORKSHOP MANUAL w w w h i t c h c o c k s m o t o r c y c l e s c o m ...
Page 81: ...ROYAL ENFIELD WORKSHOP MANUAL w w w h i t c h c o c k s m o t o r c y c l e s c o m ...
Page 91: ...ROYAL ENFIELD WORKSHOP MANUAL w w w h i t c h c o c k s m o t o r c y c l e s c o m ...
Page 108: ...ROYAL ENFIELD WORKSHOP MANUAL NOTES w w w h i t c h c o c k s m o t o r c y c l e s c o m ...
Page 109: ...ROYAL ENFIELD WORKSHOP MANUAL NOTES w w w h i t c h c o c k s m o t o r c y c l e s c o m ...


