background image

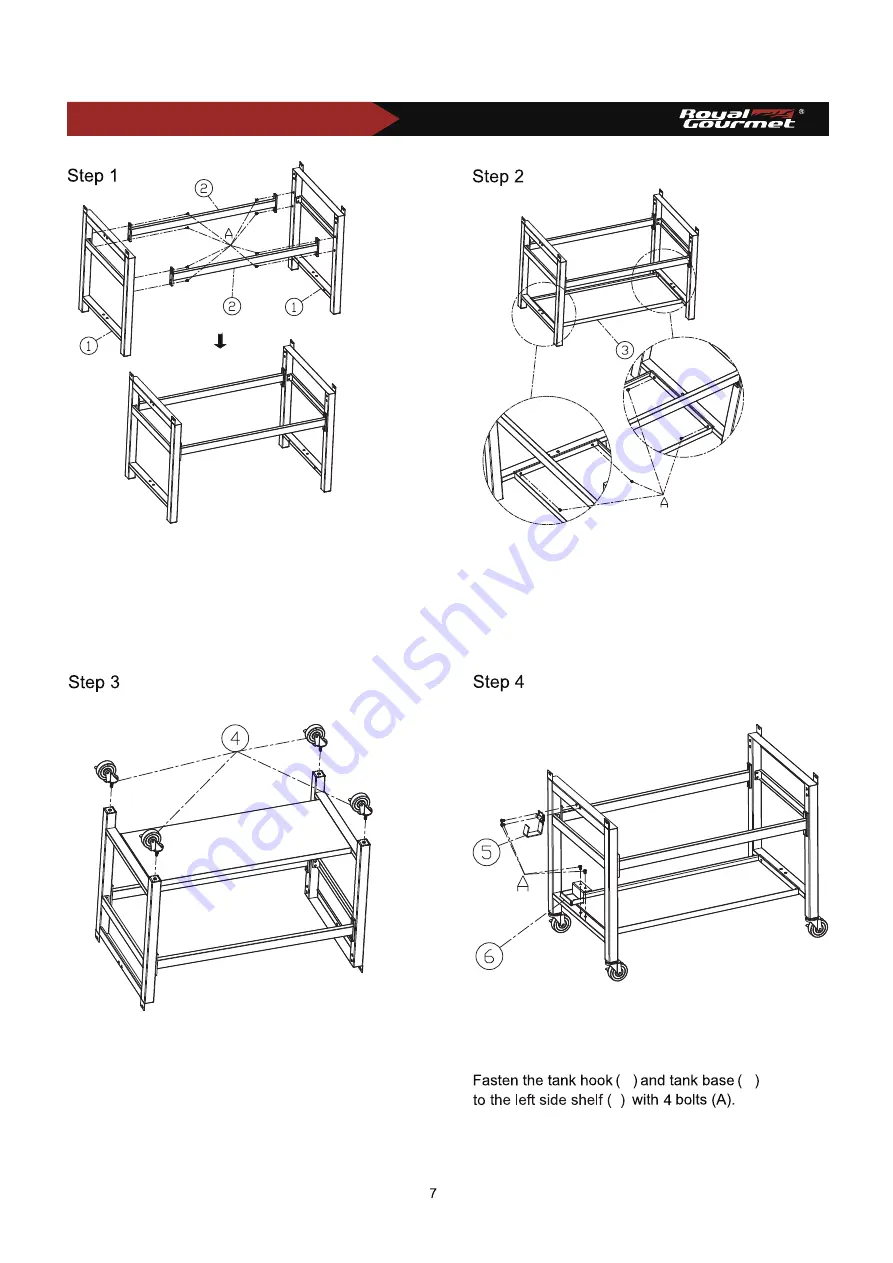
Assemble the side shelves (1) to the 

cart beams (2) 

with 8 bolts (A) as shown.

Please note: secure and tighten all the bolts until step 3. 

Assemble the side shelves (1) to the

 bottom shelf (3) 

with 4 bolts (A) .

5

6

1

Assembly lnstructions

Insert the casters (4) to the side shelves

 by 

twisting clockwise until tightened

, Turn over the bottom 

assembly when completed and lock all casters to 

prevent it from moving.

Summary of Contents for 0423-D

Page 1: ...www royalgourmetcorp com Model GB4000 4 Series No 0423 D ...

Page 2: ...General Information and Instructions LP Gas and Cylinder Information Cylinder Specifications LP Cylinder Leak Test Operating Instructions Cleaning Instructions Trouble Shooting Guide Grilling Recipes Warranty and Customer Service 2 3 4 5 6 7 9 10 11 14 12 13 15 16 10 17 18 19 20 21 Contents ...

Page 3: ...For Your Safety ...

Page 4: ...ended Keep children and pets away from the griddle AT ALL TIMES 5 DO NOT place griddle on any type of tabletop surface 6 DO NOT use griddle in high winds 4 This griddle is shipped from the factory for propane gas use only 1 The minimum distances around the griddle that must be kept free of combustible materials is 36 inches 90cm 2 Do not place the griddle where there are combustible surfaces overh...

Page 5: ...1 16 15 14 14 13 11 10 12 10 11 13 12 17 2 2 4 4 6 1 5 7 9 8 3 ...

Page 6: ...430017 Z GB4002032 ZH GB4002005 1 2 3 4 5 6 7 8 16 15 14 13 12 11 10 Ref QTY Description lllustration Ref QTY Description lllustration Side shelf A B C M6x12 M6 M6 48pcs 8pcs 4pcs 1 Side table Side table brace Z A1CT1003 H GB4002002 H GB4002004 Z GB4002022 Z A1C12004 Grease cup H GB4002007 Cooking griddle ZH GB4002006 17 4 S hook W CC115WT008 Cart joint right Z GB4002033 Side table joint Z A1C1200...

Page 7: ...Preparation Note The right and left sides of the griddle are designed as if you are facing the front of the griddle ...

Page 8: ...ighten all the bolts until step 3 Assemble the side shelves 1 to the bottom shelf 3 with 4 bolts A 5 6 1 Assembly lnstructions Insert the casters 4 to the side shelves by twisting clockwise until tightened Turn over the bottom assembly when completed and lock all casters to prevent it from moving ...

Page 9: ...as shown Fasten the cart joints to each side of main body and cart with 8 bolts A as shown Assemble the side table braces 10 11 to the main body with 8 bolts A Assembly lnstructions Fasten the side table joints 12 13 to side tables 14 with 12 bolts A Screw 8 bolts B to the side table braces then attach the side tables to the brace ...

Page 10: ...C 16 16 Assembly lnstructions 17 15 ...

Page 11: ...General Information and Instructions 0 ...

Page 12: ...11 ...

Page 13: ...12 ...

Page 14: ...DO NOT USE THE GRIDDLE ...

Page 15: ...Operating Instructions ...

Page 16: ...Cleaning Instructions ...

Page 17: ......

Page 18: ...ble Shooting Guide Turn off control knobs and LP tank valve After fire is out and griddle is cold remove burner and inspect for spider nests or rust see natural hazard and cleaning the burner assembly pages ...

Page 19: ...e brush steel wool or a scouring pad to remove stubborn spots d Periodically check the burner to see that it is free from insects and spiders which may clog the gas system deflecting gas flow Ensure to clean venturi pipes on burner very carefully making sure that there are no obstructions We recommend that you use a pipe cleaner to clean the venturi pipe area e Any modifications of this appliance ...

Page 20: ...Grilling Recipes ...

Page 21: ...aw meat open or closed corn on the cob or pineapple Meat could consist of shrimp sausage pork beef etc grate in high hot position for 1 minute on each side Kabob Marinade 1 cup soy sauce cup brown sugar cup vinegar cup pineapple juice 2 tsp salt tsp garlic powder Mix all ingredients in a saucepan and bring to boil Allow marinade to cool before marinating your meat in it Marinate beef in mixture a ...

Page 22: ...service royalgourmetusa com Warranty and Customer Service ...

Reviews: