background image

12

17

18

20

21

Summary of Contents for SG4002

Page 1: ...service royalgourmetusa com Model SG4002 Stainless Steel 4 Burner Gas Grill With Side Burner www royalgourmetusa com ...

Page 2: ...12 17 18 20 21 ...

Page 3: ......

Page 4: ...als known to the State of California to cause cancer birth defects and other reproductive harm 2 This product contains chemicals including lead and lead compounds known to the State of California to cause cancer birth defects or other reproductive harm Wash your hands after handling this product ...

Page 5: ...4 3 7 8 9 10 6 5 11 12 16 13 15 18 2 22 20 19 17 21 14 23 24 4 1 3 ...

Page 6: ...joint 1pc 1pc 4pcs 3pcs 4pcs Caster 4pcs Bottom shelf 1pc 1pc 1pc 1pc 1pc 1pc 1pc Door handle 2pcs Handle base 4pcs Main body Side table decoration 1pc Side table 1pc Side burner shelf 1pc Grease cup 1pc Flame tamer small Cooking grate big Warming rack 1pc Bolt A Pin F Bolt G Bolt C Base D Magnet E M4x10 8pcs 1pc M6x15 M5x10 55pcs Bolt B M5x20 8pcs 1pc 2pcs Bolt H M4x8 8pcs Bolt I M5x6 ...

Page 7: ......

Page 8: ...h 16 bolts A as shown Assemble the side shelves 3 to the bottom shelf with 6 bolts A Assemble the cart joint 4 to the bottom shelf and side shelf with 8 bolts A Assemble the rear shelf 5 to the bottom shelf with 5 bolts A Assemble the cylinder holder A and B 23 24 with 4 bolts G ...

Page 9: ... side shelves with 6 bolts A and 2 bolts C as shown Assemble the right cart joint 7 to right shelves with 3 bolts A and 1 bolts C Assemble the door handles 11 handle bases 12 to left and tight door with 4 bolts G Screw 4 D underneath the doors 9 10 Assemble the left cart joint 8 to left shelves with 3 bolts A and 1 bolts C ...

Page 10: ...h 4 bolts C as shown Assemble the side table decoration 16 to the side burner shelf 17 and side table 18 with 8 bolts I Please note release the hose of the side burner and regulator under the control panel using scissors Then place the main body 15 to the cart fasten the right side of main body to cart brace with 4 bolts A and 4 bolts B ...

Page 11: ... the side table with 4 bolts B as shown Fasten the side table to the main body with 4 bolts A as shown Connect the ventilator tube of the side burner to the main body and fasten it with pin F Insert the ignition line to the electrode hole as shown ...

Page 12: ...19 20 21 22 Attach the grease cup 19 to grease tra y Place the flame tamers 20 onto the main burners Place the cooking grates 21 onto the main body Place the warming grates 21 onto the main body ...

Page 13: ...12 ...

Page 14: ...13 ...

Page 15: ...14 ...

Page 16: ...15 ...

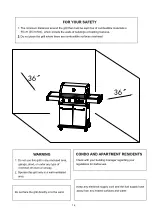
Page 17: ...36 36 16 ...

Page 18: ...17 ...

Page 19: ...18 ...

Page 20: ...19 ...

Page 21: ...20 ...

Page 22: ...service royalgourmetusa com 21 ...

Reviews: