background image

Paramount 65X

5

3. INSTALLATION

Note: The laminator should be installed by a trained service technician.

The laminator comes fully assembled, except for the feed table and paper guide to avoid shipping damage. Upon arrival, 

thoroughly inspect the unit. It is imperative that any shipping damage is reported and a claim is filed with the delivering 

carrier immediately upon receipt.
The laminator should be located in an area with adequate work space for feeding graphics and lamination materials.
Avoid placing the laminator in a dusty area or near sources of extreme heat or cold.
Once the laminator is in place, lock the casters into position. Always unlock the casters  when moving to a different location.       

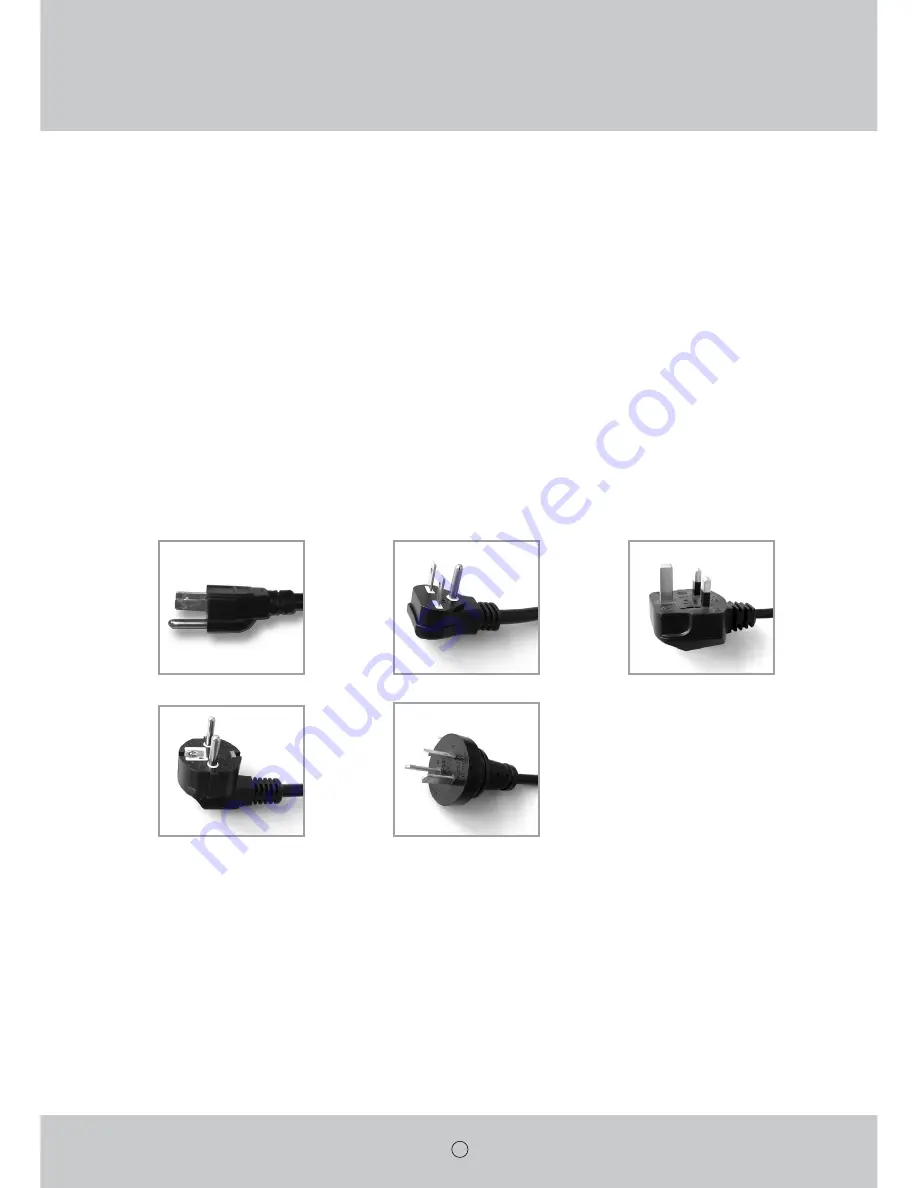
ELECTRICAL REQUIREMENTS

Royal Sovereign recommends that a licensed electrician ensures proper power installation to your laminator in accordance 
with electrical codes in your area.
The laminator should have a dedicated power line.  

120V UL

230V UL

240V UK

220V EU

220V AU

Summary of Contents for Paramount 65X

Page 1: ...t 65X Royal Sovereign International Inc Owner s Manual GRAPHIC LAMINATION PRODUCTS Please read and retain these instructions To register your product please go to www royalsovereign com www royalsover...

Page 2: ...ecautions 4 4 Installation 5 5 Product Identification 7 6 Control Panel 8 7 Using Foot Pedal 9 8 Loading Film 9 9 Threading Film 9 9 1 Decaling 10 9 2 Mounting 10 10 Maintenance 10 11 Troubleshooting...

Page 3: ...to provide years of continuous service For complete operating and maintenance information please read this manual thoroughly Upon receipt of your laminator please inspect the box the machine and all...

Page 4: ...achine 6 Place machine on a level surface then set the moveable feet down to floor to keep the machine steady 7 Avoid excessive sunlight humidity and extreme temperatures 8 Ensure the unit is turned o...

Page 5: ...nator should be located in an area with adequate work space for feeding graphics and lamination materials Avoid placing the laminator in a dusty area or near sources of extreme heat or cold Once the l...

Page 6: ...t It is imperative that any missing parts are reported and a claim is filed with the reseller immediately upon receipt of shipment Part Name Quantity Picture Laminator 1 Owner s Manual 1 Spare Motor F...

Page 7: ...der 2 Shaft Release Liner 10 Air Intake 3 Emergency Switch 11 Knob Speed Control 4 Roller 12 Button 5 Safety Sensor 13 Pressure Gauge 6 Table Front 14 Pressure Regulating Valve 7 Foot 15 Pneumatic Tog...

Page 8: ...ld the button Speed Rotate the knob to control the roller s speed from 0 to 19 7 ft min Run Stop To start or stop the rollers Pressure gage To indicate the pressure of top roller from 0 to 1Mpa 145Psi...

Page 9: ...e press the foot pedal once and then release Repeat to stop the rollers 8 LOADING FILM Royal Sovereign films are wound with the adhesive side facing the inside of the roll adhesive in Loading films to...

Page 10: ...Press the foot pedal once and then let it go while slowly pulling the release liner as the board enters the main roller nip Press the foot pedal once again when the board has completely exited from t...

Page 11: ...Reset the circuit breaker d Replace the fuse There is power but the roller are not turning after the RUN button is pressed a Emergency switch es is are engaged b Laser safety sight is tripped a Disen...

Page 12: ...x Material Diameter Film 7 8 200mm Maximum Laminating Speed 19 7 ft min 6m min Ready Time 40min Heating Method Hot Roller Maximum Temperature 122 F 50 C Film Core 3 Auto Grip Roller Nip 1 8 30mm Rever...

Page 13: ...herein is in lieu of all other warranties expressed or implied including any warranty or merchantability or fitness for a particular purpose Royal Sovereign will not be liable for personal damage or p...

Reviews: