background image

9

8. Please wait until " Ready Lamp" is steadily lit.

(

If materials are laminated while Ready Lamp is blinking, lamination results 

may not be good enough

)

.

9. Once the ready lamp is steadily lit place the lamination pouch with the sealed

end first into the entrance of the laminator.

10. The laminated item will exit the rear of machine.

11. If an item gets jammed press the "Reverse" button to clear the jam.

12. For periods in between jobs set the laminator to "pre-heat" to conserve

electricity.

13. Repeat the above steps until all of your lamination is completed.

When lamination is completed turn the power off

RHD-2201

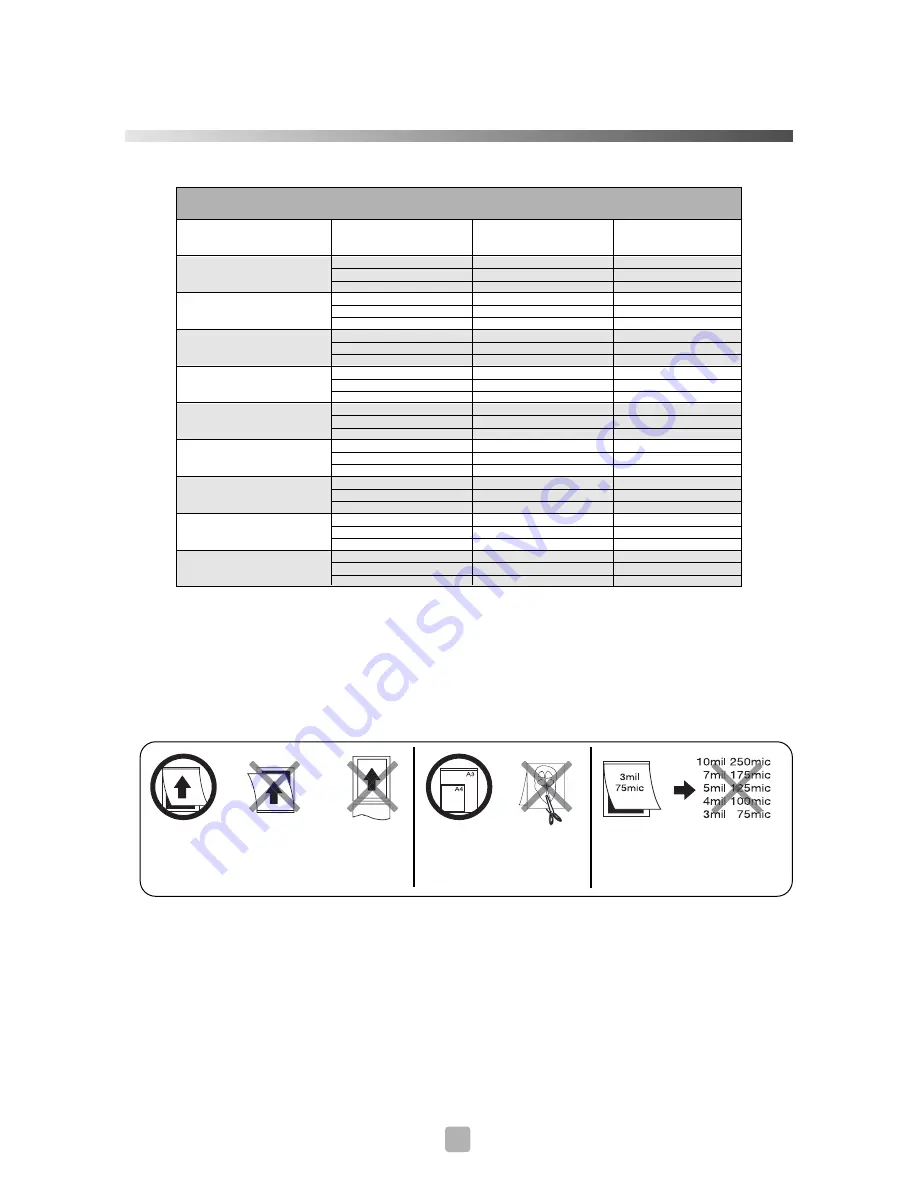
Make sure that you place the laminating pouch
with the sealed end first into the entrance of the
laminator.

Only laminate whole pouches,
DO NOT cut or alter pouches
in anyway before laminating.

Set temperature according to
pouch film thickness.

FILM SETTINGS  

-Based on 25

˚

C-

Film Thickness

75 mic ( 3 mil )

100 mic ( 4 mil )

125 mic ( 5 mil )

150 mic ( 6 mil )

175 mic ( 7 mil )

200 mic ( 8 mil )

250 mic ( 10 mil )

THINFLEX

FOIL

90
90
90
95
95
95

100
100
100
105
105
105
110
110
110
115
115
115
125
125
125
120
120
125
120
125
125

6
5
4
7
6
4
7
6
4
7
6
4
6
5
4
6
5
4
6
5
4
4
3
3
4
4
3

80

120
200

80

120
200

80

120
200

80

120
200

80

120
200

80

120
200

80

120
200

80

120
200

80

120
200

Paper(g)

Temp(

˚C

)

Speed

Summary of Contents for RHD-2201

Page 1: ...Royal Sovereign International Inc OWNER S MANUAL Model No RHD 2201 English LAMINATOR Please read instructions carefully before use...

Page 2: ...Introduction 3 Package Contents 3 Safety Precautions 4 Parts 5 Features Guide 7 Operating Instructions 8 Maintenance 10 Trouble Shooting Guide 10 Warranty 12 Contents Page TABLE OF CONTENTS 2 RHD 2201...

Page 3: ...hank you for purchasing the RHD 2201 Pouch laminator It has been designed and manufactured to provide years of continuous service For high quality lamination please read this instruction manual thorou...

Page 4: ...e electrical wiring 3 Keep flammable and wet objects away from the machine 4 Place machine on a flat sturdy surface 5 Avoid excessive sunlight humidity and temperatures 6 Unplug the machine when movin...

Page 5: ...5 RHD 2201 PARTS Metal cover Cover Roller Operation pane Entrance Exit Power cord Power switch...

Page 6: ...ontroled 40 C 160 C in unit of 1 C In case of wide range of temperature please push the button continuously Speed It can be controled 1 9 step in units of 1step Please refer to the manual Film Termper...

Page 7: ...aximum speed is 2700mm min and 1 9 step can be controled for it s condition of lamination 8 Preventing Overheat Function When the wong condition of termperature sensor heating system is automatically...

Page 8: ...st to save time 7 Choose appropriate laminating thickness and speed using the FND controller Please see below temperature and speed table which is standard for RHD 2201 Materials to be laminated 80g T...

Page 9: ...ompleted When lamination is completed turn the power off RHD 2201 Make sure that you place the laminating pouch with the sealed end first into the entrance of the laminator Only laminate whole pouches...

Page 10: ...ntrance of the machine 3 Continue repeating step 2 until the paper exits the machine and is not dirty NOTE Rollers should be cleaned after 10 laminations Do not use regular paper to clean the rollers...

Page 11: ...x laminating width mm 346 Laminating pouch thickness micron 75 250 Max laminating thickness mm 3 Max laminating speed mm min 2700 Number of rollers EA 6 Heating method HOT ROLLER Ready Time Min 5 6 Dr...

Page 12: ...e returned to Royal Sovereign International freight prepaid with proof of purchase Upon repair or replacement the product will be returned to the customer freight collect Return defective product to t...

Reviews: