PRODUCT OVERVIEW
-3-
1. 3 or 5 Gallon bottles (Sold separately)
2. Secure 2-step child safety lock
protection (hot water)
3. LED indicator lights
4. Removable dishwasher safe drip tray
5. Hot Water Spout
6. Cold Water Spout
OPERATION
A. Unpacking
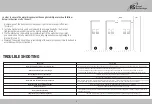
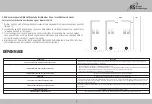
Steps to replace water bottles
3
1
6
4
2
5
This water dispenser has been cleaned prior to packaging the unit . To remove any dust or debris that may have collected during shipment,
we however recommend cleaning the water dispenser prior to use. Refer to the Rinsing, Cleaning and Draining section of this manual.
(Page 4, Section B)
• Use a clean cloth to wipe off neck of bottle.
• Remove cap.
• Carefully lift bottle (approx. 40 Ibs.) using your legs and not your back. Do not place hands on opening of bottle while placing in reservoir.
• Insert the water bottle on the water intake over reservoir opening so it settles properly on it.
• Wipe off any water which may have splashed on dispenser top.
To turn on the cooling operation, turn on the switch at the back of the water dispenser.
The green LED Indicator light will now be lit. The green LED indicator light will stay lit while the cooling process is on. Once the water
reaches the appropriate temperature the green LED indicator light will turn off and will remain off until the water dispenser starts the
cooling process again.
C. Cold Water Control
D. Hot Water Control
To turn on the heating operation, turn on the switch at the back of the water dispenser. The red LED indicator
light will then be lit and the heating process will start. When the water reaches the appropriate temperature the red LED indicator light will
turn off. When the temperature goes down to approx 80°C (176°F), the red LED indicator light will turn on and another heating process will
start.
Do not plug-in the water dispenser into an electrical outlet or turn on the unit until water has begun to dispense from the
hot and cold water spots. Failure to follow this warning may cause the water dispenser to overheat.
Place the water dispenser upright on a flat surface. Position the water dispenser so that there is about
10cm (4”) of clearance from the wall on the back and on both sides.
DO NOT PLUG IN THE POWER CORD OR TURN ON THE UNIT.
B. Locating the Water Dispenser
Do not plug-in the water dispenser into an electrical outlet or turn on the unit until water has begun to dispense from the hot and
cold water spots. Failure to follow this warning may cause the water dispenser to overheat.


