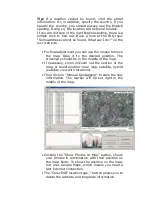
•
Click the “Manual Geotagging” button to save the
new information.
•
The marker will be set right into the middle of the
section of the map.
•
If necessary, you can drag the marker to the desired
position for a final adjustment, and click “Manual
geotagging” again.
•
Clicking the “Show Photos on Map” button, shows
your photos in combination with their position on
the map. Note: To show the position on the map,
locr uses Google Maps, which means you need a
fast Internet connection.
•
The “Clear EXIF location tags…” button allows you to
delete the latitude and longitude information.
•
To view the photos in Google Earth, first click the
“Show in Google Earth”, and then the “Yes” button.
•
Now select the photo/s you want to upload and click
the “Upload Photos” button.
•
At least determine the privacy status, click “OK”,
and then have a look at the locr web site.
Tip:
Double-clicking the left mouse button (zoom in), or
Summary of Contents for RGM-3800
Page 13: ......
Page 16: ...Start installation Please click Finish to finish the Installation ...
Page 20: ...locr PC Client is being installed Installation Complete ...
Page 21: ...Finally you will see the icon on the windows desk ...
Page 28: ...Step 2 You can connect to the Photo match tool locr ...
Page 41: ......


