background image

1

SAFETY INFORMATION

1.  To reduce the risk of electric shock, turn the electricity off at main fuse box or circuit breaker 

before beginning fan installation or servicing the fan.

2.  Read all instructions and safety information carefully before installing your fan and save this 

manual.

3.  All electric connections must be complied with local electrical code and the National Electrical 

Code. If you are unfamiliar with electrical wiring, please have a qualified licensed electrician 

perform the installation.

4.  The fan must be mounted with a minimum of 7 Ft (2.1M) clearance from the trailing edge of the 

bales to the floor.

5.  The metal outlet box and ceiling support joist must be securely mounted, and capable of reliably 

supporting a minimum of 50 lbs ( 23 kgs). 

Use only UL - listed outlet boxes marked “Acceptable For Fan Support.”

6.    To reduce the risk of personal injury, use only approved hanging brackets and screws supplied 

with the fan for mounting to the outlet box.

7.  After completing installation, check all setscrews and make sure they are firmly secured. 

WARNING: To reduce the risk of fire or electric shock, do NOT use this fan with any solid-state speed control 

device.


WARNING: To reduce the risk of personal injury, do NOT insert foreign objects in between rotating fan 

blades.

CAUTION: To reduce the risk of personal injury, use only set screws provided with the fan for mounting to 

the outlet box. 


Most outlet boxes commonly used for supporting of the lighting fixture are not acceptable for fan 

support and may need to be replaced. Consult a qualified electrician if in doubt. 


8.  Wooden blades are not intended for storage or installation in spaces that are not 

temperature controlled. To avoid issues with blade warping do not store or install ceiling 

fans in areas without air conditioning. 

9.  Do not operate reversing switch while fan blades are in motion. Fan must be turned off 

and blades stopped before reversing blade direction.

WARNING: To reduce the risk of personal injury, use only parts provided with fan. 

The use of parts other than those provided with fan will void the warranty. 

Summary of Contents for 1073-PC

Page 1: ...1073 PC For Models Installation Guide 1073LED PC...

Page 2: ...AN INSTALLING MOUNTING BRACKET 4 DOWNROD BALL ASSEMBLY 5 HANGING THE FAN MOTOR ASSEMBLY 5 MAKING ELECTRICAL CONNECTIONS 6 9 8 7 8 8 10 11 12 9 13 13 TROUBLESHOOTING CARE OF YOUR FAN OPTIONAL LIGHT KIT...

Page 3: ...to the outlet box 7 After completing installation check all setscrews and make sure they are firmly secured WARNING To reduce the risk of fire or electric shock do NOT use this fan with any solid sta...

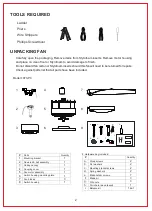
Page 4: ...s 7 f Spring washers 3 g Blade kit 3 h Pull chain wood tassel 1 i Balance kit 1 set Model 1073 PC TOOLS REQUIRED Ladder Wire Strippers Phillips Screwdriver Pliers UNPACKING FAN Carefully open the pack...

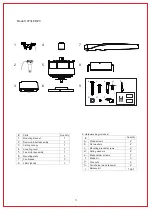
Page 5: ...1 6 Mounting plate 1 7 LED Light kit 3 8 Fan blades 1 Model 1073LED PC 1 4 5 6 7 8 9 2 3 f a b c d e g h i 9 Hardware bag included Quantity a Wood screws 2 b Mounting bracket screws 2 c Wire nuts 2 d...

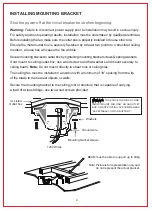
Page 6: ...crews spring washers If not mount to ceiling outlet box use wood screws and flat washers and mount securely to ceiling beam Note Do not mount directly to sheet rock or ceiling tiles The ceiling fan mu...

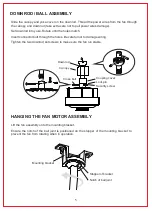
Page 7: ...through the holes Be careful not to damage wiring Tighten the two downrod set screws to make sure the fan run stable HANGING THE FAN MOTOR ASSEMBLY Lift the fan assembly onto the mounting bracket Ens...

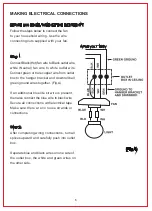
Page 8: ...so connect the blue wire to black wire Secure all connections with electrical tape Make sure there are no loose strands or connections Follow the steps below to connect the fan to your household wirin...

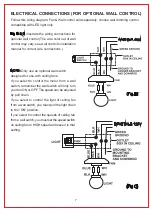
Page 9: ...motor from a wall switch remember the wall switch will only turn your fan ON or OFF The speed can be adjusted by pull chain If you select to control the light of ceiling fan from a wall switch you mu...

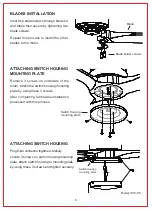
Page 10: ...ith this process Plug 9 pin connector together carefully Locate 3 screws on switch housing mounting plate attach switch housing to mounting plate by using these 3 screws and tighten securely Model 107...

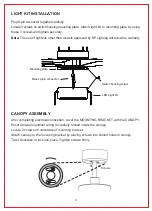
Page 11: ...ws and tighten securely Molex 9 pin connector Switch housing screw LED Light kit Mounting plate Screws CANOPY ASSEMBLY After completing electrical connection cover the MOUNTING BRACKET with the CANOPY...

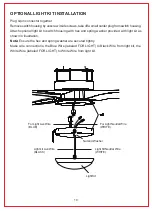
Page 12: ...hex and spring washer provided with light kit as shown in illustration Note Ensure the hex and spring washer are secured tightly Make wire connections the Blue Wire labeled FOR LIGHT to Black Wire fr...

Page 13: ...ith a minimum of 7 feet clearance from the trailing edge of the blades to the floor be careful to avoid raising your arms or nay object in the path of the blades Connect the two WOOD TASSELS to the pu...

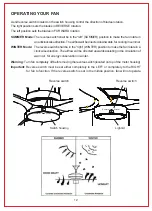
Page 14: ...er WINTER Mode The reverse switch shall be in the right WINTER position to make the fan rotate in a clockwise direction The airflow will be directed upwards assisting in the circulation of warm air fo...

Page 15: ...witch wire connections in the switch housing Make sure all motor housing screws are snug Make sure the screws that attach the fan blade bracket to the motor hub is tight Make sure wire nut connections...

Page 16: ...RP 082119...
Reviews: