background image

16

PX4 AIR

®

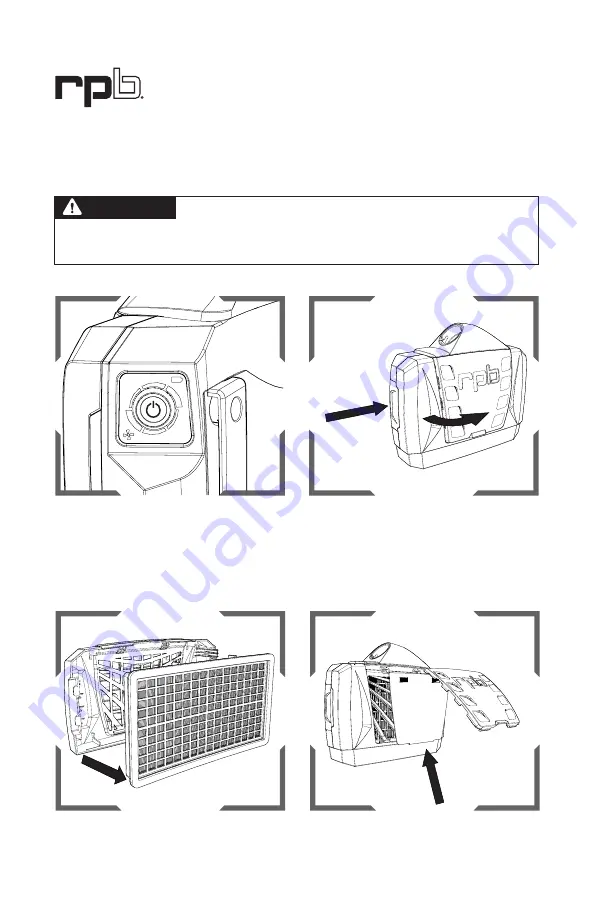
TO REMOVE THE HE FILTER

Make sure the 03-911 fan unit is switched off 
before attempting to open the Door. (Note: 
Press and hold button to power off.) If the 
unit is on, contaminants may get pulled into 
the unit and the suction may make it hard to 
remove the filter.

(1.) Depress the latch, (2.) Rotate the door to 
the right and lift the door off the latch.

1.

2.

Remove the 03-985 filter from the Door and 
dispose of it in a suitable way. 

Install the new replacement 03-985 filter 
as per Fig 3.3 and 3.4. Inspect the 03-981 
Prefilter and replace as needed.

FIGURE 4.1

FIGURE 4.2

FIGURE 4.3

FIGURE 4.4

Depending on the contaminants filtered by the PX4 AIR

®

, the 

used filter itself may be hazardous. Take appropriate precautions when handling to avoid 
exposure to released contaminants; a company disposal procedure may needed.

WARNING

FILTER REMOVAL

RESPIRATOR SETUP AND CARE 

CONTINUED

Summary of Contents for NIOSH PX4 AIR

Page 1: ...uct users Read this manual and the respirator head top Instruction Manual and follow the Product User Safety Instructions page 9 Manuals are regularly updated Make sure this manual is available to all...

Page 2: ...ON AND CLEANING 25 PRODUCT SPECIFICATIONS AND DATA 27 PARTS AND ACCESSORIES 28 WARRANTY AND LIABILITY STATEMENT 30 CONTENTS EXPLANATION OF SIGNAL WORDS AND SYMBOLS The following signal word and safety...

Page 3: ...ctual Property means any patent patented articles patent applications designs industrial designs copyrights software source code database rights moral rights inventions techniques technical data trade...

Page 4: ...lations or recommendations Contaminants or contaminant concentrations are unknown PROTECTION PROVIDED AND LIMITATIONS Improper selection fit use or maintenance of this product can result in injury lif...

Page 5: ...not intrinsically safe AIR SOURCE Powered Air Check that the contaminated area is within the limits of use for a Powered Air Purifying Respirator and determine the type of contamination Once the cont...

Page 6: ...for hoods and or helmets I Contains electrical parts that may cause an ignition in flammable or explosive atmospheres J Failure to properly use and maintain this product could result in injury or dea...

Page 7: ...n should determine what kind of respiratory face and eye head and hearing protection is appropriate for the intended activities and environments of use For example select a respirator appropriate to t...

Page 8: ...e work area Measure and monitor airborne contaminant levels in the work area in accordance with applicable requirements Make sure work area is well ventilated Exposure limits for mixtures The American...

Page 9: ...PX4 AIR PAPR See Respirator Component Diagram page 6 See the instruction manual and approval label for the selected head top for NIOSH approval with the PX4 AIR and the assigned protection factor Use...

Page 10: ...ation and application PAPR Once the contamination level has been confirmed determine the correct filter cartridge to be used for the application to make sure that you are sufficiently protected Make s...

Page 11: ...sure to use the FR Fire Retardant specific model of the PX4 AIR with the FR belt and spark arrestor in place see Respirator Setup and Care page 12 Confined Spaces If this respirator is used in confine...

Page 12: ...well ventilated place where the charger can be monitored and easily observed during charging Battery care Do not use the battery outside the recommended temperature limits 14 F to 131 F 10 C to 55 C...

Page 13: ...ss The triangle warning light will indicate when there is a problem charging When all three lights display green the battery is fully charged FIGURE 2 3 FIGURE 2 4 Fit the battery to the charging stat...

Page 14: ...ce Life of HE Filter Prefilter and Spark Arrestor The HE filter should be replaced if the airflow alarm is activated or the flow indicator reading falls below the 6cfm 170 slpm minimum airflow The HE...

Page 15: ...as you face it rotate the door to the left and latch in place In environments with sparks such as welding or grinding use the 03 982 Spark Arrestor in front of the 03 981 Prefilter This will reduce t...

Page 16: ...oor off the latch 1 2 Remove the 03 985 filter from the Door and dispose of it in a suitable way Install the new replacement 03 985 filter as per Fig 3 3 and 3 4 Inspect the 03 981 Prefilter and repla...

Page 17: ...breathing tube clockwise a turn to lock into position Make sure that it is fully locked in position BREATHING TUBE Select the flexible breathing tube that suits your respirator head top check that th...

Page 18: ...r 04 091 is in the safe range before use so that there is sufficient air flow POWER BUTTON AND BATTERY INDICATION The top row of green lights indicate the charge of the battery 3 lights is fully charg...

Page 19: ...annot be achieved Blocked Speed 1 cannot be achieved Speed 240 slpm The blue lights indicate the selected fan speed The red lights indicate the level of blockage When the lights flash red and blue the...

Page 20: ...a new one LOW BATTERY CHARGE ALARM A pulsing alarm sounds when approximately 10 15 minutes of charge is left in the battery Leave the work area Power the unit off and remove the battery and place on...

Page 21: ...Welding grinding where sparks may be present and High Heat Applications BELT AND SUPPORT ATTACHMENT Take the loose end of the Belt and thread from behind through the outer slot slot furthest out from...

Page 22: ...sure that the battery is securely fitted to the PX4 AIR PAPR 3 BREATHING TUBE Inspect the breathing tube completely looking for splits and cracks in the tube the fittings are held securely in the tub...

Page 23: ...e button after 5 10 seconds indicating that the airflow is below the minimum airflow Remove your hand and the alarm and LED should return to normal operation once the airflow is back to safe levels 7...

Page 24: ...contained RESPIRATOR SETUP AND CARE CONTINUED AIR FLOW Speed 1 Greater than 6cfm 170slpm Speed 2 Greater than 7 4cfm 210slpm Speed 3 Greater than 8 4cfm 240slpm OPERATING TEMPERATURE 14 F to 131 F 10...

Page 25: ...urations Note you should consult with your transport specialist before transporting Lithium ion batteries BATTERY CHARGING 3 hours PRODUCT STORAGE LIFE from new if kept in original sealed packaging A...

Page 26: ...26 PX4 AIR PARTS AND ACCESSORIES FIGURE 9 1 1 3 2 4 5 7 8 9 10 11 10 13 6 14 15 16 17 12...

Page 27: ...C Power Cable AU 2 pin 09 021 AU 16 24 Volt Power Supply with Power Cord 03 952 24 Volt Power Supply with Power Cord AU 03 952 AU 24 Volt Power Supply with Power Cord EU 03 952 EU 24 Volt Power Supply...

Page 28: ...ect occurs RPB will repair or replace the defective Product or a component of the Product in its sole discretion This repair or replacement remedy is the sole and exclusive remedy under this limited w...

Page 29: ...29 NOTES...

Page 30: ...esigned to increase your productivity RPB T LINK Built off the Z Link platform the T Link is designed to work with you not against you Gone are the days of having to fight against a Tyvek respirator T...

Reviews: