background image


Valid from: 11/2011 

Technical changes reserved 

Page 9 

Doc.:  OM_VIAS & VICD (10D) 

8.3. 

Special cleaning hints 


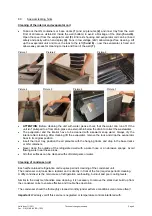
Cleaning of the interior and evaporator coil 


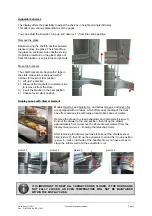
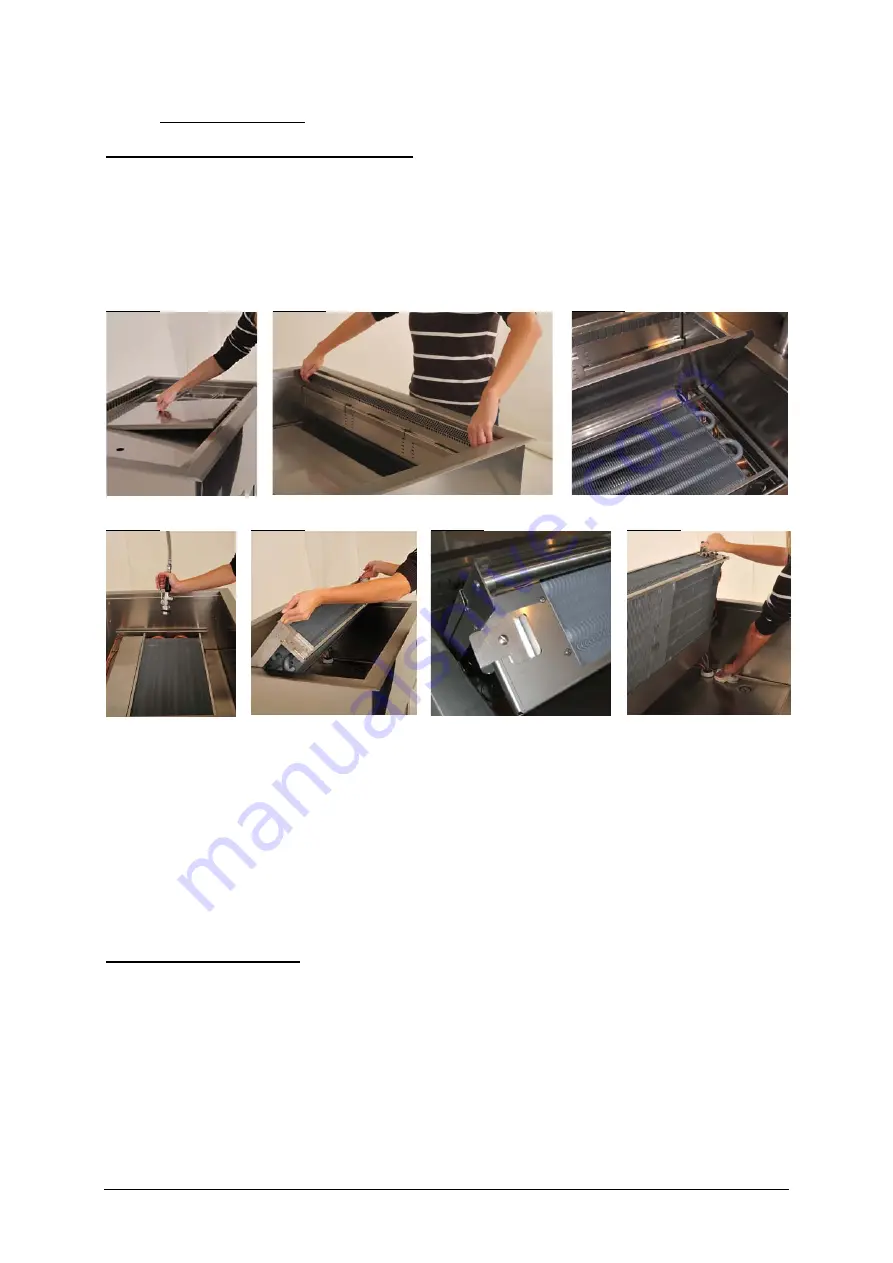
  Take out the GN containers or base decks 

(1) 

and air plenums 

(2)

 and inner tray from the well. 

First of all remove visible dirt inside the well (bottom) to avoid a blockage of the drain 

(5 und 6)

Open the cover from the evaporator unit 

(3)

. Entire s/s housing and evaporator coil can be rinsed 

safety and easily with a hand spray 

(4).

 Fans in low voltage (24V) allow danger-free cleaning. Lift 

up the evaporator unit and move the lock to the left

 (5 und 6)

 – now the evaporator is fixed and 

allows easy access for cleaning corners and floor of the well 

(7)

.  


Picture 1 

Picture 2 

Picture 3 


Picture 4 

Picture 5 

Picture 6 

Picture 7 


ATTENTION

: Before cleaning the unit with water please check that the water can run off. If the 

unit isn’t plumped to a floor drain, place an external bin below the drain to collect the wastewater.  

  The  evaporator  and  the  interior  have  to  be  cleaned  with  lukewarm  soap  water.  Always  dry  the 

interior after cleaning. After cleaning lift the evaporator, remove the lock and drop the evaporator 
back in its original position. 

  Insert the inner tray, position the air plenums with the hanging tracks and drop in the base decks 

or GN containers. 

  Never clean the outside of the refrigerated well with a water hose or an abrasive sponge. Avoid 

flowing water near these areas.  

  All other surfaces can be cleaned with soft detergents or water.  


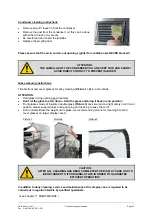
Cleaning of condenser unit 
 

Each self-contained refrigeration unit requires periodic cleaning of the condenser unit.  
The condenser coil (looks like a radiator and is directly in front of the fan) requires periodic cleaning.  
A dirty condenser is the main cause of refrigeration overheating, burnout and poor cooling levels. 
 
Similar to the daily merchandise area cleaning, it is necessary to remove the static dust build up from 
the condenser coils to ensure effective and trouble free operation.  
 
The condenser should be thoroughly cleaned monthly (under extreme conditions clean more often)! 
 

Important

: Warranty void if this service is neglected or temperature controls interfered with. 

Summary of Contents for VIENNA Air Screen

Page 1: ...Operating and Maintenance instructions Please read this manual carefully before you start to operate your cooling equipment Following the instructions helps to ensure the unit is fully functional at a...

Page 2: ...of the unit 4 5 Safety notes 4 6 Fundamental operating notes 5 6 1 Switching on the appliance 5 6 2 Setting the temperature 5 6 3 Manual defrosting 5 6 4 Lighting 5 7 Operating description 6 7 1 Load...

Page 3: ...a qualified refrigeration technician Air currents near the refrigerating unit resulting from improperly installed ventilation or draughts are to be avoided in order to ensure the efficient functioning...

Page 4: ...can lead to property damages This symbol points to operation tips and especially useful information of optimal use 1 5 Validity These operating instructions are valid for the models VIENNA Closed Disp...

Page 5: ...those intended are to be considered as not being in compliance with the regulations The manufacturer supplier is not liable for any damages resulting from such actions The user bears the entire risk U...

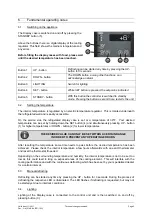
Page 6: ...refrigerated display case is set at a temperature of 39 F Your desired temperature can be set by holding down the SET button 4 and simultaneously pressing UP button 1 for higher temperatures or DOWN b...

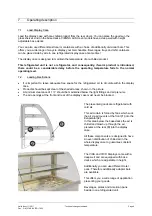
Page 7: ...portant to leave adequate free space for the refrigerated air to circulate within the display case Products should be kept clear of the shaded areas shown in the picture A minimum clearance of 1 shoul...

Page 8: ...the bracket in the new position 4 Choose level slant position Display cases with drawer element Models Gastro L and Gastro SL and series Green L and Green SL are equipped with a drawer which offers ea...

Page 9: ...these parts It is absolutely necessary to bear some fundamental things in mind to keep this stainless steel unit working and to maintain its long life always keep the stainless steel surface clean ma...

Page 10: ...rior have to be cleaned with lukewarm soap water Always dry the interior after cleaning After cleaning lift the evaporator remove the lock and drop the evaporator back in its original position Insert...

Page 11: ...2 in and outside ATTENTION Hold glass during opening and cleaning Don t let the glass top fall down Hold the glass and bring it back in end position Front glasses made of insulated double glass Pictur...

Page 12: ...stomer service The ventilators are not running Customer service The air circulation in the well is blocked Clear the ventilation openings Status display and error notification Message Cause Error elim...

Page 13: ...ediately by a specialized service representative 11 Maintenance In order to guarantee efficient operation of the refrigerated well along with optimum presentation of the goods the entire technological...

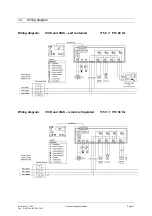
Page 14: ...11 2011 Technical changes reserved Page 13 Doc OM_VIAS VICD 10D 12 Wiring diagram Wiring diagram VICD and VIAS self contained 115 V 1 PH 60 Hz Wiring diagram VICD and VIAS remote refrigerated 115 V 1...

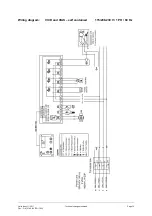
Page 15: ...Valid from 11 2011 Technical changes reserved Page 14 Doc OM_VIAS VICD 10D Wiring diagram VICD and VIAS self contained 115 208 230 V 1 PH 60 Hz...

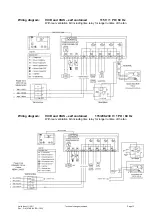
Page 16: ...ng diagram VICD and VIAS self contained 115 V 1 PH 60 Hz With rear ventilation Kit including time relay for longer runtime of the fan Wiring diagram VICD and VIAS self contained 115 208 230 V 1 PH 60...

Page 17: ...P a r t s S e r v i c ed i r e c t 1 8 6 6 7 2 7 0 7 2 1 S e r v i c eE ma i l s e r v i c e r p i i n d u s t r i e s c o m P a r t s E ma i l p a r t s r p i i n d u s t r i e s c o m...

Reviews: