background image


Valid from: 11/2011 

Technical changes reserved 

Page 5 

Doc.:  OM_VIAS & VICD (10D) 

6. 

Fundamental operating notes  


6.1. 

Switching on the appliance  

 
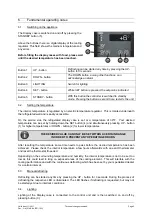
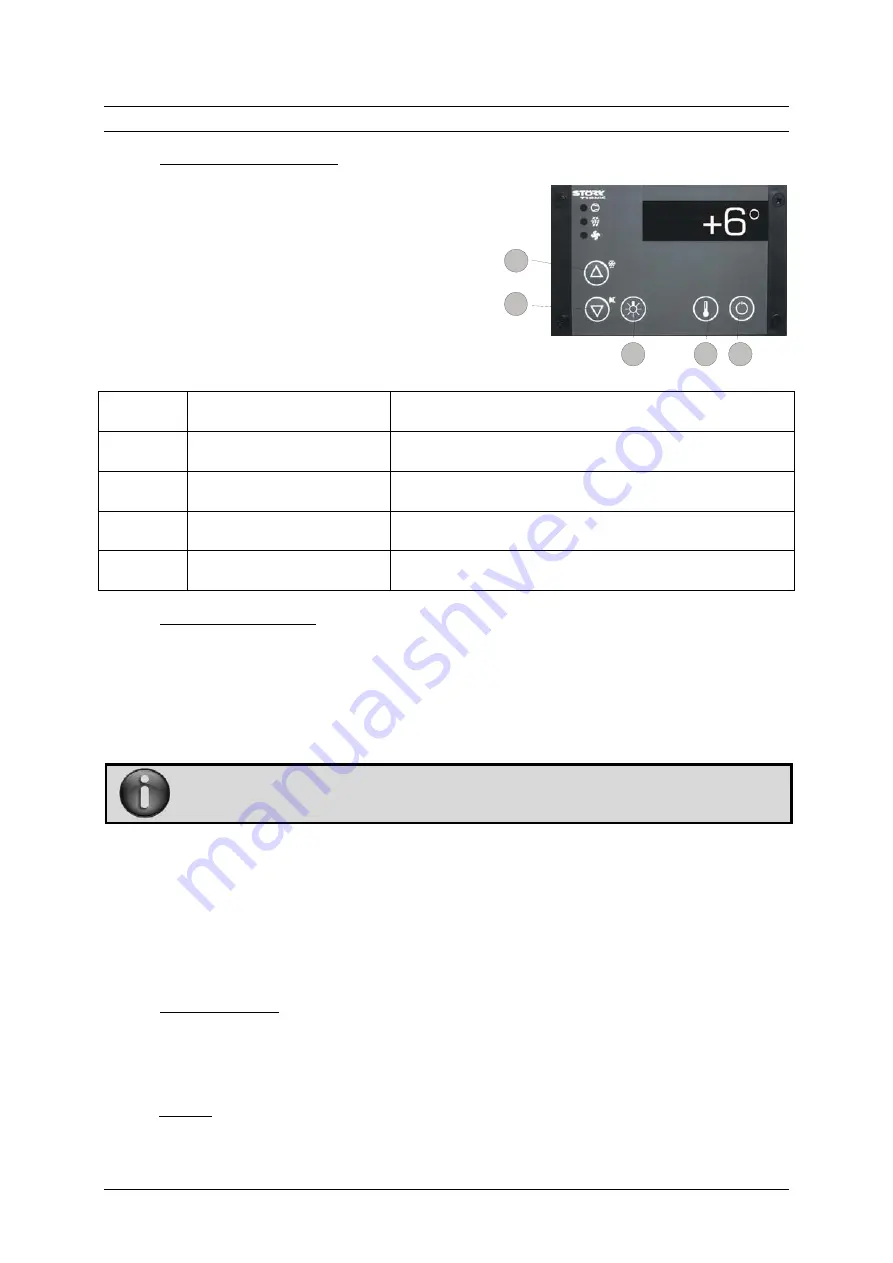
The Display case is switched on and off by pressing the 
STANDBY button (5).  

1

2

3

4

5

Above the buttons there is a digital display of the cooling 
regulator. This field shows the medium temperature and 
any errors.  
 

Before filling the display cases with food, please wait 
until the desired temperature has been reached.  


Button 1 

UP - button 

Defrosting can be started any time by pressing the UP-
button for 3 seconds 

Button 2 

DOWN - button 

The DOWN button, among other functions, can 
acknowledge an alarm 

Button 3 

LIGHTING 

Switch for lighting 

Button 4 

SET - button 

While SET button is pressed, the setpoint is indicated 

Button 5 

STANBY - button 

With this button the controller is switched to standby 
mode. Pressing the button a second time, restarts the unit 


6.2. 

Setting the temperature  

 
The interior temperature is regulated by an electric temperature regulator.  This is located underneath 
the refrigerated well and is easily accessible. 
 
On  the  service  side  the  refrigerated  display  case  is  set  at  a  temperature  of  39°F.    Your  desired 
temperature can be set by holding down the SET button (4) and simultaneously pressing UP - button 
(1) for higher temperatures or DOWN - button (2) for lower temperatures.   


THE DESIRED VALUE CAN ONLY BE SET WITHIN A CERTAIN RANGE  

IN ORDER TO PREVENT ANY OPERATING ERRORS. 


After  resetting  the  temperature  some  time  needs  to  pass  before  the  desired  temperature  has  been 
achieved.  Please check the interior temperature a few hours afterwards with an exact thermometer 
and reset the thermostat if needed.   


Depending on the surrounding temperature and humidity, the interior temperature is not to be set too 
low as this could lead to icing on exposed areas of the cooling element.  This will interfere with the 
cooling performance and with the continuous defrosting which has been set by your specialized dealer 
for a certain interval.   
 
6.3. 

Manual defrosting 


Defrosting can be started any time by pressing the UP - button for 3 seconds. During the process of 
defrosting the respective LED is illuminated. The LED flashes if defrosting is requested, but may not 
be started yet due to interlock conditions. 
 
6.4. 

Lighting  

 
Lighting  of  the  Display  case  is  connected  to  the  control  unit  and  is  then  switched  on  and  off  by 
pressing button (3). 

Summary of Contents for VIENNA Air Screen

Page 1: ...Operating and Maintenance instructions Please read this manual carefully before you start to operate your cooling equipment Following the instructions helps to ensure the unit is fully functional at a...

Page 2: ...of the unit 4 5 Safety notes 4 6 Fundamental operating notes 5 6 1 Switching on the appliance 5 6 2 Setting the temperature 5 6 3 Manual defrosting 5 6 4 Lighting 5 7 Operating description 6 7 1 Load...

Page 3: ...a qualified refrigeration technician Air currents near the refrigerating unit resulting from improperly installed ventilation or draughts are to be avoided in order to ensure the efficient functioning...

Page 4: ...can lead to property damages This symbol points to operation tips and especially useful information of optimal use 1 5 Validity These operating instructions are valid for the models VIENNA Closed Disp...

Page 5: ...those intended are to be considered as not being in compliance with the regulations The manufacturer supplier is not liable for any damages resulting from such actions The user bears the entire risk U...

Page 6: ...refrigerated display case is set at a temperature of 39 F Your desired temperature can be set by holding down the SET button 4 and simultaneously pressing UP button 1 for higher temperatures or DOWN b...

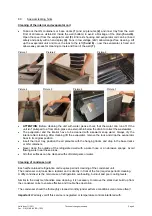
Page 7: ...portant to leave adequate free space for the refrigerated air to circulate within the display case Products should be kept clear of the shaded areas shown in the picture A minimum clearance of 1 shoul...

Page 8: ...the bracket in the new position 4 Choose level slant position Display cases with drawer element Models Gastro L and Gastro SL and series Green L and Green SL are equipped with a drawer which offers ea...

Page 9: ...these parts It is absolutely necessary to bear some fundamental things in mind to keep this stainless steel unit working and to maintain its long life always keep the stainless steel surface clean ma...

Page 10: ...rior have to be cleaned with lukewarm soap water Always dry the interior after cleaning After cleaning lift the evaporator remove the lock and drop the evaporator back in its original position Insert...

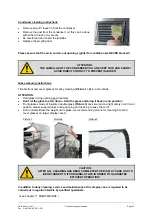
Page 11: ...2 in and outside ATTENTION Hold glass during opening and cleaning Don t let the glass top fall down Hold the glass and bring it back in end position Front glasses made of insulated double glass Pictur...

Page 12: ...stomer service The ventilators are not running Customer service The air circulation in the well is blocked Clear the ventilation openings Status display and error notification Message Cause Error elim...

Page 13: ...ediately by a specialized service representative 11 Maintenance In order to guarantee efficient operation of the refrigerated well along with optimum presentation of the goods the entire technological...

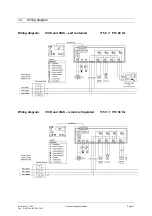
Page 14: ...11 2011 Technical changes reserved Page 13 Doc OM_VIAS VICD 10D 12 Wiring diagram Wiring diagram VICD and VIAS self contained 115 V 1 PH 60 Hz Wiring diagram VICD and VIAS remote refrigerated 115 V 1...

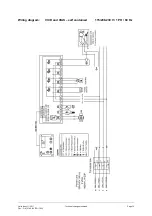
Page 15: ...Valid from 11 2011 Technical changes reserved Page 14 Doc OM_VIAS VICD 10D Wiring diagram VICD and VIAS self contained 115 208 230 V 1 PH 60 Hz...

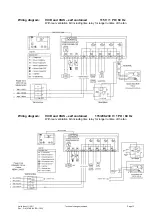
Page 16: ...ng diagram VICD and VIAS self contained 115 V 1 PH 60 Hz With rear ventilation Kit including time relay for longer runtime of the fan Wiring diagram VICD and VIAS self contained 115 208 230 V 1 PH 60...

Page 17: ...P a r t s S e r v i c ed i r e c t 1 8 6 6 7 2 7 0 7 2 1 S e r v i c eE ma i l s e r v i c e r p i i n d u s t r i e s c o m P a r t s E ma i l p a r t s r p i i n d u s t r i e s c o m...

Reviews: