- 20 -
M
AGNUM
-OP-EN
ONE PASS SCRUBBING:
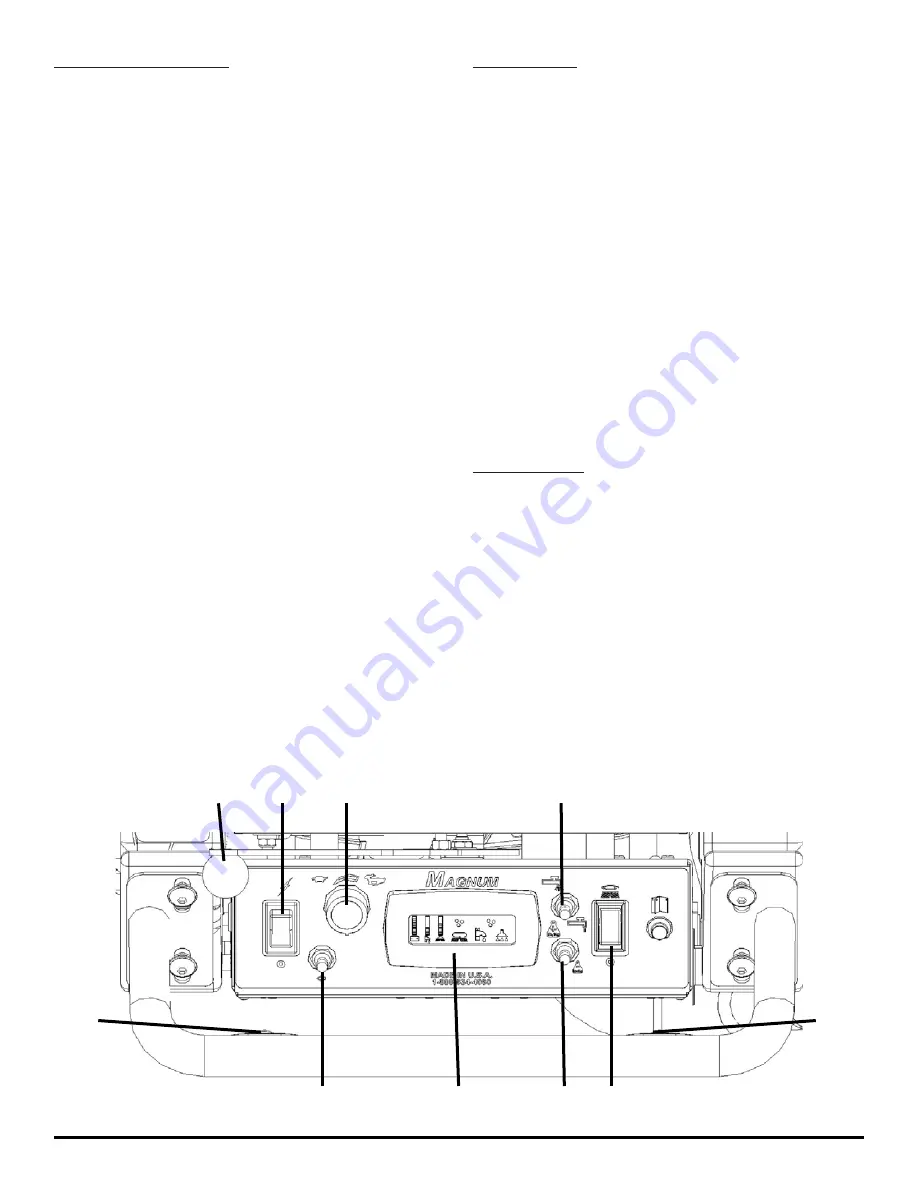
1. Turn on machine Power Switch
(A)
, make sure the
Speed Control Knob
(B)
is at a lower setting.
2. Lower the Squeegee by rotating the Squeegee
Lift Lever
(C)
all the way to the right
(Vacuum
Motor will turn on automatically)
.
3. Lower Scrubdeck head to the fl oor by pressing
the Scrubdeck Switch on the Control Panel
(G)
.
4. Press up or down on the Solution Flow Toggle
(H)
to regulate the amount of solution fl ow.
5. Begin scrubbing by pressing one of the green
Drive Buttons
(D)
on the handle bars. Adjust the
Speed Control Knob
(B)
to the desired setting.
6. Once the machine begins to move, check the down
pressure on the LCD screen
(F)
. To adjust the down
pressure, push toggle switch
(I)
forward to increase
pressure backward to decrease pressure. Start
scrubbing at the #1 or #2 marks. Do not use the
#4 or #5 marks without management’s approval.
7. To operate the machine in reverse, simply
pull the Reverse switch
(E)
back towards
the Handlebar. The reverse speed is set to
approximately 50% of the forward speed.
8. To stop the machine, let go of the Drive Buttons
(D)
.
SCRUB ONLY:
1. Turn on machine Power Switch
(A)
while making sure
the Speed Control Knob
(B)
is at a lower setting.
2. Lower Scrubdeck head to the fl oor by pressing
the Scrubdeck Switch on the Control Panel
(G)
3. Press the Solution Flow Toggle button
(H)
up or
down to regulate the amount of solution fl ow.
4. Begin scrubbing by pressing one of the green
Drive Buttons
(D)
on the Handlebars. Adjust the
Speed Control Knob
(B)
to the desired setting.
5. To operate the machine in reverse, simply
pull the Reverse Switch
(E)
back towards
the Handlebar. The reverse speed is set to
approximately 50% of the forward speed.
6. To stop the machine, let go of the Drive Buttons
(D)
.
VACUUM ONLY:
1. Turn on machine Power Switch
(A)
while making sure
the Speed Control Knob
(B)
is at a lower setting.
2. Lower the Squeegee by rotating the Squeegee
Lift Lever
(C)
all the way to the right
(Vacuum
Motor will turn on automatically)
.
3. Begin vacuuming by pressing one of the green
Drive Buttons
(D)
on the Handlebars.
B
G
E
H
A
C
D
D
I
F


