- 10 -
M
ICRO
M
AG
-OP-EN
MACHINE SETUP
UN-CRATING MACHINE:
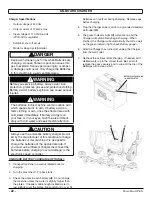
Carefully check the crate for any signs of damage and that
the Batteries are in the unit.
To un-crate the machine, remove banding strips from
around the crate. Take off the top and sides and dispose
properly. Remove brackets
(A)
from machine wheels.
Remove bolts
(B)
from pallet, then remove board
(C)
.
Carefully roll the machine off of the base. Notify the carrier
immediately if concealed damage is discovered.
CONNECTING BATTERIES:
Your machine is equipped with (2
×
) 12-Volt/ 85 AH, (2
×
)
12-Volt/ 130 AH, or (2
×
) 12-Volt/ 150 AH Wet Lead Acid,
AGM, or Deep Cycle Batteries which form a 24 Volt
system.
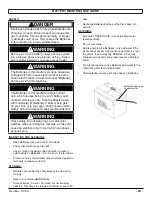
(SEE PICTURE BELOW OR BATTERY DISCONNECT
LABEL FOR CORRECT CABLE CONNECTIONS)
1. Turn all switches to the
OFF
position and remove Key
(if machine is equipped with Optional Key Switch)
.
2. Attach all Battery Cables as shown below.
3. Turn
ON
main Key Switch and check the Battery
Condition Meter to ensure correct installation. Charge
Batteries if needed
(SEE BATTERY CHARGING)
.
NOTICE
Batteries are a possible environmental hazard. Consult
your Battery supplier for safe disposal methods.
NOTICE
Orientation of Batteries is critical for cables to reach.
ATTACHING SQUEEGEE:
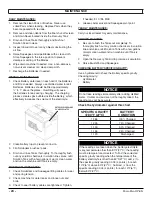
1. Lower the Squeegee Mounting Plate by rotating the
Squeegee Lift Lever
(A)
in a clockwise motion
(SEE
BELOW)
.
2. Loosen the two knobs
(B)
on the Squeegee and slide
them into the slots in the Squeegee Mounting Plate
(SEE BELOW)
.
3. Tighten the two knobs and connect the Vacuum Hose
(C)
from the machine to the Squeegee
(SEE BELOW)
.
4. You may have to adjust the Squeegee Pitch
(SEE
ADJUSTING SQUEEGEE ON THE NEXT PAGE)
24 VOLTS
A
B
B
C
A
B
C


