background image

13.4 - Adding the Seat Retainers

c)                 

d)                 

e)                 

f)                 

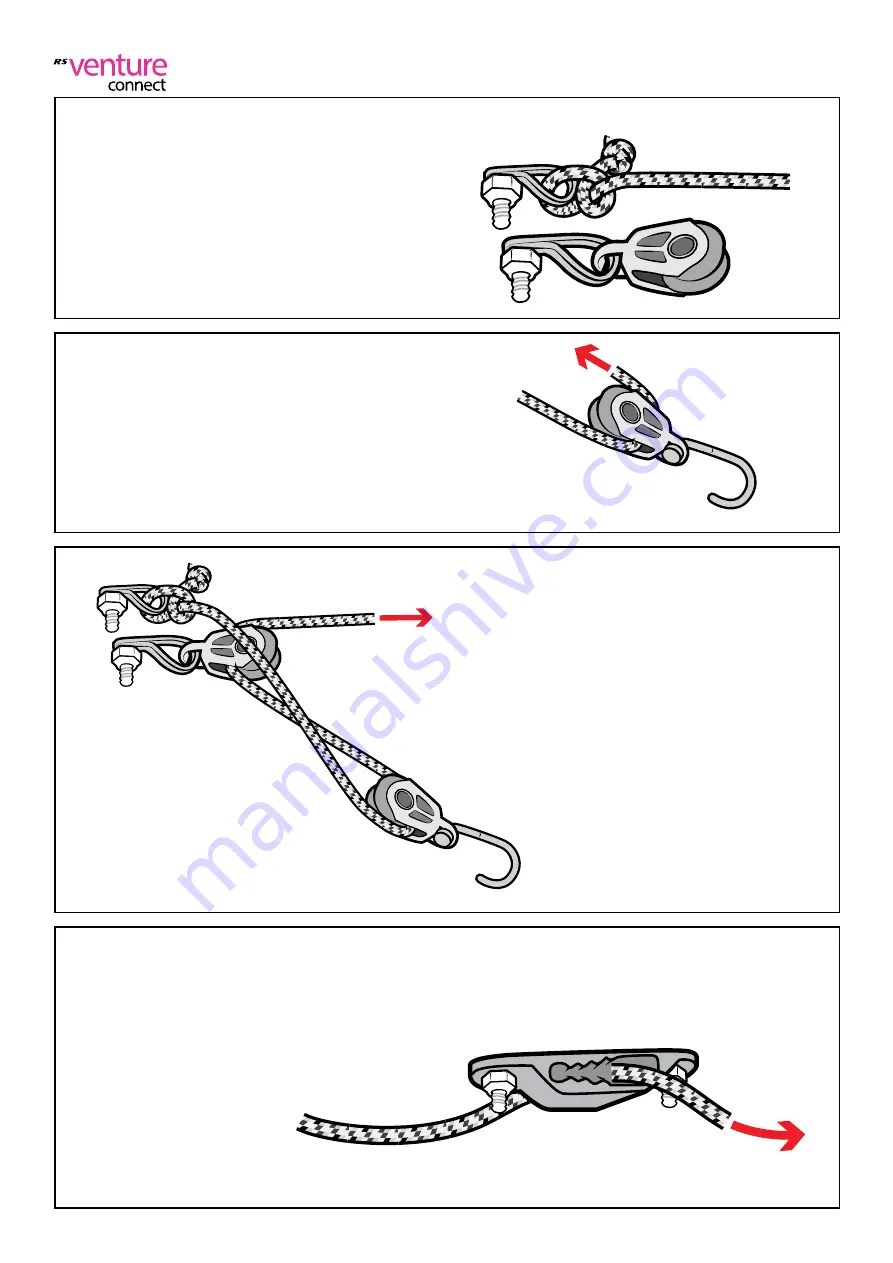
Tie one end of the seat retainer line to 
the P-clip (without the block on it) on the 
underside of the seat with 

knot #1

.

Pass the other end of the seat retainer 
line through the block with hook attached.

Pass the end through the block on the 
underside of the seat.

Pass the end through the cleat on the underside of the seat.

Summary of Contents for Venture Connect

Page 1: ...Rigging Guide V3...

Page 2: ...emoving old fittings 12 Control lines 12 1 Adding control line cleats to the foredeck 12 2 Adding control line takeaways 12 3 Adding the gnav control line 12 4 Adding the downhaul control line 13 Seat...

Page 3: ...Elastic Tensioner 20 5 Using the Power Boom 21 Sip Puff Operating Guide 21 1 Fitting the Sip Puff Controller 21 2 Using the Sip Puff Controller 22 SCS PA Problem Solving 22 1 Troubleshooting 22 2 Cont...

Page 4: ...RS Venture Connect 11 9 11 RACE 9 RS Venture Connect SCS 11 9 11 RACE 9 RS Venture Connect SCS Race With full rescue support at a World Sailing Event 11 9 11 RACE 9 SAFETY INSTRUCTIONS RIG SELECTION...

Page 5: ...ces the craft may fully invert or remain on its side during a capsize A combined mobile crew weight of 150KG will be required to right the boat from a fully inverted position if a rescue boat is not a...

Page 6: ...Dealer for advice If your boat is fitted with a secondary keel securing device please make sure this is secured correctly before going sailing Relace the Velcro securing strap every 12 months When us...

Page 7: ...fort please ensure that you have adequate experience before assuming command of the craft If you are unsure RS your RS Dealer or your national sailing federation for example the Royal Yachting Associa...

Page 8: ...Rigging Guide PLEASE FOLLOW RIGGING GUIDE IN CORRECT ORDER...

Page 9: ...et Jib Sheet HARDWARE Owner s manual Rudder Tiller extension Boom Mainsail Jib Keel Hoist Mast and rigging SPINNAKER KIT Spinnaker sheets Ratchet blocks Spinnaker QUANTITY 1 1 1 1 2 1 1 1 1 1 1 1 2 1...

Page 10: ...ckle key Small flat bladed screw driver PVC electrician s tape Whilst your RS Venture has been carefully prepared it is important that new owners should check that shackles and knots are tight This is...

Page 11: ...ugh the forward hole in the gunwhale and tie knot 3 underneath Repeat on the other side of the boat Locate the 40mm single block mainsheet bridle and 2 x mainsheet bridle elastics Tie each elastic to...

Page 12: ...Rigging Guide 3 Rigging the Mast PLEASE FOLLOW RIGGING GUIDE IN CORRECT ORDER To complete this section you will need The mast A flat bladed screw driver...

Page 13: ...spreaders will result in undesirable sailing characteristics and may even result in failure of the mast a Carefully unpack the spreaders from the top of the mast being sure not to damage any of the se...

Page 14: ...then insert the shroud Ensure that the shroud is tensioned between T Terminal and spreader tip then tighten the screw firmly This method locks in the dihedral angle Length Adjustment The position is d...

Page 15: ...parated by a groove Both of these blocks will fit between the bolt at the front of the mast step and the bolt at the back Ensure that the shrouds and forestay are fitted correctly and loose at the low...

Page 16: ...ly either side of the middle of the boat close to the mast gate The mast should be lifted keeping bolt upright of course so it is close to the gunwhale for you to lift in You can now lift the mast up...

Page 17: ...dle of the shroud adjustor plate with the clevis pin and split ring provided Wrap PVC electrician s tape around the split rings for security and to avoid snagging The between hole 7 9 is a good place...

Page 18: ...Rigging Guide 4 Boom PLEASE FOLLOW RIGGING GUIDE IN CORRECT ORDER To complete this section you will need The boom The gnav bar The Mainsheet...

Page 19: ...ll work in the same way Connect the front of the boom to the gooseneck on the mast Connect the upper end of the gnav bar to the bracket on the mast above the gooseneck It is vital that the gnav toggle...

Page 20: ...boom up by hoisting with the mainsheet at the rear of the boom 4 1 Rigging the Gnav Make sure purchase is extended fully when sail is up 4 2 Rigging the Mainsheet a Take one end of the mainsheet and...

Page 21: ...through the block on the end of the boom Pass the end of the mainsheet forwards through the two webbing loops on the underside of the boom 4 2 Rigging the Mainsheet e Pass the end of the mainsheet th...

Page 22: ...f Pass the end of the mainsheet through the mainsheet block and jammer base then tie knot 3 in the end 4 2 Rigging the Mainsheet...

Page 23: ...Rigging Guide 5 Sails PLEASE FOLLOW RIGGING GUIDE IN CORRECT ORDER...

Page 24: ...k of the sail direct to the lower furling unit via the pin and split ring a b Make sure the furling line is uncleated and that the furling unit is fully charged i e all the furling line is wound round...

Page 25: ...nd of the halyard from the mast exit just below deck level to hoist the jib When the jib halyard is pulled all the way up a wire loop will emerge from the mast 5 1 Hoisting the Jib f Stow the ends of...

Page 26: ...e front of the cockpit or standing on the starboard side of the boat adjacent to the shroud in both cases with good access to the furling cleat To furl the jib hold a little tension on the jib sheet a...

Page 27: ...liard tensioned the forestay is redundant and should be stowed out of the way against the mast with the shockcord and clip provided The forestay must be reattached before the jib is lowered Failure to...

Page 28: ...st Stop hoisting the sail approximately 60cm 2ft from the top Refer to section 5 5 and attach the mainsail to the boom Continue to fully hoist the sail You will need to keep the sail in line with the...

Page 29: ...f the outhaul rope through the clew of the main sail and clip it on the end of the boom Ensure that the main halyard rope is in the cleat and pull the main sail to the top Pull on the main sail at the...

Page 30: ...d of the downhaul through the cleat on the side of the mast The downhaul is already tied to the gooseneck Pass the end of the downhaul through the eyelet in the tack of the main sail 5 6 Rigging the D...

Page 31: ...Rigging Guide 6 Gennaker PLEASE FOLLOW RIGGING GUIDE IN CORRECT ORDER To complete this section you will need 1 x RS Venture gennaker 1 x gennaker sheet 2 x ratchet blocks...

Page 32: ...metal fairlead on the centreboard case Next through the 30mm block positioned just aft of the cleat This is the hoist block d Lead the halyard over the centre board and through the 30mm block attached...

Page 33: ...rd to the head of the gennaker d Take the gennaker downhaul line the other end of the halyard which you previously led up the chute sock and with the gennaker correctly orientated on the starboard rig...

Page 34: ...he block by the starboard shroud adjustor plate in the direction of the arrow on the block c Lead the other gennaker sheet around the jib luff and through the block on the port side Tie the two ends o...

Page 35: ...the gennaker downhaul pull the gennaker down into the chute and sock 6 3 Rigging the Gennaker Sheet Care should be taken when dropping a new gennaker on dry land Many sharp points on the trolley can s...

Page 36: ...Rigging Guide 7 Keel PLEASE FOLLOW RIGGING GUIDE IN CORRECT ORDER...

Page 37: ...u risk damaging the boat d Remove the shackle from the lifting eye on the keel Replace the shackle on the lifting wire so you don t lose it Never let go of the handle even if broached Before you lower...

Page 38: ...of the keel It is very important to make sure the keel is locked down Make sure the strap is tight 7 1 Lowering the Keel Refer to the Safety Instructions at the begining of this document regarding se...

Page 39: ...Rigging Guide 8 Rudders PLEASE FOLLOW RIGGING GUIDE IN CORRECT ORDER To complete this section you will require Rudder x 2 Com bar Tiller extension...

Page 40: ...hen attach using the screws provided a b To fit the rudder simply line up the pins pintles with the holes gudgeons on the rudder stock and transom of the boat and push down until the retaining clip cl...

Page 41: ...slightly to unlock the blade 2 Pull towards you into the boat until the blade reaches it s maximum up position 3 Push the tiller gently down to hook over the top of the stock To put the rudder down 1...

Page 42: ...Rigging Guide 9 Reefing PLEASE FOLLOW RIGGING GUIDE IN CORRECT ORDER...

Page 43: ...erson may reef the mainsail while sailing on a gentle close reach sails eased on a starboard tack Make sure you are in plenty of clear water while reefing a Ease the reefing line right out from the ou...

Page 44: ...pictureabove the sail will start to concertina c When the reefing position is lowered down to the boom Tie a sail tie through the cringle in the middle of the sail and around the boom with a reef knot...

Page 45: ...ed Control System V5 For fitting the SCS kit to an existing RS Venture Connect PLEASE FOLLOW RIGGING GUIDE IN CORRECT ORDER If the SCS kit has already been added see the notes at the start of each sec...

Page 46: ...9 9 10 1 SCS Pack Contents dacron patches 2 30mm block for spinnaker takeup 1 rings 2 elastic for strop 2 manual 1 Size 9 mainsail 1 storm jib 1 storm spinnaker 1...

Page 47: ...rol line block with rope and bobble 2 gnav control line block 2 gnav control line rope 2 downhaul control line block 2 downhaul control line rope 2 2 toe rail set 4 seat rail set 4 toe rails seats sea...

Page 48: ...30mm jib sail block 2 jib strop for blocks 1 jib sheet 1 steering gear 1 Q clip 2 steering line kit 1 steering line organiser aft cockpit 2 steering line organiser aft gunwhale 4 steering line organi...

Page 49: ...e RS Venture Connect that are obsolete once the SCS kit is added You can remove them at this point Remove the gnav control line cleat from the mast a b c Completely remove the downhaul line from the b...

Page 50: ...PLEASE FOLLOW RIGGING GUIDE IN CORRECT ORDER Seated Control System 12 Control Lines If your boat has the SCS kit already fitted you should skip this section...

Page 51: ...Make sure you add the p clip to the bottom of one of the bolts on each side of the boat There are 3 machine screws already on each side of the foredeck to attach the control line cleats Remove the nu...

Page 52: ...pass it forwards through this metal ring and then bring it aft again There is another metal ring on the front bolt of the mast step Pass the end of the elastic through this ring then forward again tow...

Page 53: ...v control line to the eyelet on the floor of the cockpit just to port of the mast step Take the loose end of the gnav control line and feed it through the port cleat on the foredeck as shown a b c A M...

Page 54: ...orwards under the foredeck and through the port block on the control line takeaway you added in step 4 Pass the end aft again and tie it to the eyelet on the underside of the gnav control line cleat Y...

Page 55: ...ntrol Line h Locate the upper block on the gnav control line behind the cleat to the port side of the mast i j Attach the Qloc to the loop as shown Take the Qloc tie and attach both ends of it to this...

Page 56: ...excess tail and seal the end with a lighter Adjust the position of the figure of eight so that this rope is tight when the gnav is fully extended 12 3 Adding the Gnav Control Line l m n Hook the Qloc...

Page 57: ...just to starboard of the mast step Take the loose end of the downhaul control line and feed it through the starboard cleat on the foredeck as shown Make sure the rope goes the right way through the cl...

Page 58: ...mast gate Pass the line forwards under the foredeck and through the starboard block on the control line takeaway you added in step 4 Pass the end aft again and tie it to the eyelet on the underside of...

Page 59: ...not 3 in one end of the downhaul Pass the other end through the cleat on the port side of the mast and tie knot 3 in the tail Locate the top block on the downhaul control line Take the Qloc tie and at...

Page 60: ...he centre console section 5 before it can be used l m n 12 4 Adding the Downhaul Control Line Attach the Qloc to the loop as shown Pass the end of the downhaul through the cringle in the tack of the s...

Page 61: ...PLEASE FOLLOW RIGGING GUIDE IN CORRECT ORDER Seated Control System 13 Seats If the SCS kit has already been added go straight to section 13 1f and section 13 3...

Page 62: ...screw holes Remove these twelve screws Don t discard them Using the screws you removed in step c screw the toerail inserts into the boat Make sure thery are orientated correctly the hooked parts must...

Page 63: ...ard inboard e f 13 1 Adding the Toe Rail Inserts Screw the eyelets holding the velcro keel strap back into place using the same screws you removed in step a Screws go into the small screw holes on the...

Page 64: ...removed in step b screw the toerail inserts into the boat Make sure thery are orientated correctly the hooked parts must be at the top and must face forward FORWARD Add sealant into holes first 13 2 A...

Page 65: ...ainer lines and 2x 20mm blocks with hooks 13 3 Adding the Seats 13 4 Adding the Seat Retainers a a b Slot the rails at the base of the seats into the brackets on the sides of the cockpit The seat posi...

Page 66: ...the P clip without the block on it on the underside of the seat with knot 1 Pass the other end of the seat retainer line through the block with hook attached Pass the end through the block on the und...

Page 67: ...des of the cockpit This is a friction fit so you may have to push quite hard to get them in 4 5 Adding the Toerails a g Hook the block which you attached in step d onto the rope loop on the deck organ...

Page 68: ...PLEASE FOLLOW RIGGING GUIDE IN CORRECT ORDER If the SCS kit has already been fitted you must still complete steps 14 1 14 2 14 3 14 4 14 5 14 7 Seated Control System 14 Centre console...

Page 69: ...plinth Untie the figure of eight in the end of the jib furler line and unthread it from the cleat under the foredeck Thread the furling line through the cleat on the starboard side of the centre conso...

Page 70: ...k on it in the SCS kit Pass the other end of the line forwards through the eyelet on the port side of the centre console Open the mast gate and slide the rope loop with block attached over the mast ga...

Page 71: ...the gennaker down into the chute Pull on the handle which will release the gennaker halyard cleat The gennaker halyard firing line is now ready to use 5 3 Adding the Gennaker Halyard Firing Line It i...

Page 72: ...centre console The downhaul control line is now ready to use Increasing downhaul tension decreasing downhaul tension Locate the block attached to the downhaul control line between the cleat and the ho...

Page 73: ...obble into the rope loop on the port side of the centre console The gnav control line is now ready to use Adding gnav tension Releasing gnav tension release control line from cleat 14 5 Adding the Gna...

Page 74: ...block so that it hangs directly above the centre console To do this loosen the screw in the track above the block reposition the block then tighten the screw again Pass the tail of the mainsheet thro...

Page 75: ...Remove the two bolts holding the fairlead to the jib car Locate the jib sheet blocks metal spacers 30mm jib blocks and the jib block tie in the SCS kit d Add metal spacers into the fairlead holes the...

Page 76: ...of the jib Tie a knot 3 in one end of the jib sheet and feed it through the port jib fairlead as shown Feed the jib sheet through the port block on the jib Thread the jib sheets through the small blo...

Page 77: ...g the Jib Sheets to the Centre Console Feed the jib sheet through the port cleat on the lower tier of the centre console Pass the jib sheet through the block on top of the starboard jib fairlead Do no...

Page 78: ...b Sheets to the Centre Console Feed the jib sheet through the starboard block on the jib Feed the jib sheet through the starboard jib fairlead and tie a figure of eight in the end The jib sheet is now...

Page 79: ...GUIDE IN CORRECT ORDER If the SCS kit has already been fitted go straight to 15 4i Seated Control System 15 Steering lines Different low friction steering options i e left is right are visible in the...

Page 80: ...o with blocks and steering lines attached forward cockpit sides and two with a block and a metal clip for the aft cockpit floor aft gunwhale aft cockpit floor fwd cockpit sides Remove the 3 screws in...

Page 81: ...e near the stern on both sides of the boat e Line up the steering line tidies with the screw holes keeping the block towards the stern and screw into place using the screws you removed in step d f Add...

Page 82: ...ith the screw holes keeping the steering line at the front and the block towards the stern and screw into place using the screws you removed in step d Make sure the steering line comes out through the...

Page 83: ...s by sliding the ends of the steering bar into the front slot of the seat inserts Remove the screws from the front slot of the seat inserts either side of the cockpit Fix the steering bar into place u...

Page 84: ...There is an eyelet attached to the end of each tiller Remove the screw holding one end of the eyelet Rotate the eyelet to allow you to add the Q clip then rotate the eyelet back into place Replace the...

Page 85: ...plastic bobble and pass it around the turning block in the port steering handle Pass the end of the line through the block on the front port organiser and tie a 20mm block on the end with knot 1 Locat...

Page 86: ...the end through the block on the port organiser in the aft corner of the cockpit floor Pass the end across the boat and through the blocks on the starboard gunwhale Attach the end of the rope to the s...

Page 87: ...ockpit from starboard to port leaving the green bobble on the starboard side of the boat Put the red bobble back on the end of the elastic and tie knot 3 in the end Slide the green plastic bobble thro...

Page 88: ...e pack and tie one end onto the forward steering line organiser on the port side of the boat with knot 2 Pass the end across the boat passing through the rings on top of both tillers Tie the end onto...

Page 89: ...teering handles to check that the rudders respond correctly If you have applied too much tension to the steering lines the handles will be hard to move too little and the boat will be slow to respond...

Page 90: ...PLEASE FOLLOW RIGGING GUIDE IN CORRECT ORDER If the SCS kit has already been fitted go straight to 16 1d Seated Control System 16 Elastic takeaways...

Page 91: ...Pull the line out of the block on the front port toestrap fitting Tie the elastic to the eyelet on the transom just above the bung Thread the loose end of the elastic aft from the cockpit through the...

Page 92: ...il under the port seat and through the block you added in step b Thread the gennaker downhaul forward under the port seat over the port toerail and through the block on the port toestrap fitting e f 1...

Page 93: ...the mast foot Add a P clip to the bolt then replace the nut and tighten Tie bungy onto p clip with knot 1 Pass the elastic up the mast and through the metal ring then tie the end onto the plastic rin...

Page 94: ...he gennaker and tie it back onto the top patch with knot 2 k 16 1 Adding the Gennaker Uphaul Downhaul Takeaways a b 16 2 Gennaker Sheet Tidies Locate the 2 x gennaker sheet elastics and 2 x plastic ri...

Page 95: ...e tank just aft of the steering handles in an aft direction Pass the tail aft and tie it to the deck eye at the back of the side tank with knot 1 Repeat on the other side of the boat Untie the knot be...

Page 96: ...Power Assisted Steering and Mainsheet V2 PLEASE FOLLOW RIGGING GUIDE IN CORRECT ORDER...

Page 97: ...rproof Control Box Power Switch Rear cockpit hatch cover with ram control arms locknuts locknuts reversed thread Ball Joints Quick release assembly Rear hatch tray foam components Sachet of jointing c...

Page 98: ...17 Pack contents Power Boom 1c Pack contents Sip Puff Controller Joystick controller box Sip puff headset with clear plastic pipe 1 1 1 Power boom...

Page 99: ...ut of the rear tank hatch to allow the wires to exit Measure carefully and mark the area to be cut Cut the rear tank hatch as shown Round off any sharp corners with a file Stick the rubber trim into p...

Page 100: ...on the floor and slot the two small pieces into them ensuring that the low end of the slanted short piece joins up with the low long piece and vice versa high long piece low long piece short pieces Pl...

Page 101: ...jointing compound to the threads of the ball joint Be very careful with the jointing compound It gets everywhere and stains clothing Wearing gloves is recommended Rear cockpit hatch cover with ram Fo...

Page 102: ...the bar has a reverse thread Select the correct nut accordingly Select the correct end threaded end of the control bar and wind it on two turns into the inboard ball joint fitting pre fitted to the b...

Page 103: ...tch Connect the power switch to the control box and make sure it is in the off position Connect the hand controller joystick and steering to the control box Lead all wires through the lid cut out Fit...

Page 104: ...levers are set on the centre line This is done by eye siting from behind the boat The ram can be moved by hand with a bit of effort by pulling or pushing on the black actuation levers mounted on the h...

Page 105: ...joint under you fitted to the underside of the tiller p Visually check the tiller you attached is pointing just inside the centre line The twin rudder system has a slight amount of toe in when at res...

Page 106: ...t as necessary by twisting the control rods When happy tighten up the locking nuts to hold the end fittings in place 18 3 Control arms Connect the quick release end fitting to the other side If requir...

Page 107: ...18 3 Control arms s Turn the power switch on and test full articulation of tillers left and right Make sure the rudders are clear of the ground...

Page 108: ...PLEASE FOLLOW RIGGING GUIDE IN CORRECT ORDER Seated Control System 19 Power Assist Pack Electronic Joystick Steering Operating Guide...

Page 109: ...bodied person onboard the boat to assist in the event of mechanical or electrical failure The Power Assist Package can be used in many scenarios and this guide only gives generic advice for its opera...

Page 110: ...board but on top of the hatch and connect the ram power lead making sure the lead routes through the cutout Make sure no cables are trapped and carefully position the lid in place Secure the lid in pl...

Page 111: ...s the boat passing through the rings on top of both tillers then tie to the forward organiser on the opposite side Tie elastic onto forward organiser with knot 2 Raise the rudders and lock in position...

Page 112: ...ockpit from starboard to port leaving one bobble on the starboard side of the boat Put the other bobble back on the end of the elastic and tie knot 3 in the end Slide the plastic bobbles through the l...

Page 113: ...19 3 Afloat a b c...

Page 114: ...PLEASE FOLLOW RIGGING GUIDE IN CORRECT ORDER Seated Control System 20 Power Mainsheet System Operating Guide...

Page 115: ...20 1 Motor Drum Line a b Line passes through bullseye on boom Line shackles onto the slug in the track on the boom knot 2...

Page 116: ...ection 4 5 a b It is important that enough mainsheet tail remains in the boat so that the able bodied sailor can override the the drum in the event of power failure 20 3 Boom Slug Track Mainsheet Moto...

Page 117: ...sheet block on boom track slug Stopper knot inside boom Elastic passes through hole Allow the motor to sheet out until the boom almost touches the shrouds then cleat the mainsheet Mark the mainsheet a...

Page 118: ...Boom c The able bodied sailor can adjust the mainsheet by hand if necessary For example an emergency sheet out in a gust but the mainsheet must be returned to the marked position before the motor is...

Page 119: ...out in light winds Stop the drum if loops form along the boom Push the boom out by hand before restarting the drum Carefully watch the drum line to make sure it does not unspool off the drum 20 5 Usin...

Page 120: ...PLEASE FOLLOW RIGGING GUIDE IN CORRECT ORDER Seated Control System 21 Electronic Joystick Sip Puff Controller Operating Guide...

Page 121: ...Controller Make sure the power switch is in the off position a b c d Plug the grey wire from the joystick into the black Peli Box from joystick Plug the clear tube from the sip puff headset into the j...

Page 122: ...puff will operate the steering Constant positive or negative pressure will move tillers left or right If you stop positive or negative pressure the tillers will stop moving The joystick will operate...

Page 123: ...1 2 Using the Sip Puff Controller Sip puff will operate the mainsheet Constant positive or negative pressure will sheet in or out The joystick will control the steering but will interfere with the sip...

Page 124: ...c With the rocker switch in OFF position 21 2 Using the Sip Puff Controller Joystick will control steering and mainsheet...

Page 125: ...PLEASE FOLLOW RIGGING GUIDE IN CORRECT ORDER Seated Control System 22 Problem Solving...

Page 126: ...ge Power switch not connected or connection issue See note on control board lights 5 2 Individual component failure Wire connection issue See note on control board lights 5 2 There are lights on the c...

Page 127: ...roller Joystick or Sip Puff Left signal received from controller Joystick or Sip Puff Right signal received from controller Joystick or Sip Puff Light on when controller activated but no movement conn...

Page 128: ...SCS Modifications...

Page 129: ...the end of control lines to deck organisers on either side of the boat as shown b The deck eye and Q clip on the tiller needs to be moved or a new one added if you want to retain the option of the ori...

Page 130: ...hale on the same side of the boat and around the block Tie several spaced knots in the end of the line then attach the line to the tiller by sliding one of the knots into the Q clip e Pass the end of...

Page 131: ...hat the rudders respond correctly If you have applied too much tension to the steering lines the handles will be hard to move too little and the boat will be slow to respond Bear in mind that adjustin...

Page 132: ...Appendix 1 Steering System...

Page 133: ...Rigging Guide 10 Completion PLEASE FOLLOW RIGGING GUIDE IN CORRECT ORDER...

Page 134: ...e not already done so coil the main and jib halyards neatly and stow them in the halyard bag on the starboard side or in the velcro pocket in the base of the chute sock if you have the gennaker Now yo...

Page 135: ...Rigging Guide 11 Sailing Hints PLEASE FOLLOW RIGGING GUIDE IN CORRECT ORDER...

Page 136: ...the rudder blade Then s he may instruct the crew to push the bow off the wind and climb in Once the depth allows the helm should turn the boat head to wind while the crew lowers the keel as described...

Page 137: ...ld be sailing too close to the wind Ease the mainsheet and bear off away from the wind for a while to get the boat going again When sailing downwind both sails should be let out as far as possible To...

Page 138: ...d speed To drop the gennaker reverse the procedure used to hoist The boat should be sailing on a broad reach and the slack in the gennaker downhaul is pulled in from the left hand halyard block As the...

Page 139: ...Rigging Guide 12 Maintenance PLEASE FOLLOW RIGGING GUIDE IN CORRECT ORDER...

Page 140: ...occurs during an event sailing can often be continued as long as leaking can be prevented by drying the area and applying strong adhesive tape CAUTION if the damage is close to a heavily loaded point...

Page 141: ...DO NOT attempt to launder the sail yourself A sail can be temporarily repaired using a self adhesive cloth tape such as Dacron or Mylar The sail should be returned to a sail maker for a professional...

Page 142: ...Rigging Guide 13 Warranty PLEASE FOLLOW RIGGING GUIDE IN CORRECT ORDER...

Page 143: ...itten approval of RS Sailing will void this warranty 5 Warranty claims for materials or equipment not manufactured by RS Sailing can be made directly to the relevant manufacturer RS Sailing warrants t...

Page 144: ...a a b c d e b Knot 1 Knot 1 Knot on knot Knot 2 Bowline Knot 4 Knot 2 Knot 5 Knot 3 Knot 6 14 Knots...

Page 145: ...a a b b c Knot 3 Figure of eight Knot 4 Overhand knot Knot 6 Cow hitch Knot 5 Double sheet bend 14 Knots...

Page 146: ...Rigging Guide 15 Glossary...

Page 147: ...hrase wind on the beam means that the wind is coming from the side Bear away To turn downwind Beat To sail a zig zag course to make progress upwind Beaufort Scale A measure of wind strength from Force...

Page 148: ...own on a chart at the lowest possible tide Cleat A device to grip ropes and hold them in place some grip automatically while others need the rope tying around them Clew Lower corner of the sail closes...

Page 149: ...wnwind Gennaker Chute Webbing pocket in which the gennaker is stowed when not hoisted Gennaker Pole The sprit that protrudes from the front of the hull to which the tack of the gennaker is attached Gn...

Page 150: ...aker Hull The hollow lower most part of the boat floating partially submerged and supporting the rest of the boat I Into the Wind To point the bow in the direction that the wind is blowing from causin...

Page 151: ...segments of an orange Used with lines of latitude to measure position and distance Lower Furling Unit The fitting at the bottom of the forestay that enables the jib to be furled Luff The front edge o...

Page 152: ...dal change O Off the Wind To sail in the direction that the wind is blowing Outboard Bracket Kit Bracket which enables an outboard engine to be attached to the transom Outboard Engin Small portable en...

Page 153: ...r blade fits and which then attaches to the rudder pintle Run To run with the wind or to sail in the direction that the wind is blowing S Safety Boat Cover Support boats usually RIBs in case of emerge...

Page 154: ...e to which the tack of the gennaker is attached Tender A small vessel usually used to transport crew to a larger vessel Tidal height The depth of water above chart datum Tidal range The difference bet...

Page 155: ...ng anchor meaning to be in motion Upwind To sail against the direction in which the wind is blowing W Wetsuit Neoprene sailing suit designed to keep you warm when wet Windward The part of the boat clo...

Reviews: