FOCUS 320 Owner's Manual
17
RSF Woodburning Fireplaces
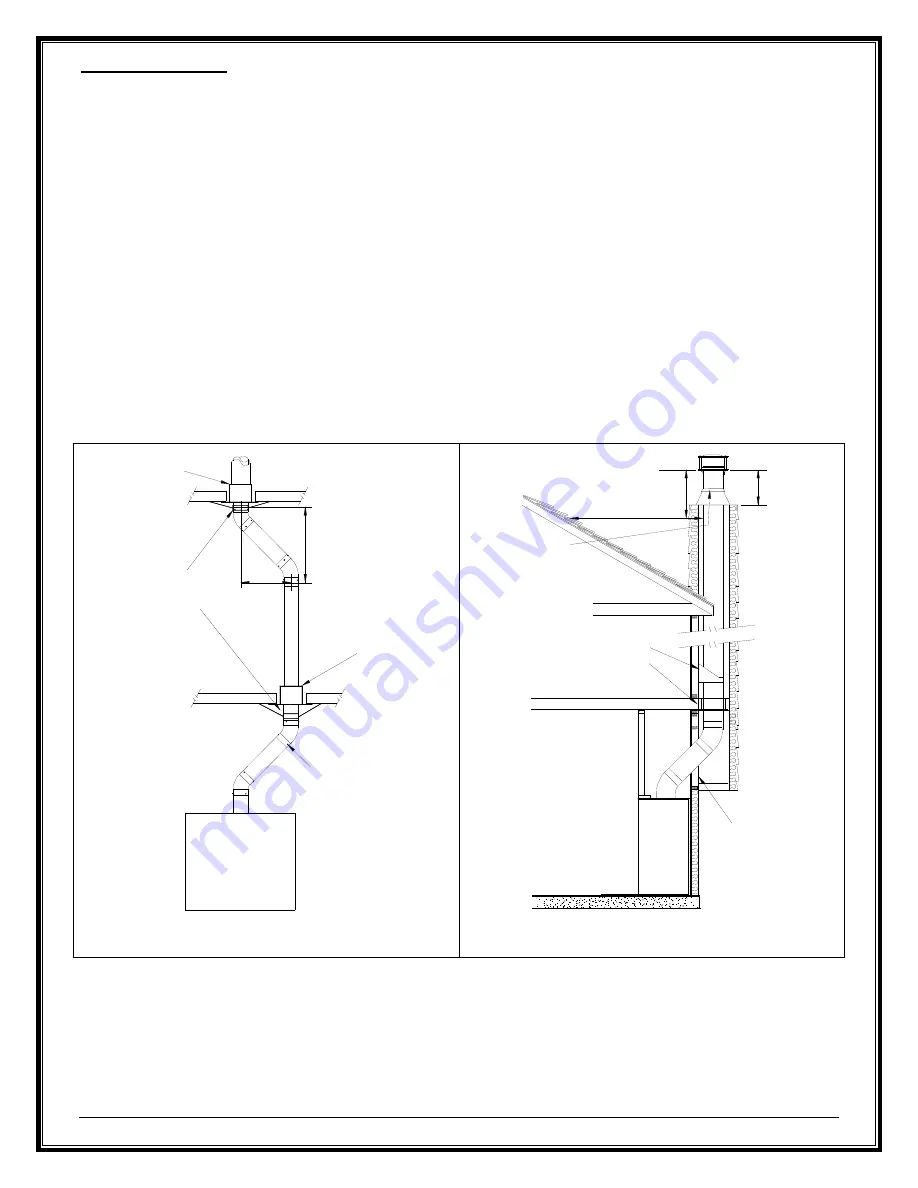
OFFSET CHIMNEY
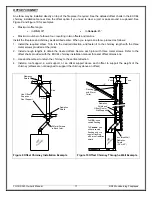
An elbow may be installed directly on top of the fireplace if required. See the detailed offset charts in the EXCEL
chimney installation manual. Use the offset option if you need to clear a joist or pass around a cupboard. See
Figure 9 and Figure 10 for examples.
•
Maximum offset angle:
•
In
USA
: 30°
•
In
Canada
: 45°
•
Maximum number of elbows: four, resulting in two offsets and returns.
Install the fireplace and chimney as described earlier. When you require an elbow, proceed as follows:
1. Install the required elbow. Turn it in the desired direction, and fasten it to the chimney length with the three
metal screws provided at the joints.
2. Install enough lengths to obtain the desired offset. Secure each joint with three metal screws. Refer to the
offset charts provided with the EXCEL chimney installation manual for exact offset dimensions.
3. Use another elbow to return the chimney to the vertical direction.
4. Install a roof support, a wall support, or an offset support above each offset to support the weight of the
chimney (elbows are not designed to support the chimney above an offset).
Figure 9 Offset Chimney Installation Example
Figure 10 Offset Chimney Through a Wall Example
Radiation
Shield
Use Offset
Support or
Roof Support
RS
F
Fi
re
pla
ce
Radiation
Shield
3 Metal Screws
in Each Joint
Rise
Offset
10'
2' min.
Flashing*
with Storm
Collar
1' min.
Radiation
Shield and
Offset, Roof or
Wall Support
Insulated Wall
Radiation
Shield
(30° or 45°)
*In
USA
: use a
vented flashing
*In
Canada
: use
either a vented
flashing only or a
regular flashing
with a roof radiation
shield
RSF
Fireplace


