background image

14

6 Product 

specifications

Note


Specifications and design are subject to change without 

notice.

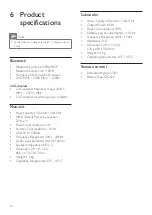
Bluetooth


Bluetooth profiles: A2DP, AVRCP


Bluetooth version: 4.2 + EDR


Frequency band/ maximum power: 


2402 MHz ~ 2480 MHz  / -2 dBm

2.4G wireless


2.4G wireless frequency range: 2404.5

MHz ~ 2479.5 MHz


2.4G wireless maximum power: -16dBm

Main unit


Power Supply: 100-240V~ 50/60Hz


MAX Output Power by speaker: 

25W x 4


Power Consumption: 25 W


Standby Consumption: < 0.5 W


USB: 5V   500mA


Frequency Response: 120Hz - 20KHz


Audio input Sensitivity (AUX): 500mV


Speakers Impedance: 8Ω x 2


Dimension (W x H x D ): 

800 x 67.3 x 81.7 mm


Weight: 1.6 kg

Operating temperature: 0°C - 45°C

Subwoofer

Power Supply: 100-240 V~, 50-60 Hz


Output Power: 60 W

Power Consumption: 20 W


Standby power consumption: < 0.5 W


Frequency Response: 40Hz - 120Hz

Impedance: 4 Ω

Dimensions (W x H x D): 

120 x 403 x 300 mm


Weight: 4.1 kg

Operating temperature: 0°C - 45°C

Remote control


Distance/Angle: 6m/30°


Battery Type:  CR2025

Summary of Contents for HTL3310

Page 1: ...HTL3310 User manual www philips com welcome Register your product and get support at HTL3310 Soundbar Speaker USER MANUAL This user manual only for FCC application ...

Page 2: ...he Remote Control 8 Placement 8 3 Connect 9 Connect to HDMI ARC Socket 9 Connect to Optical Socket 9 Connect to AUX Socket 9 Connect to Power 10 Pair up with the subwoofer 10 4 Use your Soundbar 11 Turn ON and OFF 11 Auto Standby 11 Select Modes 11 Adjust theVolume 11 Select Equalizer EQ Effect 11 Bluetooth Operation 12 AUX OPTICAL HDMI ARC Operation 12 USB Operation 13 5 Wall mount 13 6 Product s...

Page 3: ...lue printed on the back or bottom of the product Never connect the product to the power outlet if the voltage is different Risk of injury or damage to this product For wall mounting this product must be securely attached to the wall in accordance with the installation instructions Use only the supplied wall mount bracket if available Improper wall mounting may result in accident injury or damage I...

Page 4: ...d no protective earth provided Care for your product Use only microfiber cloth to clean the product Care of the environment Disposal of your old product and battery Your product is designed and manufactured with high quality materials and components which can be recycled and reused This symbol on a product means that the product is covered by European Directive 2012 19 EU This symbol means that th...

Page 5: ...rcuit different from that to which the receiver is connected Consult the dealer or an experienced radio TV technician for help EN This device contains licence exempt transmitter s receiver s that comply with Innovation Science and Economic Development Canada s licence exempt RSS s Operation is subject to the following two conditions 1 This device may not cause interference 2 This device must accep...

Page 6: ...his section includes an overview of the Wireless subwoofer a b c a AC Socket Connect to the power supply b PAIR button Press to to enter the pairing mode for the subwoofer c Subwoofer indicator When the power is turned on the indicator lights up During wireless pairing between the subwoofer and the main unit the indicator blinks orange quickly When the pairing succeeds the indicator lights up oran...

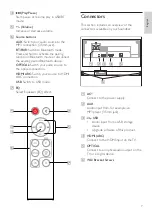
Page 7: ...ource to the optical connection HDMI ARC Switch your source to HDMI ARC connection USB Switch to USB mode g EQ Select Equalizer EQ effect Connectors This section includes an overview of the connectors available on your Soundbar e b a c d f a AC Connect to the power supply b AUX Audio input from for example an MP3 player 3 5mm jack c USB Audio input from a USB storage device Upgrade software of thi...

Page 8: ...ay 2 Now slide the battery tray out of the remote control 3 Remove the old battery Place a new CR2025 battery into the battery tray with the correct polarity as indicated 4 Slide the battery tray back into the slot in the remote control Precautions Concerning Batteries When the Remote Control is not to be used for a long time more than a month remove the battery from the Remote Control to prevent ...

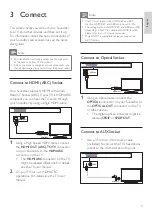
Page 9: ...connector on your Soundbar to the HDMI ARC connector on theTV The HDMI ARC connector on theTV might be labeled differently For details see theTV user manual 2 On yourTV turn on HDMI CEC operations For details see theTV user manual Note YourTV must support the HDMI CEC and ARC function HDMI CEC and ARC must be set to On The setting method of HDMI CEC and ARC may differ depending on theTV For detail...

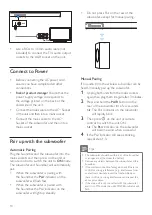
Page 10: ...g interferences and repeat the above procedures If the main unit is not connected with the subwoofer and it is in ON mode the unit s POWER indicator will flash AUX R L AUDIO OUT Use a RCA to 3 5mm audio cable not included to connect theTV s audio output sockets to the AUX socket on the unit Connect to Power Before connecting the AC power cord ensure you have completed all other connections Risk of...

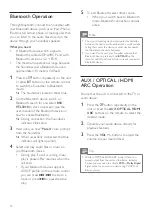
Page 11: ...plug from the mains socket Please turn the unit off completely to save energy when not in use Select Modes 1 Press the button repeatedly on the unit or press the AUX OPTICAL HDMI ARC BT PAIR USB buttons on the remote control to select the desired mode The indicator light on the front of the main unit will show which mode is currently in use Green AUX mode Green flash USB mode Blue Bluetooth mode O...

Page 12: ... play if a call is coming music play is paused Play resumes when the call ends If your Bluetooth device supports AVRCP profile on the remote control you can press to skip to a track or press to pause resume play 5 To exit Bluetooth select other source When your switch back to Bluetooth mode Bluetooth connection remains active Note The music streaming may be interrupted by obstacles between the dev...

Page 13: ...mage If you have any query contact Consumer Care in your country Before wall mounting make sure the wall can support the weight of your Soundbar Before wall mount you need not remove the four rubber feet at the bottom of the Soundbar otherwise the rubber feet cannot be fixed back Screw length diameter Depending on the type of wall mounting your Soundbar make sure that you use screws of a suitable ...

Page 14: ...ut Power by speaker 25W x 4 Power Consumption 25 W Standby Consumption 0 5 W USB 5V 500mA Frequency Response 120Hz 20KHz Audio input Sensitivity AUX 500mV Speakers Impedance 8Ω x 2 Dimension W x H x D 800 x 67 3 x 81 7 mm Weight 1 6 kg Operating temperature 0 C 45 C Subwoofer Power Supply 100 240V 50 60 Hz Output Power 60 W Power Consumption 20 W Standby power consumption 0 5 W Frequency Response ...

Page 15: ...rmation If using Bluetooth ensure that the volume on your source device is turned up and that the device is not muted Remote control does not work Before you press any playback control button first select the correct source Reduce the distance between the remote control and the unit Insert the battery with its polarities aligned as indicated Replace the battery Aim the remote control directly at t...

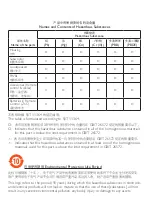
Page 16: ...ubstance contained in all of the homogeneous materials for this part is below the limit requirement in GB T 26572 表示该有害物质至少在该部件的某一均质材料中的含量超出 GB T 26572 规定的限量要求 Indicates that this hazardous substance contained in at least one of the homogeneous materials used for this part is above the limit requirement in GB T 26572 10 环保使用期限 Environmental Protection Use Period 此标识指期限 十年 电子电气产品中的有害物质在正常使用的条件下不会发生...

Page 17: ...dio and the double D symbol are trademarks of Dolby Laboratories FCC Supplier s Declaration of Conformity Philips Soundbar Speaker HTL3310 XX This device complies with part 15 of the FCC Rules Operation is subject to the following two conditions 1 This device may not cause harmful interference and 2 this device must accept any interference received including interference that may cause undesired o...

Reviews: