background image

11

NOTE:

• 

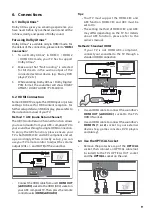
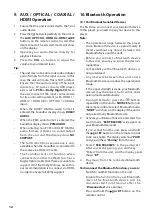
If the wireless connection fails again, check if 
there is conflict or strong interference 


(for example, interference from an electronic 
device) around your location. Remove these 
conflicts or strong interferences and repeat 
the above procedures.

• 

The subwoofer should be within 6m (18 feet) 
of the soundbar in an open area.

• 

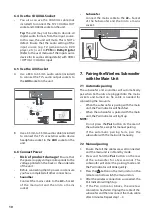
If a TV or an external device is connected, the 
main unit AUX model and the subwoofer will 
switch on automatically when the TV or the 
external device is switched on.

• 

If  the  main  unit  is  not  connected  with  the 
subwoofer and it is in On mode, the POWER 
Indicator will flash. Follow step 1 ~ 4 above 
to pair the subwoofer to the main unit.


8.  Basic Operation

8.1  Standby/ON

When you first connect the main unit to the mains 
socket, the main unit will be in Standby mode.

• 

Press  the 

  button  on  the  unit  or  on  the 

remote control to switch the unit ON.

• 

Press the 

 button again to switch the unit 

back to STANDBY mode. 

• 

Disconnect the mains plug from the mains 
socket  if  you  want  to  switch  the  unit  OFF 
completely.

-  

If a TV or an external device is connected, the 
unit will switch on automatically when the 
TV or the external device is switched on.

8.2  Automatic Power Off Function

The  unit  automatically  turns  to 

Standby 

mode 

after about 15 minutes if the TV or the external 
unit is disconnected, switched off or the volume is 
too close to mute.

•  

To switch the unit off completely, remove the 
mains plug from the mains socket.

•  

Please turn the unit off completely to save 
energy when not in use.

8.3  Select Modes

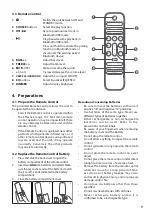
Press the 


(SOURCE)


button on the unit or the 

AUX

BT, OPT/COA, HDMI 1/2, HDMI eARC

 and 

USB 

and


buttons on the remote control to select 

the desired mode. The selected mode will show 
on the display.

8.4  Adjust the Bass/Treble Level

•  

Press the 

BASS +/- 

buttons on the remote 

control to adjust bass level. 

•  

Press the 

/- 

buttons on the remote 

control to adjust bass level. 

8.5  Turn the Surround Sound ON/OFF

•  

Press the 

VERTICAL/SURROUND

 button on 

the remote control to turn on the surround 
sound. Press this button again to turn off the 
surround sound.

8.6  Select Equalizer (EQ) Effect

Press the


VOICE / SPORT / MOVIE / MUSIC 

buttons on the remote control to select your 
desired preset equalizer effects.

8.7  Adjust the Volume

•  

Press the 

+ / - (VOL)

 buttons on the unit or 

on the remote control to adjust the volume.

•  

If you wish to turn the sound off, press the 

 (MUTE)


button on the remote control. 

Press the 

 (MUTE)


button again or press 

the 

+ / - (VOL)

 buttons on the unit or on the 

remote control to resume normal listening.

8.8  Adjust the Brightness

Press  the 

DIMMER 

button  on  the  remote 

control to select brightness level.

Summary of Contents for TB600W3

Page 1: ...3 1Channel Dolby Atmos Soundbar Instruction Manual www richsound com For more indepthinformation go to our Web site ...

Page 2: ...n the apparatus 20 Batteries should be recycled or disposed of as per state and local guidelines 21 The use of apparatus in moderate or tropical climates Important Safety Instructions The lightning flash with arrowhead symbol within an equilateral triangle is intended to alert the user to the presence of uninsulated dangerous voltage within the product s enclosure that may be of sufficient magnitu...

Page 3: ...he unit with chemical solvents as this may damage the finish Use a clean dry or slightly damp cloth When removing the power plug from the wall outlet always pull directly on the plug never yank on the cord Changes or modifications to this unit not expressly approved by the party responsible for compliance will void the user s authority to operate the equipment The rating label is pasted on the bot...

Page 4: ... flammes nues comme des chandelles sur le produit 20 Les piles doivent être recyclées ou mises au rebut conformément aux directives nationales et locales 21 Utiliser l appareil dans des climats tempérés ou tropicaux Consignes de sécurité Le symbole éclair avec une flèche dans un triangle équilatéral est destiné à alerter l utilisateur de la présence d une tension dangereuse non isolée dans le capo...

Page 5: ...ue d incendie ou d électrocution ne pas exposer cet appareil à la pluie ou à l humidité Cet appareil ne doit pas être exposé à des égouttements ou éclaboussures ni des objets remplis de liquides tels que des vases ne doivent être placés sur l appareil Si la fiche secteur ou le coupleur de l appareil est utilisé comme sectionneur ce dispositif doit toujours rester facilement accessible Le fait de r...

Page 6: ...a été déclaré conforme aux limites stipulées pour un appareil numérique de classe B conformément FCC Ces limites ont pour but d assurer une protection raisonnable contre le brouillage nuisible dans une installation résidentielle Cet équipement produit utilise et peut émettre de l énergie en radio fréquence et s il n est pas installé et utilisé conformément aux directives il peut causer un brouilla...

Page 7: ...e the AUX Socket 10 6 6 Connect Power 10 7 Pairing the Wireless Subwoofer with the Main Unit 10 7 1 Automatic pairing 10 7 2 Manual pairing 10 8 Basic Operation 11 8 1 Standby ON 11 8 2 Automatic Power Off Function 11 8 3 Select Modes 11 8 4 Adjust the Bass Treble Level 11 8 5 Turn the Surround Sound ON OFF 11 8 6 Select Equalizer EQ Effect 11 8 7 Adjust the Volume 11 8 8 Adjust the Brightness 11 ...

Page 8: ...and specifications are subject to change without notice HDMI Cable 3 5mm to 3 5mm Audio Cable RCA to 3 5mm Audio Cable Main Unit Wireless Subwoofer Wall Bracket Wall mounting Screw Remote Control AAA Batteries x 2 AC Power Cord x 2 ...

Page 9: ...L VOL buttons Increase decrease the volume level 7 AC Socket 8 COAXIAL Socket 9 OPTICAL Socket 10 USB Socket Insert the USB device to play music 11 AUX Socket Connect to an external audio device 12 HDMI OUT eARC ARC Socket Connect to a TV via HDMI cable 13 HDMI IN 1 2 Sockets Connect to a TV via HDMI cable 3 2 Wireless Subwoofer 1 AC Socket Connect to power 2 PAIR button Press activate the pairing...

Page 10: ...e incorrectly 4 2 Replace the Remote Control Battery 1 Press and slide the back cover to open the battery compartment of the remote control 2 Insert two AAA size batteries included Make sure the and ends of the batteries match the and ends indicated in the battery compartment 3 Close the battery compartment cover 1 3 2 Precautions Concerning Batteries Be sure to insert the batteries with correct p...

Page 11: ...uried inside the wall It is the installer s responsibility to verify that the wall will safely support the total load of the unit and wall brackets Additional tools not included are required for the installation Do not overtighten screws Keep this instruction manual for future reference Use an electronic stud finder to check the wall type before drilling and mounting 1 Drill 4 parallel holes Ø 5 5...

Page 12: ...please ensure your TV is both HDMI CEC and ARC compliant and set up accordingly When correctly set up you can use your TV remote control to adjust the volume output VOL and MUTE of the sound bar HDMI eARC ARC HDMI OUT eARC ARC Connect the HDMI cable from unit s HDMI OUT eARC ARC socket to the HDMI ARC socket on your ARC compliant TV Then press the remote controltoselectHDMI eARC ARC Tips Your TV m...

Page 13: ...unit and then into a mains socket Subwoofer Connect the mains cable to the AC Socket of the Subwoofer and then into a mains socket KGJVNUTK 7 Pairing theWireless Subwoofer with the Main Unit 7 1 Automatic pairing The subwoofer and soundbar will automatically pair when both units are plugged into the mains sockets and turned on No cable is needed for connecting the two units When the subwoofer is p...

Page 14: ...automatically turns to Standby mode after about 15 minutes if the TV or the external unit is disconnected switched off or the volume is too close to mute To switch the unit off completely remove the mains plug from the mains socket Please turn the unit off completely to save energy when not in use 8 3 Select Modes Press the SOURCE button on the unit or the AUX BT OPT COA HDMI 1 2 HDMI eARC and USB...

Page 15: ...olby support 10 Bluetooth Operation 10 1 Pair Bluetooth enabled Devices The first time you connect your bluetooth device to this player you need to pair your device to this player Note The operational range between this player and a Bluetooth device is approximately 8 meters without any object between the Bluetooth device and the unit Before you connect a Bluetooth device to this unit ensure you k...

Page 16: ...rofile A2DP you can listen to the music stored on the device through the player If the device also supports Audio Video Remote Control Profile AVRCP you can use the player s remote control to play music stored on the device 1 Pair your device with the player 2 Play music via your device if it supports A2DP 3 Use supplied remote control to control play if it supports AVRCP To pause resume play pres...

Page 17: ...ction The subwoofer is out of range please move the subwoofer closer to the soundbar Make sure the subwoofer is within 5 m of the soundbar the closer the better The soundbar may have lost connection with the subwoofer Re pair the units by following the steps on the section Pairing the Wireless Subwoofer with the Soundbar The unit may not be able to decode all digital audio formats from the input s...

Page 18: ...etooth Wireless specification Bluetooth Version profiles V 4 2 A2DP AVRCP Bluetooth Frequency bands 2402 MHz 2480 MHz 2 4G wireless frequency range 2400 MHz 2483 MHz 13 3 Subwoofer Power Supply AC100 240V 50 60Hz Power Consumption W 0 5 W Standby Impedance 3 Ω Frequency Response 40Hz 120Hz Dimension WxHxD 240 x 420 x 240 mm Net weight 5 5 kg 13 4 Amplifier RMS Output Power Total 240 W Main Unit 30...

Page 19: ......

Reviews: