background image


RSTAR Affinity 

Data Logger 

Installation Guide


PSM0003A 

RST Instruments Ltd. 

Page 7


3. 

Thread the instrument or sensor cable through the cable gland and into the 
enclosure. 

4. 

Pull the terminal tab to detach the terminal block from the data logger. 

5. 

Use a 2 mm flat head screwdriver to tighten each of the stripped instrument 
wire to the assigned pins on the terminal block. 

6. 

Tighten the cable gland to seal the connection and protect the data logger 
from moisture and dirt. 

7. 

Screw the front cover back on the data logger following the tightening 
sequence shown in Figure 5. Make sure the rubber seal on the cover is free 
of debris and seated in its groove before tightening the screws. 


Figure 5: Front Cover Tightening Sequence 

3.2.1 

Configuration Identification Label 

The data logger’s flexible design supports a variety of instruments. Specific 
instrument interface modules (IIM) are installed at the factory. The label on the 
side of the enclosure shows the data logger’s serial number and the configuration 
option shows as 

aa-bb-cc-dd-ee-f-gg-h

,


where: 

  aa = instrument port 1 interface (sensor type and connection)* 

  bb = instrument port 2 interface (sensor type and connection)* 

  cc = instrument port 3 interface (sensor type and connection)* 

  dd = instrument port 4 interface (sensor type and connection)* 

  ee = instrument port 5 interface (sensor type and connection)* 

  f = Number of batteries (1=one battery, 2=2 batteries, 3=3 batteries) 

Summary of Contents for RSTAR Affinity Gateway

Page 1: ...ontained in this document RST Instruments Ltd reserves the right to change the information at any time and assumes no liability for its accuracy Copyright 2020 RST Instruments Ltd All rights reserved...

Page 2: ...6 3 2 Connect the Cable Gland 6 3 2 1 Configuration Identification Label 7 3 2 2 QR Identification Code 9 3 3 Install or Replace Batteries 9 3 4 Install External Antenna 10 3 5 Install the Data Logge...

Page 3: ...ure 10 Wall Mount Plate 12 Figure 11 Magnet Mounts 13 Figure 12 4 20 mA Circuit Diagram 19 LIST OF TABLES Table 1 IIM Pin Assignment 5 Table 2 Recommended LoRaWAN Antenna 5 Table 3 IIM Instrument Enco...

Page 4: ...ndustrial internet of things IIoT solution for reliable real time data flow from your worksite to your desktop all from a single vendor The RSTAR Affinity Connectivity Solution is a scalable and flexi...

Page 5: ...et of Things IIoT market that provides data collection communications site management data insight and remote monitoring together in one comprehensive product line It collects data in a variety of app...

Page 6: ...d traceability through a built in audit trail Bluetooth connectivity and a QR code scanner make for quick easy and accurate instrument installation and commissioning saving an average of four hours pe...

Page 7: ...COMPARTMENT The data logger s service port compartment houses the batteries micro USB port and instrument interface modules IIM Figure 3 Service Port Compartment The data logger accommodates up to fi...

Page 8: ...P67 rated and can be used in harsh environments It simplifies field installation and is ideal where sensors are frequently replaced The connectors are installed by RST for specific instruments There a...

Page 9: ...ad screwdriver 20 mm open wrench or an optional gland wrench available from RST 3 2 CONNECT THE CABLE GLAND NOTE The cable gland seals the connection and protects the data logger from moisture and con...

Page 10: ...he cover is free of debris and seated in its groove before tightening the screws Figure 5 Front Cover Tightening Sequence 3 2 1 Configuration Identification Label The data logger s flexible design sup...

Page 11: ...ms with an asterisk mean IIM configuration is encoded as a two digit number that identifies the IIM type and the connection option shown in Table 3 Code IIM Type Number of Channels Connector Type 10 V...

Page 12: ...on country a data logger may or may not have factory installed Li SOCl D cell batteries If it has factory installed batteries you have to remove the insulating pull tabs which prevents the batteries f...

Page 13: ...n the RSTAR Affinity field app Refer to the RSTAR Affinity Field App User Guide for information on resetting the battery meter 3 4 INSTALL EXTERNAL ANTENNA The data logger may be ordered with an inter...

Page 14: ...r include the following Pole mount for use on a pole with diameter between from and 120 mm 5 and 254 mm 10 Wall mount for use on a flat wall or panel Magnet mount for use on a magnetic wall or panel S...

Page 15: ...to a wall complete the following steps 1 Remove the four screws from the back of the data logger 2 Install the back plate using the same four screws Tighten the screws 3 Install the wall mount plates...

Page 16: ...previous installations 2 Screw the magnets as shown in the picture Tighten the screws 3 Mount the data logger on a magnetic surface 3 5 4 Mount to a Secondary Enclosure Radio signals are affected by e...

Page 17: ...lled in the data logger monitor the data collected from the sensor reset the battery lifecycle accumulator whenever a new battery is installed measure the radio signal strength from the data logger to...

Page 18: ...attery Life See Appendix A for battery life expectancy COMPUTING SPECIFICATIONS Processor STM 32 L4 Arm Cortex M4 On board flash storage 64 MB SPI Flash Expandable storage 16 GB micro SD memory card B...

Page 19: ...S 485 IIM Number of Channels Single RS 485 instrument Data Rate 1 200 to 11 5200 Baud half duplex Power Output 12 V DC voltage direct current 2 A continuous Dual Channel 4 20mA IIM Number of Channels...

Page 20: ...ata Type of sensors or instruments Sensor and instruments consume different power due to their inherit design Typically active instruments that require the data logger to provide power to the instrume...

Page 21: ...zometer THERMISTOR AND THERMISTOR IIM The Thermistor and Thermistor IIM TH TH supports up to two thermistor sensors This IIM module converts thermistor s resistance in the range of 20 ohms to 200 000...

Page 22: ...on Guide PSM0003A RST Instruments Ltd Page 19 Figure 12 4 20 mA Circuit Diagram The pin assignments are Pin 1 shield Pin 2 sensor 1 12V DC output source Pin 3 sensor 1 shunt input Pin 4 sensor 2 12 VD...

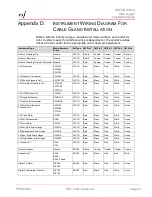
Page 23: ...ssure Cell LPTPC06 LPTPC09 LPTPC12 VW TH Bare Black Red White Green VW NATM Stress Cell VW3291 VW TH Bare Black Red White Green VW Liquid Settlement SSVW105 VW TH Bare Black Red White Green VW In Line...

Page 24: ...Red White Green Vertical In Place Inclinometer Legacy IC7565B IC7575B IC7570B IC7525B IC7555B IC7520B IC7550B RS485 Bare White Brown Black Blue Horizontal In Place Inclinometer Legacy IC32003H IC3200...

Reviews: