background image

4

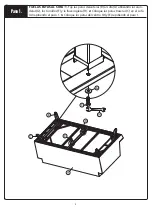
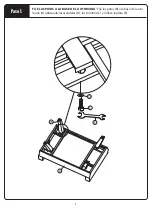
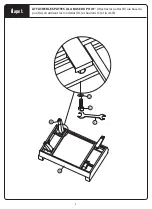
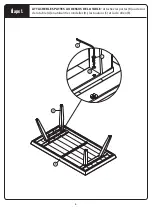
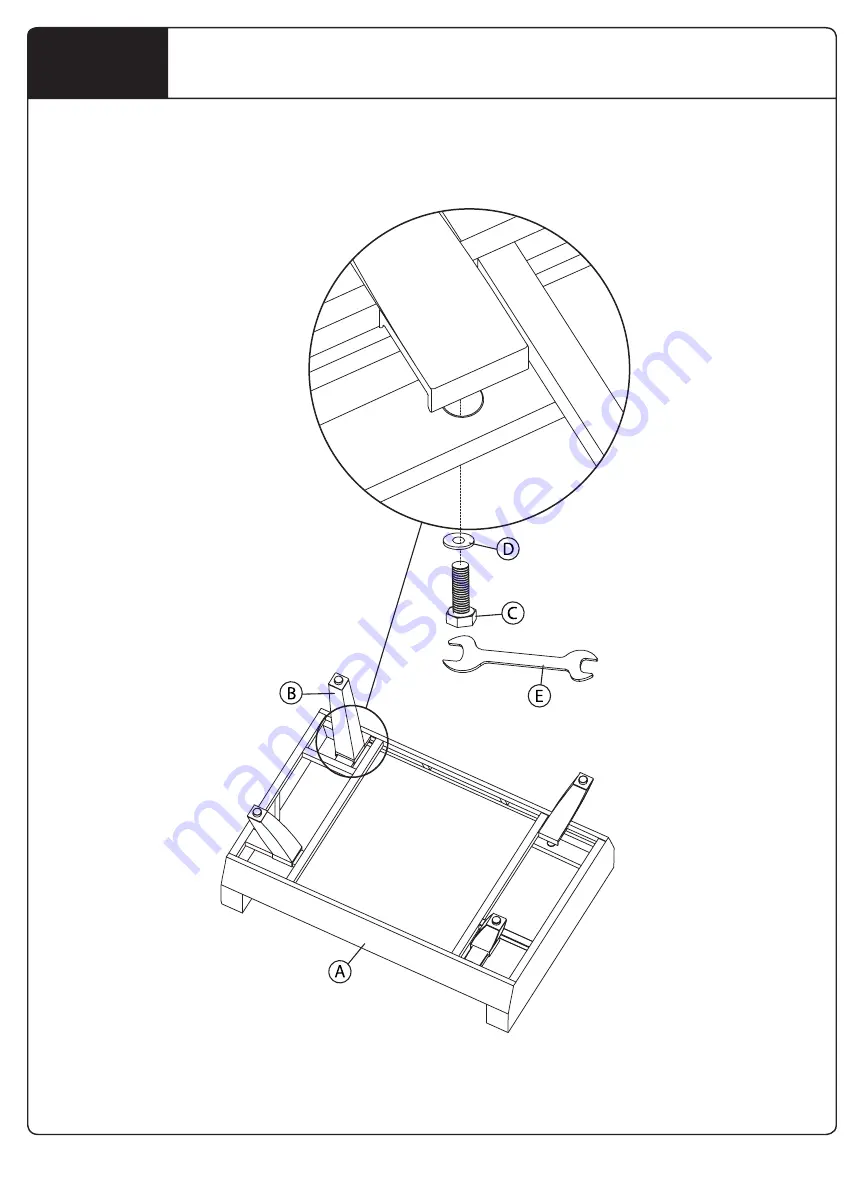
ATTACHER LES PATTES À LA BASE DU POUF - 

Attachez les pattes (B) à la base du 

pouf (A) en utilisant les rondelles (D), les boulons (C) et la clé (E). 

Étape 1.

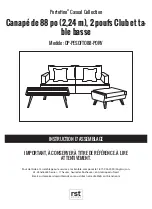
Summary of Contents for Portofino Casual OP-PESOFTO88-PORV

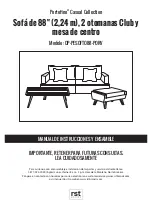
Page 1: ...ORTANT RETAIN FOR FUTURE REFERENCE READ CAREFULLY For assistance with assembly or customer service call 1 877 924 2090 English Monday Friday 8 a m to 5 p m Mountain Time North America Email customerse...

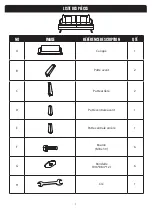
Page 2: ...1 PARTS LIST NO PICTURE PART DESCRIPTION QTY A Sofa 1 B Front leg 2 C Back leg 2 D Middle front leg 1 E Middle back leg 1 F Bolt M8 x 30 6 G Washer 016 08 4 1 2 6 H Wrench 1...

Page 3: ...tach the front legs B to the sofa A using washers G bolts F and wrench H 2 Attach the back legs C to the sofa A by repeating the steps from step 1 3 Attach the middle legs D and E by repeating the ste...

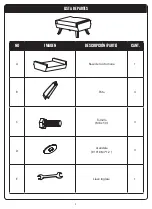
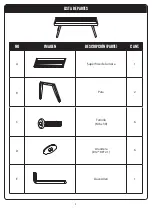
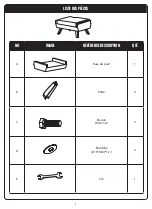
Page 4: ...3 v PARTS LIST NO PICTURE PART DESCRIPTION QTY A Ottoman base 1 B Leg 4 C Bolt M8 x 30 4 D Washer 016 08 4 1 2 4 E Wrench 1...

Page 5: ...4 ATTACH LEGS TO OTTOMAN BASE Attach the legs B to the ottoman base A using washers D bolts C and wrench E Step 1...

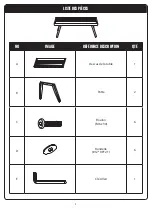
Page 6: ...5 v PARTS LIST NO PICTURE PART DESCRIPTION QTY A Table top 1 B Leg 2 C Bolt M6 x 30 6 D Washer 012 06 2 1 6 E Allen wrench 1...

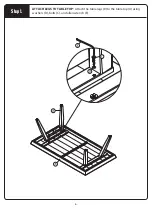
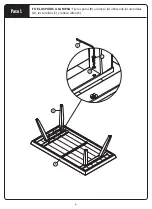
Page 7: ...6 ATTACH LEGS TO TABLE TOP Attach the table legs B to the table top A using washers D bolts C and allen wrench E Step 1...

Page 8: ...radiators or fires All timber surfaces may change color Spray polishes are best to avoid as they contain silicones which may spoil the surface by building up overtime Check bolts and screws regularly...

Page 9: ...CUIDADOSAMENTE Para asistencia con el ensamblaje e instalaci n de las partes y servicio al cliente llame 1 877 924 2090 Ingl s Lunes Viernes 8 a m 5 p m Hora de la Monta a Norte Am rica P ngase en co...

Page 10: ...E PARTES NO IMAGEN DESCRIPCI N PARTE CANT A Sof 1 B Pata delantera 2 C Pata trasera 2 D Pata delantera del centro 1 E Pata trasera del centro 1 F Tornillo M8 x 30 6 G Arandela 016 08 4 1 2 6 H Llave i...

Page 11: ...las patas delanteras B al sof A utilizando las aran delas G los tornillos F y la llave inglesa H 2 Coloque las patas traseras C en el sof A repitiendo el paso 1 3 Coloque las patas del centro D y E r...

Page 12: ...3 v LISTA DE PARTES NO IMAGEN DESCRIPCI N PARTE CANT A Base de la otomana 1 B Pata 4 C Tornillo M8 x 30 4 D Arandela 016 08 4 1 2 4 E Llave inglesa 1...

Page 13: ...4 FIJE LAS PATAS A LA BASE DE LA OTOMANA Fije las patas B a la base de la oto mana A utilizando las arandelas D los tornillos C y la llave inglesa E Paso 1...

Page 14: ...5 v LISTA DE PARTES NO IMAGEN DESCRIPCI N PARTE CANT A Superficie de la mesa 1 B Pata 2 C Tornillo M6 x 30 6 D Arandela 012 06 2 1 6 E Llave Allen 1...

Page 15: ...6 FIJE LAS PATAS A LA MESA Fije las patas B a la mesa A utilizando las arandelas D los tornillos C y la llave Allen E Paso 1...

Page 16: ...inio dise ados para necesitar mantenimiento m nimo Evite que se acumule demasiada suciedad limpiando con agua y jab n suave Nunca deje muebles sobre el agua SUPERFICIES DE PIEDRA MESA Limpie los derra...

Page 17: ...RVER TITRE DE R F RENCE LIRE ATTENTIVEMENT Pour de l aide a l assemblage ou le service a la client le composez le 1 877 924 2090 Anglais Lun di Vendredi 8 heures 17 heures heure des Rocheuses en Am ri...

Page 18: ...1 LISTE DES PI CES NO IMAGE R F RENCE DESCRIPTION QT A Canap 1 B Patte avant 2 C Patte arri re 2 D Patte centrale avant 1 E Patte centrale arri re 1 F Boulon M8 x 30 6 G Rondelle 016 08 4 1 2 6 H Cl 1...

Page 19: ...hezlespattesavant B aucanap A enutilisantles rondelles G lesboulons F etlacl H 2 Attachezlespattesarri res C aucanap A enr p tantles tapes partirdel tape1 3 Attachezlespattescentrales D et E enr p tan...

Page 20: ...3 v LISTE DES PI CES NO IMAGE R F RENCE DESCRIPTION QT A Base du pouf 1 B Patte 4 C Boulon M8 x 30 4 D Rondelle 016 08 4 1 2 4 E Cl 1...

Page 21: ...4 ATTACHER LES PATTES LA BASE DU POUF Attachez les pattes B la base du pouf A en utilisant les rondelles D les boulons C et la cl E tape 1...

Page 22: ...5 v LISTE DES PI CES NO IMAGE R F RENCE DESCRIPTION QT A Dessus de la table 1 B Patte 2 C Boulon M6 x 30 6 D Rondelle 012 06 2 1 6 E Cl Allen 1...

Page 23: ...6 ATTACHER LES PATTES AU DESSUS DE LA TABLE Attachez les pattes B au dessus de la table A en utilisant les rondelles D les boulons C et la cl Allen E tape 1...

Page 24: ...vitez de laisser trop de poussi re s empiler en les lavant avec du savon doux et de l eau Ne laissez jamais de mueble sous l eau CADRES EN ALUMINIUM Les liquides renvers s doivent tre nettoy s rapide...

Reviews: