


- 14 -
GB
GB
- 14 -
GB
GB
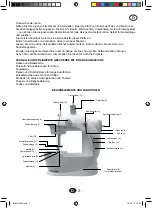
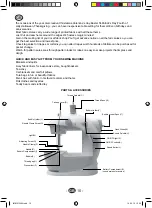
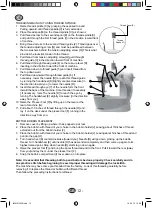
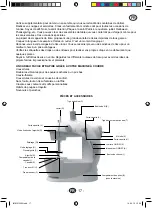
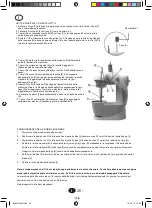
CHANGING THE NEEDLE:
1. Turn the hand wheel [K] clockwise to raise the needle [R] to its highest position.
2. Loosen the needle clamp screw [O] by turning it counter-clockwise [toward you]. You may need to use
a short slotted screwdriver or small players.
3. Tighten the stitch by turning the tension screw [N] clockwise. Sewing heavier fabric may require
loosening the stitch. Very light fabric may require tightening the stitch . Bobbin tension cannot be
adjusted.
4. Place the new needle with the flat side facing in against the needle clamp [P].
5. Push it gently as far up as it will go, and against the needle clamp [P].
6. Tighten the needle clamp screw [O] while holding the needle [R] in place.
Note: Needle come in various sizes designated by numbers. They designate the left of the needle. The
smaller the number, the thinner the needle. Use smaller needles for more delicate fabrics and larger
needles for heavier fabrics.
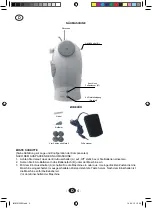
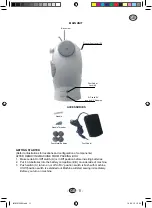
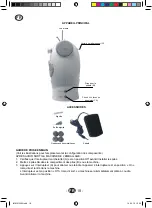
WINDING THE BOBBIN:
You can wind your own bobbins with thread from spools. You purchase separately to have a virtually
unlimited thread color selection. Match your fabrics or contrast with the thread shades of your choice.
1. Always remove the bobbin [S] from the bobbin case on the machine before you wind a new bobbin.
2. Place the thread spool [E] on the thread spindle [C].
3. Put the bobbin pin into the hole on the hand wheel and turn it slightly counter-clockwise.
4. Take an empty bobbin and in one hand. Pull the thread down from the thread spool [E] and thread the
loose end through the small hole on the bobbin rim from the inside.
5. Leaving the loose end on the outside of the bobbin, wind the thread several turns around the inside of
the bobbin.
6. Place the bobbin on the bobbin pin, making certain that the thread is winding on to the bobbin in a
counter-clockwise direction. [This would mean the thread should be winding under the bobbin, not over
it].
7. Hold the thread lightly guiding it gently through your thumb and index finger.
8. When the bobbin is full, switch off the machine.Insert the bobbin into the bobbin case using the
instructions for threading the machine.
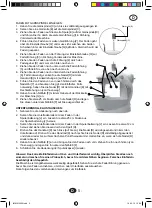
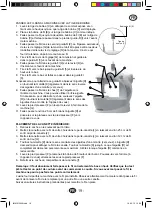
Sewing sleeves
1. The machine designed to allow you to sew sleeves easier. First hold up the presser foot [F] and
position the sleeve under the needle. Put the bobbin part of the sleeve in the gap between the platform
and the base.
2. Loer the presser foot and follow the step 5-13 in the section of operating the machine on the previus
page. Now you can sew the sleeves easily.
3. The light [W] in the sewing machine head can illuminate your sewing when more light needed.
Safety Information
• Always disconnect or remove power supply including batteries when changing needles or threading
machines.
• Never open the main motor case of the machine. The mechanism has been factory adjusted.
• Always check the threading of the lockstitch before beginning to sew a seam. Improper threading or
placement of the bobbin in the case will result in damage to the machine.
• Do not pull on fabric as you sew gently guide only. Pulling could break the needle and result in damage
to the machine.
• Remove batteries when the machine is not in use for long periods. This saves battery life and protect
the machine.. Keep extra batteries on hand so projects will not be interrupted when batteries need to
be replaced.
•
KEEp AWAy FROM CHILDREN:
This sewing machine is not toy and not meant to be used by or near
children.
• The sewing machine is an electrical appliance when used with adapter [not included]. Do not submerge
- 15 -
GB
GB
the unit or any other parts in water .Do not operate the sewing machine wit wet hands, without shoes,
or while standing in water or on a wet surface when using the adapter [not included].
Do not change needles or thread machine while untis is on.Do not touch needles before
You turn off the power.
Never use with a damaged power cord or plug.
Keep the power cord away from heated surfaces.
Do not close door on cord or pull around sharp edges ,this could cause the cord to become
Punctured or damaged and could result in injury .
Do not unplug by pulling or tugging on the cord. Grasp the plug with dry hands to remove
the plug from the outlet.
Do not sew clothing while it is on your body.
Use only the power adapter recommended [Sold Separately] by the manufacturer ,any other
Adapter may cause injury or damage to the machine.
Never leave the swing machine unattended while plugged in. Turn switch off and unplug
the cord when not in use.
PRINTED IN CHINA
TECHNICAL DATA
Operating voltage
:
230V ~ 50Hz
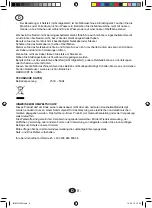
End of life disposal
Used up devices do not belong with the household waste! If the device should no longer be
able to be used after some time, each consumer is obligated by law to return end of life devices
separately from regular household waste – for example, to a collection station of his
municipality/city district etc. This will ensure the professional recycling of end of life devices
and avoid negative consequences for the environment. The electric devices are therefore
marked with the above symbol.
Your service hotline for Austria: +43 2236 660 606 66
IM MN 2000.indd 14
14.05.12 13:20


