background image

Getting Started | Create Your Own Preset

EN-20

Manual | TouchMonitor TM7/TM9

Create Your Own Preset

Presets are used to define and edit all the specific settings for your 
work flow. So you can create audio groups containing a defined 
signal source selection and one or more instruments sharing this do-
main and showing parameters of audio signals. Also you can create 
non-audio groups containing intruments, that are not related to audio 
input signals, like clock, hardware status monitor, or global keyboard.

If you want to create a preset from scratch, please proceed as follows:

1.  If not visible, touch the empty space of the screen to display the 

control bar.

2.  Touch the 

Menu

 key in the right section of the control bar to  

access the menu system starting with the 

Main Menu

.

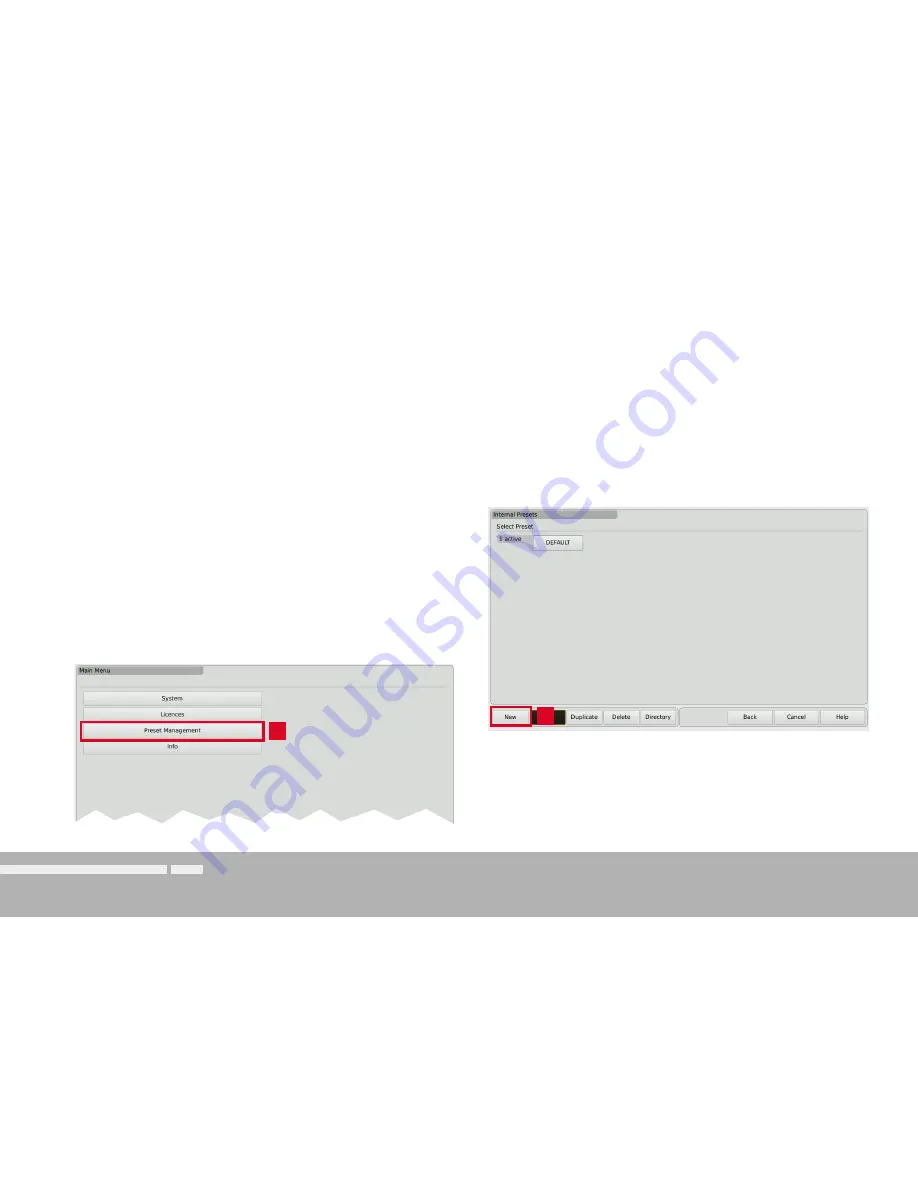
3.  Touch the 

Preset Management

 key. The 

internal Presets

 menu 

appears.

4.  Touch the 

new

 button to create a new preset. A preset with an 

editable default name is created (see next figure, touch Preset 

Name to edit).

3.

4.

Summary of Contents for TouchMonitor TM7 Series

Page 1: ...ing safety information Function Description Presets List Software Update Boxing Manual CE RoHS Information Operating Manual TouchMonitor TM7 TM9 2011 RTW GmbH Co KG Elbeallee 19 50765 K ln Germany Fon...

Page 2: ...2002 95 EC For TouchMonitor s declaration of conformity see the appendix of the Quick Start Guide Please note The figures in this operating manual are carefully created and are used to illustrate the...

Page 3: ...TouchMonitor TM7 TM9 Software Version 2 nn 09 2011 Quick Start Guide EN...

Page 4: ...95 EC TouchMonitor has been KC certified for Korea Reg no TM7 KCC REI LA1 TM7 Reg no TM9 KCC REI LA1 TM9 Please note The figures in this operating manual are carefully created and are used to illustr...

Page 5: ...l points your attention to specific characteristics that are no malfunctions Important Safety Instructions Read these instructions Study carefully and understand all safety and operating instructions...

Page 6: ...ate with suspected failures If you suspect there is da mage to the unit have it inspected by qualified service personnel Do not use this apparatus near water Do not operate in wet damp conditions Do n...

Page 7: ...er Before connecting any devices to the unit make sure that the power supply is disconnected Protect the power cord from being walked on or pinched particu larly at plugs convenience receptacles and t...

Page 8: ...ch substances into the environ ment and to reduce the use of natural resources we encourage you to recycle this product in an appropriate system that will ensure that most of the materials are reused...

Page 9: ...You Begin 8 Introduction 8 Scope of Delivery 10 Installation 13 Connection 14 Pin Assignment 15 Getting Started 17 System Start up 17 Adapt the TouchMonitor to your Audio System 18 Create Your Own Pre...

Page 10: ...onitor series With the TouchMonitor range you are able to meet the growing require ments in today s production post production and broadcast world Equipped with high grade 7 or 9 touch screens and an...

Page 11: ...nvironments It handles input signals of vari ous formats analog AES3 and AES3id In addition the TouchMonitor TM9 has an option to accept 3G SDI signals This option works as an audio deembedder for mix...

Page 12: ...and software licences are also listed TouchMonitor TM7 Table top unit 20700 OEM version 20700OEM Power supply Quick Start Guide Multichannel mode SW20001 Loudness and SPL display SW20002 RTA Real Tim...

Page 13: ...0002 RTA Real Time Analyzer SW20003 SSA Surround Sound Analyzer SW20004 Radar Display SW20005 Premium PPM Vectorscope SW20006 8 x AES3 8 x analog HW20711 8 x AES3id 8 x analog HW20712 Audio Interface...

Page 14: ...Loudness and SPL display SW20002 RTA Real Time Analyzer SW20003 SSA Surround Sound Analyzer SW20004 Radar Display SW20005 Premium PPM Vectorscope SW20006 8 x AES3 8 x analog HW20911 Audio Interface as...

Page 15: ...rts and interfaces are connected with the appropriate standard connection cables Attention Please read before installing Before installing the unit please study the safety instructions and the informa...

Page 16: ...ow voltage connector External USB mouse Wacom graphics tablet External VGA monitor 16 9 24 V DC 1 A 3G SDI Through In VGA HW20911 pictured HW20912 HW20913 HW20914 HW20915 Optional 3G SDI interface opt...

Page 17: ...nalog 1 resp 9 hot 12 Input analog 1 resp 9 cold 25 Shield case 13 not used External view of the con nector AES3 I O 1 4 AES3 I O 5 8 transformer balanced 25 pin Sub D F Pin Function 1 Output digital...

Page 18: ...1 4 AES3id In Out 5 8 3G SDI unbalanced BNC F Pin Function Pin Signal Ring Shield case Note The AES3id inputs and the 3G SDI inputs are permanently ter minated with 75 Ohm USB A 2 Full Speed USB 2 0 i...

Page 19: ...signals Digital outputs Optional external standard 16 9 VGA monitor Optional USB mouse LAN Ethernet Power supply When the TouchMonitor is connected to the power supply it will ini tiate its system st...

Page 20: ...ets 1 If not visible touch the empty space of the screen to display the control bar 1 2 3 2 Touch the Menu key in the right section of the control bar to access the menu system showing the Main Menu 4...

Page 21: ...fined reference source touch the Sync Reference key and select from the items in the right half of the menu 7 Touch the Clock key if you want to set the current date and time Start the internal clock...

Page 22: ...ng intruments that are not related to audio input signals like clock hardware status monitor or global keyboard If you want to create a preset from scratch please proceed as follows 1 If not visible t...

Page 23: ...umber of modes depends on the activated software licences 5 Touch the New Audio key to create the first audio group 5 6 The Domain key is marked select the domain of the required signal source in the...

Page 24: ...you want to use The icon of every selection is placed on the Instruments field on the left 10 11 The Preset menu now shows the audio group you just crea ted marked with a small colored triangle in the...

Page 25: ...atch them in normal display mode 13 Touch an instrument icon It will be applied to the upper left edge of the graphical screen representation 14 Use the Position and Size keys to resize the instrument...

Page 26: ...chMonitor TM7 TM9 16 When the screen layout satisfies your demands you also can ro tate instruments touch the Save key below in the control bar 17 This will return you to normal display mode showing t...

Page 27: ...ed for some seconds to make your selection If you want to use the functions of an instrument please proceed as follows 1 Touch the screen area of the instrument you want to use It will be put into foc...

Page 28: ...lay mode the name of the active preset is dis played in the lower right edge of the screen 3 The selected preset is loaded The unit automatically switches back to normal display mode and displays the...

Page 29: ...t at any time The Licences menu is used to view the licences currently installed on the TouchMonitor and to acquire new licences Instruments and functions already activated are marked with an Installe...

Page 30: ...panel 2 Touch the empty space of the screen or one of the displayed ins struments the control bar appears 2 3 4 3 Touch the Menu key in the right section of the control bar to ac cess the menu system...

Page 31: ...Touch the Done key This turns you back to the Main Menu With the USB stick inserted there are two other keys Export Preset allows you to store presets on the USB stick and Im port Preset allows you to...

Page 32: ...ences menu as described in steps 2 to 4 16 15 The licence file will be recognized and an Import Licences key will be shown in the left section of the control bar 18 The licenced instrument or function...

Page 33: ...s and instruments to your unit at any time periodic maintenance of the system software is neccessary be cause you only will find options and licences that were already availa ble at the release date o...

Page 34: ...d to avoid damage of the copied update file 3 Remove the unmounted USB stick from your computer and insert it to one of the USB ports on the rear panel of the TouchMonitor 7 Touch the key The update s...

Page 35: ...5 mm W x H x D 20700 VID Half 19 3U 214 1 x 132 6 x 49 5 mm W x H x D without mounting adapters fits to Video rack cabinets Dimensions TM9 20900 245 x 185 5 x 46 5 mm W x H x D 20900OEM 235 x 135 x 4...

Page 36: ...al clock Basic Stereo PPM Standard Software General Input sources analog and or digital depending on mounted audio interface 2 ch peakmeter for one installed Stereo channel pair L R Displays Peak leve...

Page 37: ...ponsible person 2010 12 01 on behalf of RTW We RTW GmbH Co KG Elbeallee 19 50765 K ln Germany declare under sole responsibility that the product RTW TouchMonitor 20900 Series and 20700 Series OEM unit...

Page 38: ...the LGPL Lesser General Public License of the Free Software Foundation FSF Qt libary of Nokia Corporation The LGPL is located at http www gnu org licences lgpl 2 1 html Qt is registered trademark bra...

Reviews: