background image

EN-17

EN

DA

DE 

FR

IT

ES

NL

NO

Line in

Charge port

Listen to an external audio device such as a portable 
music player using a 3.5mm stereo jack cable 
connected to the Line in socket (13) on the back of your 
R1.

Press 

SOURCE

 and rotate the 

CONTROL KNOB

 or 

repeatedly press 

SOURCE

 until 

Line in 

is displayed, 

then press the knob to select it.

If your external audio source has a volume control you 
may need to adjust it for best performance. If it’s too 
high the sound may distort; if it’s too low the playback 
volume may be too low.

Headphones

Connect your headphones to the 3.5mm stereo jack 
socket (14) on the back of your R1.

Headphone volume is adjusted independently from 
speaker volume, so when headphones are plugged in 
the volume is shown as 

Volume (HP)

.

Your R1 has a 5W, 1.0A USB power output on the back.

Connect a USB cable compatible with your device 
to the charge port (11) on your R1 to charge most 
smartphones including iPhones and most Android and 
Windows phones.

Please note that the charge port is not compatible with 
Apple iPad or iPad mini or any other device that requires 
a charger with an output greater than 5W.

Using a BackPack battery

Your R1 is fully compatible with the Ruark R1 BackPack 
battery. See www.ruarkaudio.com

To save power, your R1 will switch off completely rather 
than go into standby when running on battery. To turn 
it back on, press and hold   for two seconds until the 
Ruark Logo is displayed.

IMPORTANT: the alarms will not work when running 
off battery. To use the alarm function, your R1 must be 
plugged into mains power.

Please note that charging a device when your R1 is 
powered by a BackPack will significantly reduce the run 
time of your R1.

Summary of Contents for R1mk3

Page 1: ...guide Brugervejledning Bedienungsanleitung Gu a del usuario Guide de l utilisateur Manuale dell utente Gebruikershandleiding Brukerveiledning EN DA DE ES FR IT NL NO KR Tabletop Radio R1mk3 User guid...

Page 2: ...e pride ourselves on our customer service and will always do our utmost to help Once again thank you for choosing Ruark Audio Alan O Rourke Founder and managing director Contents What s in the box 3 O...

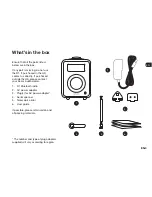
Page 3: ...irectly If purchased outside the UK please contact your Ruark Audio dealer 1 R1 Bluetooth radio 2 AC power adaptor 3 Plug s for AC power adapter 4 Aerial spanner 5 Telescopic aerial 6 User guide If po...

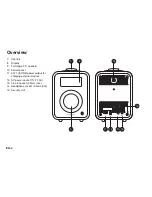
Page 4: ...10 Aerial socket 11 5W 1 0A USB power output for charging external devices 12 DC power socket 14V 1 5A 13 Line in socket 3 5mm jack 14 Headphone socket 3 5mm jack 15 Security slot Overview 10 7 8 11 9...

Page 5: ...previous track in Bluetooth 20 PRESET press to recall a saved station or press and hold for two seconds to save a radio station 21 SOURCE press to change audio source 22 ALARM SLEEP press once to set...

Page 6: ...EN 6 Getting started 1 5 3 2 4...

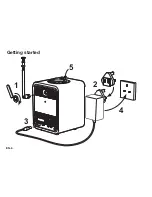
Page 7: ...4 Connect to AC mains Plug the AC power adapter into a mains power socket 5 Turn on Press to turn the radio on The first time you turn it on your R1 will automatically scan for DAB stations and adjus...

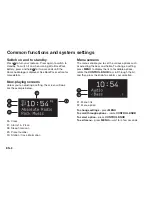
Page 8: ...elow 26 29 27 28 30 26 Clock 27 Alarm 1 2 icon 28 Sleep timer icon 29 Preset number 30 Station track information Menu screens The menus enable you to set the various options such as adjusting the bass...

Page 9: ...es instead of rotating the knob Change DAB radio station Press or to scroll through the stations in the station list then press the CONTROL KNOB to tune to the new station See DAB section for more det...

Page 10: ...s Display brightness MENU System Brightness You can independently adjust the brightness of the display when the radio is on On level and in standby Standby level When in standby and the standby bright...

Page 11: ...tery To use the alarm function your R1 must be plugged into mains power Quickly turn alarms on and off Press ALARM once for alarm 1 and twice for alarm 2 then rotate the CONTROL KNOB to choose On or O...

Page 12: ...ay take a few seconds for your R1 to appear in the list on your device and in some cases you may need to input 0000 as the pairing password If you do not connect within a few minutes your R1 will stop...

Page 13: ...nked so you can control the volume of your R1 during Bluetooth playback by adjusting the volume on your device This function may not be supported by all devices Disconnect current device To disconnect...

Page 14: ...pressing the CONTROL KNOB If you do not select the station by pressing the knob your radio will return to the current station Once the station list is displayed you can scroll through the list by rot...

Page 15: ...nu Station order and select Alphanumeric default Ensemble or Valid Valid shows available stations first and places invalid stations marked with last Station scan If the station list is empty the radio...

Page 16: ...io from weak stations you can change the scan setting so it only stops at stations with a strong signal by selecting Menu Scan setting Strong stations only FM radio text RDS RBDS Each time you press I...

Page 17: ...wn as Volume HP Your R1 has a 5W 1 0A USB power output on the back Connect a USB cable compatible with your device to the charge port 11 on your R1 to charge most smartphones including iPhones and mos...

Page 18: ...vice Do not install near any heat sources such as radiators stoves or other devices including amplifiers that produce heat Avoid exposure to extreme heat or cold Only use attachments accessories speci...

Page 19: ...th for an uncontrolled environment This equipment should be installed and operated with a minimum distance of 20 cm between radiator and your body This equipment has been tested and found to comply wi...

Page 20: ...he country of purchase guarantees products purchased outside the UK For details please contact your local Ruark distributor or outlet THIS GUARANTEE IN NO WAY VARIES OR REMOVES THE PURCHASER S STATUTO...

Reviews: