background image

16

17

18

19

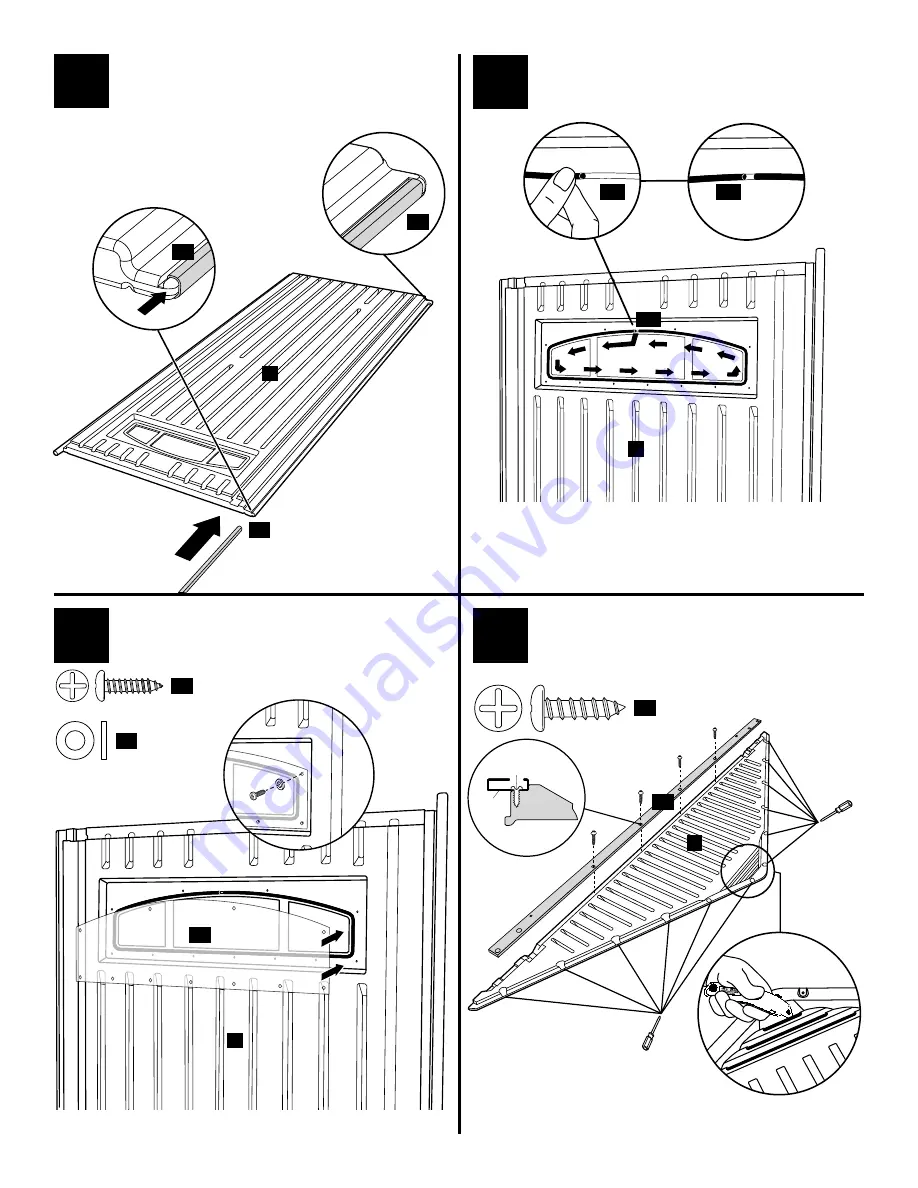
Install the 

Gasket (MM)

 into the gasket groove in the door. Start at the top and middle 

by pushing the gasket into the groove. Continue until the 

Gasket (MM) 

is fully installed.  

There will be a small gap between the ends of the gasket.

Lubricate the inside of the 

Door Reinforcement (DR)

 along the full length with liquid soap.

Starting at the top of the door, slide the 

Door Reinforcement (DR)

 onto the groove located 

on the handle side of the door. The 

Door Reinforcement (DR) 

will slide to the stop at the 

bottom of the door.

Peel off the protective paper from 

Window (LL).

 Install 

Window (LL) 

onto the door by 

matching up the holes and installing the 

Screws (BB)

 and 

Washers (CC)

 11 places.  

The “frosted” side of the window should be touching the gasket. Start all screws before 

tightening any of them down. Make sure the window is free to move until all screws have 

been started. Repeat steps 15–18 for 

Right Door Panel (H).

Using a screwdriver, punch out the screw holes around the perimeter of 

Front Gable (U)


12 places. If venting is desired, use the utility knife to cut out vent slots 3 places from 

inside of gable before assembly. Fasten the 

Door Header (DH) 

to the bottom of the 

Front 

Gable (U

) using 

Screw (AA

) 4 places.

Caution: Tighten screws only enough to compress gasket. Do not overtighten.

Caution: When installing screws, do not overtighten.
Caution: Always use gloves when using the utility knife.

Screw Holes

Screw Holes

DR

DH

MM

MM

MM

DR

DR

BB  

(11)

CC  

(11)

LL

G

G

G

AA  

(4)

SCREW (AA)

DOOR HEADER (DH)

FRONT GABLE (U)

Summary of Contents for 5H80

Page 1: ...hoosing a location in your yard make sure you choose an area with easy access and one that provides proper drainage for water to run away from the shed location Prior to beginning the assembly please complete the following items Thoroughly review all assembly steps it is important that the steps are followed in the correct order Review the parts list and make sure that no parts are missing IMPORTA...

Page 2: ... FF 6 Roof Pin Assembly Tool GG 1 Roof Lower Roof Panel 7 M 2 Upper Roof Panel Underlap 7 N 1 Upper Roof Panel Overlap 7 P 1 Front Gable U 1 Back Gable R 1 Skylight L 4 Gasket for Skylight 4 Door Header Support DH 1 Truss Rafter TR 2 Truss Collar Tie TC 1 Truss Bracket TB 2 Purlin PL 4 Safety Glasses Phillips Screwdriver Rubber Mallet Liquid Soap 2 Step Stools Stepladders Drill Gloves Utility Knif...

Page 3: ...out 8 places on Front Floor J and 12 places on Back Floor K Optional Step If desired recessed anchor locations 8 places can be used to secure the Floor to the Foundation see Step 1 Using a screwdriver punch out the screw holes on the top of Side Panel A 3 places Snap Side Panel A into Front Floor J Hold Side Panel A to prevent it from falling FLOOR PLAN Size the construction site to fit the entire...

Page 4: ... Panel B 5 places with liquid soap Connect Left Back Panel C onto dovetails of Side Panel B Engage snaps on bottom of Left Back Panel C into Back Floor K click 1 2 Screw Holes 1 2 5 Using a screwdriver punch out the screw holes on the top of Side Panel B 3 places Align the lap joint between Side Panel A and Side Panel B Snap Side Panel B into Back Floor K click Screw Holes 6 Install Wall Connector...

Page 5: ...driver punch out the screw holes on the top of Side Panel B 3 places Snap Side Panel B into Front Floor J Hold Side Panel B to prevent it from falling Using a screwdriver punch out the screw holes on the top of Side Panel A 3 places Align the lap joint between Side Panel A and Side Panel B Snap Side Panel A into Back Floor K Install Wall Connector Q 5 places click Screw Holes click 1 2 Screw Holes...

Page 6: ...es from inside of gable before assembly Connect Back Gable R onto the back wall install Screws AA 10 places Set the Left Door Panel G face down Slide the Hinge Reinforcement HR into the hole on the top door pin The Hinge Reinforcement HR will slide in until it is 1 8 above the end of the door pin click 2 1 1 2 1 2 1 2 click click click click click Screw Holes Screw Holes Screw Holes Screw Holes Ca...

Page 7: ...e Screws BB and Washers CC 11 places The frosted side of the window should be touching the gasket Start all screws before tightening any of them down Make sure the window is free to move until all screws have been started Repeat steps 15 18 for Right Door Panel H Using a screwdriver punch out the screw holes around the perimeter of Front Gable U 12 places If venting is desired use the utility knif...

Page 8: ...ble U channel Close Left Door Panel G Install Right Door Panel H by inserting the lower hinge pin into the hole in Front Floor J Lift the right end of the Front Gable U enough to insert the top hinge pin on Right Door Panel H into the Front Gable U channel With Right Door Panel H open install Bolt DD and Nut EE connecting Right Front Panel F and Door Header DH Open Left Door Panel G Close Right Do...

Page 9: ...Nut EE 2 places Fasten Truss Bracket TB to each Truss Rafter TR using Bolt DD and Nut EE 2 places Note DO NOT completely tighten bolts and nuts leave a 1 8 gap between the nut and the truss component TR TC TB 22 Using a screwdriver punch out the screw holes around the 2 skylight openings on Upper Roof Panel P 16 places Fasten Skylight L 2 places to Upper Roof Panel P install Screws AA 16 places Re...

Page 10: ...ss Bracket TB 2 places to the wall panels using Screw AA 4 places Caution When installing screws do not overtighten TB TB 27 Attach Purlin PL 2 places Fasten both Purlins PL to Truss Rafter TR using Bolt DD and Nut EE 1 place Repeat step for opposite side Note Short end of Purlins PL should be over Gables and the long end of Purlins PL should align with Truss Rafter Tighten bolts and nuts until th...

Page 11: ...ion When installing screws do not overtighten Screw Locations Screw Locations Screw Holes Screw Holes AA 12 AA 12 U R 28 2 1 3 M PL Screw Holes 1 2 3 4 M GG FF Upper Roof Panel Lower Roof Panel M Purlin PL Using a screwdriver punch out the screw holes on the top of Lower Roof Panel M 10 places While one person pushes up on the bottom of the Upper Roof Panel slide the Lower Roof Panel M over the Pu...

Page 12: ...s using Screw AA 12 places Caution When installing screws do not overtighten Caution When installing screws do not overtighten Caution When installing screws do not overtighten AA 10 AA 12 33 Snap Lock Hasp X into the interior of Right Door Panel H Fasten Barrel Bolt HH 2 places onto the interior of Right Door Panel H using supplied screws 8 places Note Lock Hasp accepts padlocks with diameter and...

Page 13: ...should not be stored in the building Heavy items should not be leaned against the walls as this may cause distortion Keep doors closed when not in use to prevent wind damage Do not climb onto roof Shed is not designed for habitation Imprimé aux États Unis D R 2011 Rubbermaid Incorporated Huntersville NC U S A 28078 1801 Service à la clientèle Sans frais 1 888 895 2110 L V 8 30h à 17h heure de l es...

Page 14: ......

Reviews: