background image

TOOLS

HOW TO:

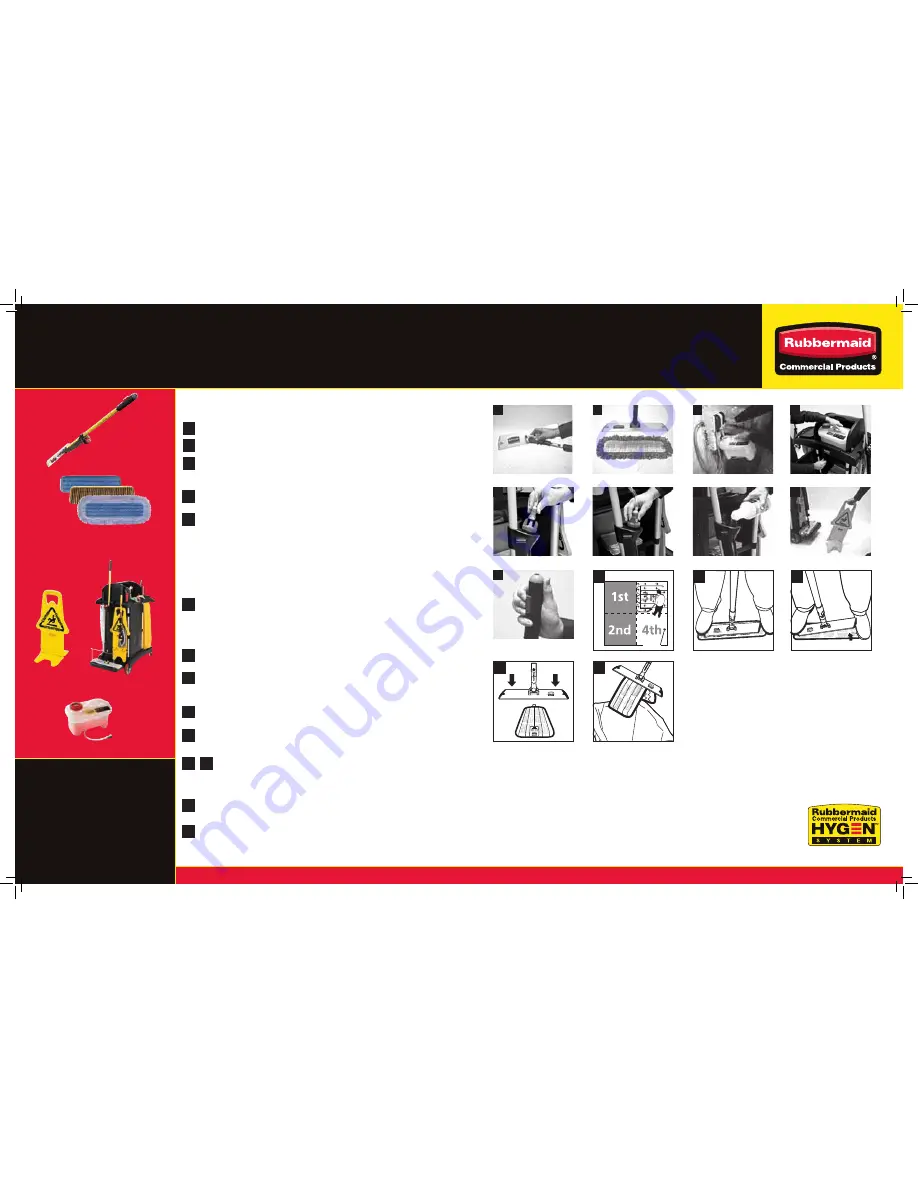
USE RUBBERMAID PULSE™ fOR DAMP MOPPING

Rubbermaid PULSE™ Caddy • Q966

Safety Sign • 9S09

18” MF Damp Mop • Q410

18” Microfiber Scrubber Mop • Q810 

18” MF High Absorbency Mop • Q416


TIPS

 • Use Q416 High Absorbency Mop 

to clean larger areas. Change 

high absorbency mop every time 

Rubbermaid PULSE™ needs to be 

refilled (21 oz.).

•  Use Q810 Scrubber Mop on tile 

or stone floors. 

•  Dust mop before damp mopping 

to reduce hazing. 

PREPARE RUBBERMAID PULSE™ fOR USE

1


Attach the Q560 Quick Connect Frame to the Rubbermaid Pulse Stick.

Attach the damp mopping pad to the Q560 Frame.
 
Fill Rubbermaid Pulse Caddy with cleaning solution.  

NOTE:

 DO NOT USE RUBBERMAID PULSE™  WITH BLEACH OR D’LIMONINE-BASED 

CLEANING SOLUTIONS.
 
Place Rubbermaid Pulse Caddy atop the Rubbermaid HYGEN™ System Cleaning Cart.

Upon arriving at cleaning site, plug the Rubbermaid Pulse Caddy Clean Connect hose 
into the Rubbermaid Pulse Clean Connect cap fitting to fill the reservoir on the stick. 
Cleaning solution will automatically cease flowing into the reservoir when it is full.  
Clean Connect technology will prevent drips when it is disconnected.

NOTE: If air in the Rubbermaid Pulse reservoir bag impedes the flow of liquid from the 
Rubbermaid Pulse Caddy via the Quick Connect hose, a simple solution is to perform  
a manual fill of the reservoir. Subsequent fills can be accomplished with the Quick  
Connect system.

 
Manual filling (without using the Rubbermaid Pulse Caddy): open the red cap at the  
top of the Rubbermaid Pulse reservoir, fill the reservoir and replace the cap.

Place floor safety sign to alert pedestrians of the potential slip and fall hazard.

 
Starting in the far corner of the room, expel enough cleaning solution onto floor to 
moisten the damp mopping pad by pressing the red trigger button in the handle of the 
Rubbermaid Pulse stick.

Mop, moving backwards, using Figure 8 strokes.

 
As the mop becomes dry, press the trigger to expel more cleaning solution.

          
         When finished cleaning a room, or when a pad is loaded with soil, remove the  
         pad by stepping on an exposed edge of the pad, and with the other foot on the  
         opposite end of the frame, then lifting the handle and frame upward. 

 
Pick up soiled pad by turning the frame 90° to the pad, then touching it to the mop to 
lift off of the floor.

The mop pad will droop, folding downward, and can be easily remove from the frame 
and dropped into the laundry bag.

2


DAMP MOPPING wITH RUBBERMAID PULSE™

Rubbermaid PULSE™ • Q969

1


2


3


4


5


6


7


8


9


10


11


High Security Cleaning Cart • 

9T75

12


13


14


15

11 

13 

12 

14 

1


2


4


5


6


7


8


3


Summary of Contents for HYGEN

Page 1: ...Rubbermaid HYGEN Product Use Manual...

Page 2: ...w standard string mop 67 8 QUAT cleaner w microfiber mop 95 3 QUAT cleaner w standard string mop 94 8 William A Rutala Ph D M P H ed Disinfection Sterilization and Antisepsis Principles Practices Curr...

Page 3: ...he locking ring before beginning to mop Clean floor using Figure 8 strokes Working with the handle pointed upward is the most comfortable position for this cleaning technique For push and pull cleanin...

Page 4: ...placing it on floor with white logo imprinted backing side of the pad facing upward Push the Quick Connect Frame onto the pad Beginning at the far corner of the room dust mop the floor using overlappi...

Page 5: ...th dust refresh it by vacuuming away the accumulated material or by wiping it away with a damp sponge To remove a large dust mop pad from the Quick Connect Frame grasp the pad by the fabric loop and p...

Page 6: ...he Charging Bucket shows the fluid level for 1 quart 1 quart is enough solution to saturate 5 mop pads Place mop pads in the Charging Bucket with the blue cleaning side down the white logo imprinted b...

Page 7: ...nnection Lock the lid back onto the Charging Bucket Beginning at the far corner of the room mop the floor using overlapping Figure 8 strokes while moving backward toward the doorway Remember to clean...

Page 8: ...flow of liquid from the Rubbermaid Pulse Caddy via the Quick Connect hose a simple solution is to perform a manual fill of the reservoir Subsequent fills can be accomplished with the Quick Connect sy...

Page 9: ...ainst the sieve to expel excess cleaning solution Rotate the Quick Connect Frame with mop pad attached 180 and repeat step 7 to complete wringing Mop the floor using Figure 8 strokes rewetting the mop...

Page 10: ...ar surfaces Select the appropriate Dusting Cover for the task Q856 or Q850 Green Dusting Covers for light fine dusting Q861 or Q852 for heavy dusting If using Q850 bend to shape of surface being clean...

Page 11: ...nsure a really solid connection When the mop pad is loaded with liquid it will be significantly heavier Making a strong connection will help keep the pad on the frame saving time and effort while clea...

Page 12: ...egee the floor using Figure 8 strokes working backward through floor area you are cleaning Pull debris into a Rubbermaid Lobby Pro Dust Pan 2531 for removal For liquid collection and removal position...

Page 13: ...ted on the next surface 1 Fold your clean Rubbermaid HYGEN Microfiber Cloth in half and then in half again resulting in a square shaped pad with 4 layers of cloth Each layer has two sides for a total...

Page 14: ...damp or dry Q891 flexi frame damp mop For general damp cleaning with or without chemicals QUICK CONNECT HANDLES FRAMES BUCKETS Q745 20 inch pole extends to 40 inches Q765 Extends from 4 to 8 feet Q77...

Page 15: ...capacity setting n Do not use fabric softener n Use bleach if desired required in health care if water does not reach at least 160 F Cold Water Method n Same as above except using cold water Detergent...

Reviews: