Gigabit Smart Switch
8
Installing the Switch
This part describes how to install the Switch and make connections to it. Please read
the following instructions step by step. Besides, the Switch does not need software
installation. Install the Switch either on a desktop or a rack.
Pre-Installation Considerations
Before installing the Switch, make sure that the RS232 cable complies with cable
specification. Since the Switch is configured through the console port, the PC must be
equipped with the console interface as well.
Desktop Installation
Step 1
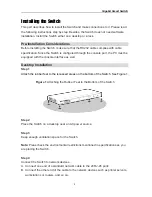
Attach the rubber feet to the recessed areas on the bottom of the Switch. See Figure 1.
Figure 1
Attaching the Rubber Feet to the Bottom of the Switch
Step 2
Place the Switch on a desktop near an AC power source.
Step 3
Keep enough ventilation space for the Switch.
Note:
Pleas check the environmental restrictions mentioned in specifications as you
are placing the Switch.
Step 4
Connect the Switch to network devices.
A. Connect one end of a standard network cable to the 24 RJ-45 ports
B. Connect the other end of the cable to the network devices such as printer servers,
workstations or routers, and so on.


