background image

18

19

4.3. 

BRAKE SYSTEM

Your Lil’Buddy is equipped with hydraulic brake discs for a fast and safe stop-
ping action. Use both brakes simultaneously for an optimal and safe braking. 
The left brake lever has an effect on the front wheel brake, the right brake 
lever has an effect on the rear wheel brake.

The brake system is provided with a fully automated lining compensation. 
This offsets the wear of the brake pads, while the brake pressure point re-
mains equal.

The front wheel brake has a stronger delay effect than the rear 
wheel brake. Exercise the purposeful use of the front wheel brake, 
so that you become familiar with its force.

If you force too much the front wheel brake, a hazard of tipping over 
exists. Your rear wheel might lift and have you fall over the handlebar.
-> Pull a little less at the left brake lever, or fully release the brake 
lever, when you notice that the rear wheel is lifted. 

After braking, specially after long rides down the hill, the brake discs, 
brake calliper and quick release and axis nuts can become very hot.
-> Do not touch the brake discs after intense braking action.  You 
could burn yourself.

4.4. 

KICKSTAND

 
When manipulating your side stand, observe the following:

Riding with unfolded side stand may lead to falling. Moving the 
Pedelec backwards with an unfolded side stand may lead to the 
clamping of the stand onto the crank.
-> Fold in the stand before starting the ride. 

If you sit on the Pedelec while the sides stand is folded out, it may fail. 
-> Do not sit on the vehicle if the side stand is folded out.

OPERATION

ERGONOMIC SETTINGS

5. 

ERGONOMIC SETTINGS

5.1. 

BRAKE LEVER

You can adjust the brake lever position on the handlebar, along with the brake 
lever angle and lever width.

5.1.1. 

ADJUSTING BRAKE LEVER POSITION

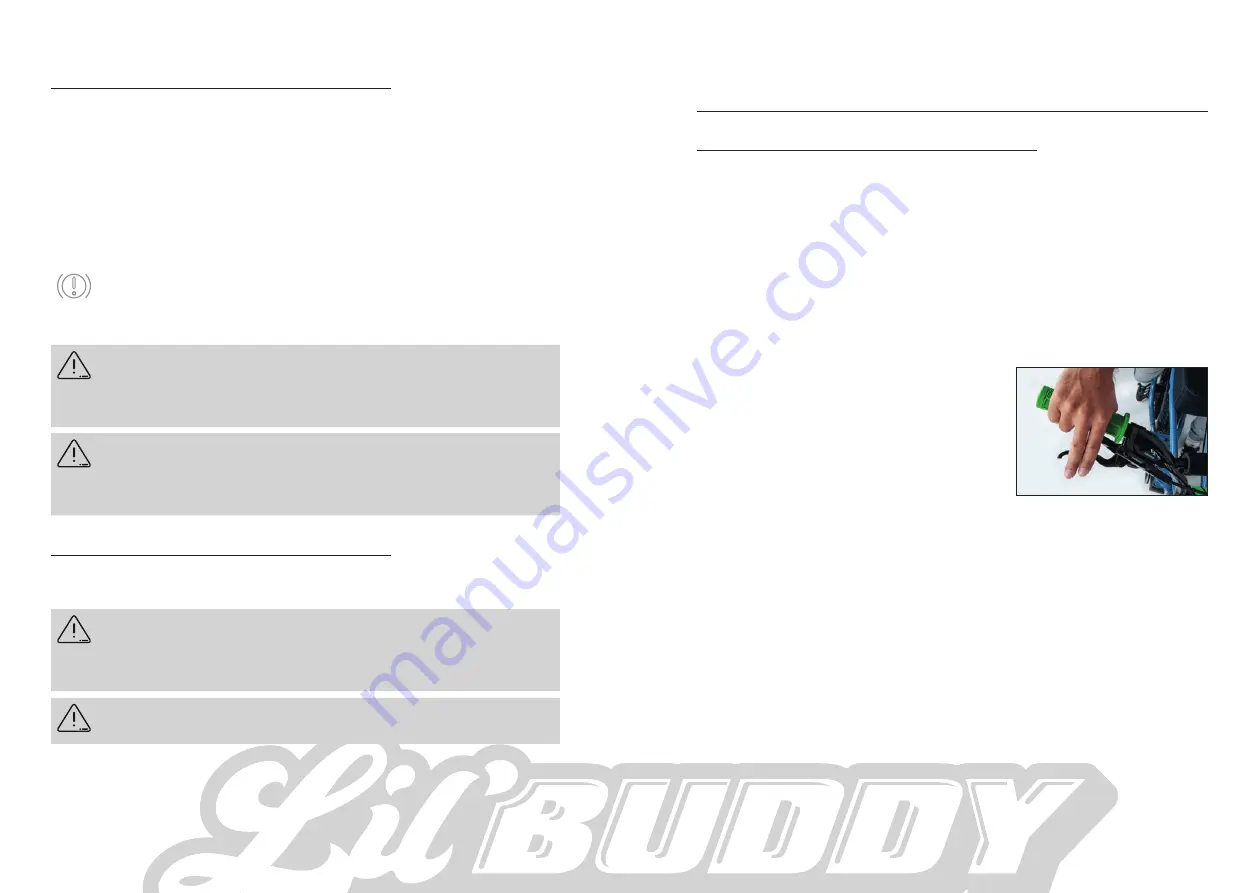
For a firm holding onto the handlebars when braking, take the brake lever by 
your index and middle finger.
To achieve this position, eventually move the lever sidewards, so that both 
fingers can grip the brake lever as shown in the picture.

You can move the brake grip on the handlebar, by loosening the hexagon 
socket screw on the handlebar clip. If required, 
first use an appropriate Allen wrench for the 
loosening and shifting of the Bosch operating 
unit or gear unit. 

Once you have found the correct position, 
tighten the grips just as much as to allow their 
rotation. 
In the next step, adjust the brake grip angle.

Summary of Contents for Lil'Buddy

Page 1: ...1 ORIGINAL OPERATING MANUAL ...

Page 2: ...s were provided with courtesy of HNF GmbH The mentioned brand names are subject to copyrights and are the property of their legitimate owners even without special indication Any reprint or copy even only in extracts is only permitted with our express written consent Subject to misprints errors and technical alterations Please note that the illustrated product may be different from the delivery con...

Page 3: ... 17 4 3 Brake system 18 4 4 Side stand 18 5 Ergonomic setting 19 5 1 Brake lever 19 5 1 1 Adjusting brake lever position 19 5 1 2 Brake grip angle 20 5 1 3 Adjusting brake lever distance 20 6 Maintenance 20 6 1 Wear parts list 21 6 2 Recommended maintenance intervals 22 CONTENTS 6 3 After an accident 22 6 4 Battery 23 6 5 Tires 23 6 6 Changing tires tubes 24 6 6 1 Dismounting the front wheel 24 6 ...

Page 4: ...atest importance1 to the technical quality of the single components of your Pedelec ensuring that you will enjoy your Lil Buddy for many years The Lil Buddy is a bicycle with electrical power assistance for the driver This aid is adjusted via a controller that evaluates the data through three sensors speed step rate and torque regulating the motor according to the selected support level When reach...

Page 5: ...um support speed will endanger your driving safety and con vert the vehicle from a Pedelec into a small motorcycle You will be exposed to sanctions in accordance with traffic licence and safety regulation with penal consequences Rotating parts such as wheels chain ring sprocket pedal crank or pedals may draw into clothing carried objects and even body parts e g your shawl or a bag attached to the ...

Page 6: ...rd of accident Lift the vehicle by the front frame so that it no longer touches the ground Turn the fork leftwards and rightwards The front wheel must follow the movement This simulated steering operation should not be difficult If the steering is not rotated easily the ahead bolt is tightened too fast 1 Loosen it by releasing the 2 screws 2 of the stem Now you can adjust the compression of the st...

Page 7: ... sure that the Bosch Motor is on By pressing the button for a few seconds front and backlight will be turned on To turn the lights off press the button for a long time Detailed information on the operation of the board computer is found under 4 1 1 Purion board computer 2 7 INITIAL ENGAGEMENT OF BRAKE DISCS Your brake system is delivered with a weak break function because the surfaces of the brake...

Page 8: ...t the higher the air pressure to be used If you are not a light weight person set the pressure of your rear tire at 1 5 bar We recommend to check the pressure every 2 4 weeks since there is an inevitable constant pressure loss of the inner tubes With a too low tire pressure a puncturing hazard exists snakebites This will result in a flat tire A tire that is damaged by tears or punctured by a sharp...

Page 9: ...The front shift lever A has two levels Release the gearshift lever after shifting so that the gearshift lever can automatically return to the starting position To go lower a gear on the sprocket press on the right side of the handlebar the front shift lever A until it snaps into place for the first time To lower down two gears on the sprocket press the front shift lever A on the right side of the ...

Page 10: ...ense braking action You could burn yourself 4 4 KICKSTAND When manipulating your side stand observe the following Riding with unfolded side stand may lead to falling Moving the Pedelec backwards with an unfolded side stand may lead to the clamping of the stand onto the crank Fold in the stand before starting the ride If you sit on the Pedelec while the sides stand is folded out it may fail Do not ...

Page 11: ...aintenance of your Pedelec If you do not know how to perform this task take your bike to a specialist for maintenance MAINTENANCE 1 A hazard of injury exists when the drive system is switched on during maintenance works You hands may get caught between the chain and chain ring during running operation Remove the battery before performing maintenance works This ensures that the drive systems out of...

Page 12: ... any parts if required 6 4 BATTERY The battery has a guaranteed service life of two years warranty term and 500 charging cycles with a remaining capacity of 60 after this period A charg ing cycle means a complete charge of the battery with one single charge or several partial charges e g two half charges A battery is a wear part as it ages over time or wear is accelerated rate by its use The batte...

Page 13: ...ont wheel is now slide out from the dropout of the fork Insert the transportation lock between the brake pads When the wheel is dismounted do not actuate the hydraulic brake discs Otherwise the calliper pistons may approach each other and touch Once you have dismounted the wheel slide some colored transpor tation locks between the brake pads MAINTENANCE 6 6 2 DISMOUNTING THE REAR WHEEL Change into...

Page 14: ...ot the case re open the quick release and retighten the nut With a too low initial tension of the quick release the wheel can come off during the ride A hazard of accident exists Always tighten the quick release firmly so that when lifting up the tension lever by its force it leaves an imprint on the palm of your hand MAINTENANCE 6 6 5 REAR WHEEL ASSEMBLY Remove the transportation lock between the...

Page 15: ... light cone is situated at a height equivalent to only half the distance between the ground and the centre of the lamp 1 67par 3 StVZO MAINTENANCE The inclination of the headlamp is set by releasing the screw connection on the lamp holder with an appropriate open end wrench and repositioning it according to a new inclination Tighten then the nut only to such extent allowing you to correct with a g...

Page 16: ... commercial transport or transport by third parties e g forward ing agent national regulations on packaging and identification must be met e g provisions of the ADR If required consult your specialist in hazardous materials for the correct preparation of the package 9 TECHNICAL DATA 9 1 COMPONENT LIST Chassis Frame Lil Buddy Unisex Fork Lil Buddy Double Down Crown Fork TRANSPORT Drive system Engin...

Page 17: ...ce of a manufacturing material or information fault The claimed damage was already existent at the time of the transfer The product was not altered due to wear or ageing The damages were not originated by any use other than the intended use Battery The battery has a remaining nominal capacity of less than 60 after a maximum of 500 charge cycles The warranty shall not include any wear parts as stat...

Page 18: ... and the national laws for the implementation of these directives Disposal of the Pedelec at the end of its service life should only be done through a public collection point Packaging materials shall be collected sep arately and directly disposed of according to local collection schemes Take the used battery to an E bike dealer or send it for disposal in the hazardous waste packaging to RUFF CYCL...

Page 19: ...RUFF CYCLES GmbH Im Gewerbepark D36 93059 Regensburg Germany info ruff cycles com www ruff cycles com 25111 2009 OMLB A5 EN ...

Reviews: