background image

14

1841488G

April 2022

-------------------------------  OR  ---------------------------------

2.00

CRITICAL

WELD AREA

2.00

MIN

2.00

MIN

8.25

MAX

2.00

CRITICAL

WELD AREA

8.25

MAX

8.25

MAX

8.25

MAX

2.00

CRITICAL

WELD AREA

2.00

CRITICAL

WELD AREA

2.00

MIN

2.00

MIN

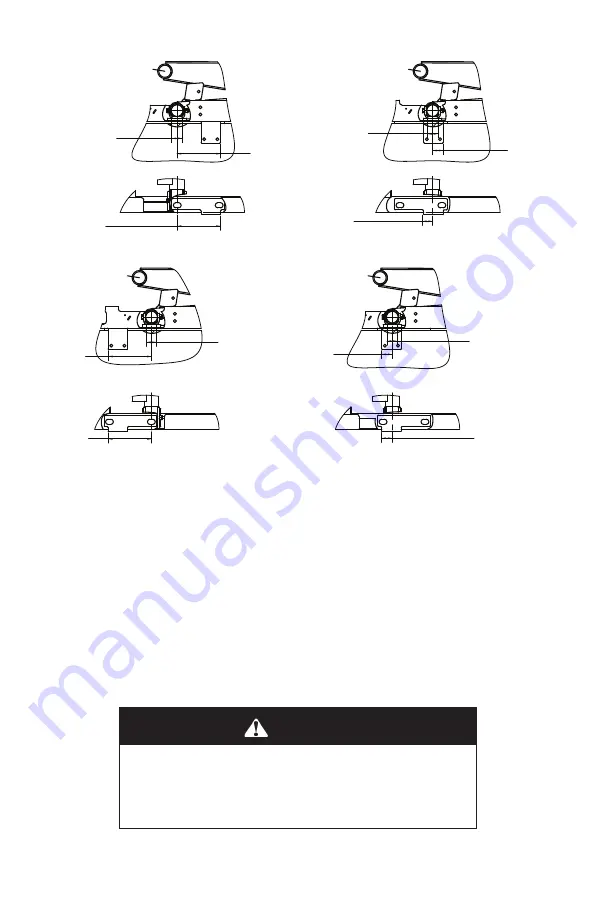
Figure 7:  

 Mounting Angle Location

2.   Locate the ideal mounting angle location along the chassis frame 

while keeping within the guidelines shown in Figure 7. Ensure the 
weld from the sub-frame to the mounting angle will be positioned 
directly below the saddle tube.

NOTE:

 Optional 10 gauge rivet spacers may be positioned under the 

mounting angle and the rear hinge angle to clear rivets on the truck 
frame.

 DANGER

Welding, oxy-fuel cutting, or grinding sparks can cause 
fuel to ignite which in turn can lead to injury or death. 
Always take adequate steps to avoid ignition of fuel 
tanks during equipment installation.

Summary of Contents for 1841488

Page 1: ...anual should be kept readily accessible for any potential operator at all times Contact your dealer or a Rugby Manufactur ing customer service representative at 800 869 9162 or www rugbymfg com with any questions or concerns INSTALLATION AND OPERATION MANUAL SR SERIES HOIST 1841488 Serial Number __________________________________________ In Service Date _________________________________________ ...

Page 2: ...7 Torque Chart 9 Section 3 Installation 10 Body Prop Installation 10 Hoist and Sub frame Assembly 11 Hoist and Sub frame Installation 13 Section 4 Decal Locations 20 Section 5 Operation 21 Raising the Prop Body 21 Lowering the Prop Body 21 Section 6 Maintenance 21 Section 7 Exploded Views 22 4016B Model 22 4020 Model 24 5020 Model 26 ...

Page 3: ...ure to follow this instruction can result in death or serious injury CAUTION Indicates a hazardous situation or unsafe practice which if not avoided could result in injury or component damage In all cases Rugby products are sold with the understanding that the pur chaser agrees to thoroughly train all operating and maintenance person nel in the correct and safe installation and operation of hoist ...

Page 4: ...ur ing Co components Incompatible hydraulic components may cause failure of the hoist which in turn could damage the vehicle damage other property and cause death or injury If hydraulic components are substituted it is the installer s responsibility to be sure they are compatible with the components supplied by Rugby Manufacturing Co Incompatible hydraulic components may cause failure of the hoist...

Page 5: ...sure psi or flow gpm than is recommended This may result in component failure injury or death DANGER Never operate the hoist until bystanders are free clear of the hoist and body This may result in injury or death DANGER Never exceed the gross vehicle weight GVW or gross axle weight GAW rating of your vehicle This may result in component damage injury or death CAUTION Unlatch tailgate prior to ele...

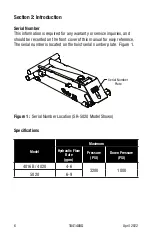
Page 6: ...should be recorded on the front cover of this manual for easy reference The serial number is located on the hoist serial number plate Figure 1 Serial Number Plate Figure 1 Serial Number Location SR 5020 Model Shown Specifications Model Maximum Hydraulic Flow Rate gpm Pressure PSI Down Pressure PSI 4016B 4020 4 6 3200 1000 5020 6 9 ...

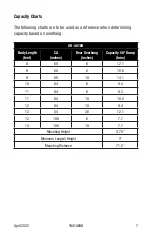
Page 7: ... capacity based on overhang SR 4016B Body Length feet CA inches Rear Overhang inches Capacity 50ӿ Dump tons 8 60 6 12 1 9 60 6 10 6 9 60 18 14 1 10 84 6 9 4 11 84 6 8 5 11 84 18 10 5 12 84 18 9 4 12 84 30 12 1 12 108 6 7 7 14 108 18 7 7 Mounting Height 9 75 Minimum Longsill Height 5 Mounting Distance 71 5 ...

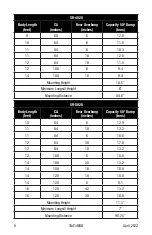
Page 8: ... 4 Mounting Height 10 5 Minimum Longsill Height 6 Mounting Distance 84 6 SR 5020 Body Length feet CA inches Rear Overhang inches Capacity 50ӿ Dump tons 10 84 6 12 9 11 84 18 13 2 11 84 6 10 8 12 84 30 17 0 12 84 18 13 2 12 108 6 10 8 14 108 30 13 2 14 108 18 10 8 14 120 18 10 8 14 120 6 9 1 16 120 42 13 2 16 120 30 10 8 Mounting Height 11 3 Minimum Longsill Height 7 Mounting Distance 90 25 ...

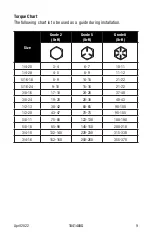
Page 9: ... ft Grade 8 lb ft 1 4 20 3 4 6 7 10 11 1 4 28 4 5 8 9 11 12 5 16 18 8 9 14 15 21 22 5 16 24 9 10 15 16 21 22 3 8 16 17 18 24 26 37 40 3 8 24 19 20 28 30 40 43 1 2 13 38 42 60 65 90 100 1 2 20 43 47 70 75 95 105 5 8 11 75 80 122 130 180 190 5 8 18 85 90 145 150 200 210 3 4 10 132 140 220 230 315 330 3 4 16 152 160 250 260 355 370 ...

Page 10: ...every SR series hoist package For instructions on how to raise and lower the body prop refer to the Operation section of this manual on page 21 Bracket Holder Figure 2 Body Prop Installation Location 1 Insert the body prop into the body prop bracket Figure 2 2 Fasten the body prop to the body prop bracket using the supplied hardware 3 Lower the body prop to the down position and align with slot un...

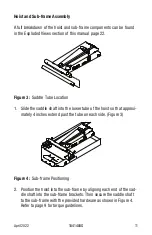
Page 11: ...1 Slide the saddle shaft into the lower tube of the hoist so that approxi mately 4 inches extend past the tube on each side Figure 3 Figure 4 Sub frame Positioning 2 Position the hoist into the sub frame by aligning each end of the sad dle shaft into the sub frame brackets Then secure the saddle shaft to the sub frame with the provided hardware as shown in Figure 4 Refer to page 9 for torque guide...

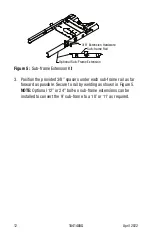
Page 12: ... Figure 5 Sub frame Extension Kit 3 Position the provided 3 8 spacers under each sub frame rail as far forward as possible Secure to rail by welding as shown in Figure 5 NOTE Optional 12 or 24 bolt on sub frame extensions can be installed to convert the 9 sub frame to a 10 or 11 as required ...

Page 13: ...ge Axle to Rear Hinge AH Application 34 Standard 46 Ford with rear fuel tank 49 Chevrolet and Dodge with rear fuel tank Approximate dimensions Figure 6 Hoist Position 1 Position the assembled hoist and sub frame onto the truck frame us ing the application chart shown in Figure 6 ...

Page 14: ...keeping within the guidelines shown in Figure 7 Ensure the weld from the sub frame to the mounting angle will be positioned directly below the saddle tube NOTE Optional 10 gauge rivet spacers may be positioned under the mounting angle and the rear hinge angle to clear rivets on the truck frame DANGER Welding oxy fuel cutting or grinding sparks can cause fuel to ignite which in turn can lead to inj...

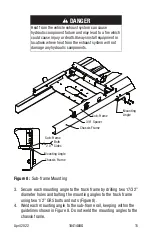
Page 15: ...mponents Sub Frame Chassis Frame 3 8 Spacer Mounting Angle Mounting Angle Chassis Frame Sub Frame 2 0 Both Sides Figure 8 Sub frame Mounting 3 Secure each mounting angle to the truck frame by drilling two 17 32 diameter holes and bolting the mounting angles to the truck frame using two 1 2 GR5 bolts and nuts Figure 8 4 Weld each mounting angle to the sub frame rail keeping within the guidelines sh...

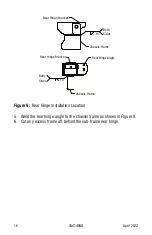
Page 16: ...Both Sides Both Sides Rear Hinge Bracket 18 Rear Hinge Angle Rear Hinge Bracket 18 Figure 9 Rear Hinge Installation Location 5 Weld the rear hinge angle to the chassis frame as shown in Figure 9 6 Cut any excess frame off behind the sub frame rear hinge ...

Page 17: ... Locations Figure 10 Lift Shaft Installation 7 Slide a lock collar onto each lifting shaft and then slide the shafts into each end of the upper hoist tube Figure 10 8 Install a body guide plate onto each sub frame rail using a set of bolt holes provided Fasten guides using the supplied hardware Figure 10 ...

Page 18: ...on the rear hinge brackets against the bottom side of the long beams Once in position weld the rear hinge brackets to the body long beams as shown in Figure 11 10 Slide each lift bracket against the inside of the long beam channel Then weld the lift bracket to the outside of the long beam Figure 11 11 With the lift bracket secured slide the lock collars against the hoist lifting tube and lock them...

Page 19: ...19 1841488G April 2022 Grease Locations Grease Locations Figure 12 Grease Fitting Locations 12 Install and grease the fittings as shown in Figure 12 ...

Page 20: ... decals must be positioned as shown in Figure 13 on both the left and right hand sides of the truck The chosen decal location should be free of any viewing obstructions Body Prop Decal Location Area Figure 13 Body Prop Decal Location Two Danger decals are supplied with each SR series hoist These decals must be positioned as shown in Figure 14 on both the left and right hand sides of the truck The ...

Page 21: ... Rotate the prop upwards to the vertical position 3 While positioning yourself as far as possible from underneath the truck grasp the prop from the latched position 4 Lower the unloaded body to the sufficient height and shut off all power Section 6 Maintenance Every 100 cycles or every two months whichever comes first Grease all hoist and rear hinge grease fittings Some grease fittings are in hard...

Page 22: ...22 1841488G April 2022 Section 7 Exploded Views 4016B Model 17 16 15 4 14 13 3 23 22 5 6 2 4 18 7 8 12 9 10 11 21 20 19 1 ...

Page 23: ...al No Plate Poly w Mask 1 9 1313141 Decal Rugby Logo Medium 1 10 1313146 Decal Made In USA 1 11 1841516 Decal SR 4016 Model 1 12 1839407 Prop Body PCBLK 1 13 1898583 Shaft Saddle Pivot 1 14 1653835 HHC Screw 1 2 13 X 4 GR5 PLT 2 15 1831125 Plate Bolt On PCBLK Body Guide 2 16 1577459 Bolt 1 2 13 X 1 1 2 FLG GR5 4 17 1576016 Nut 1 2 13 Flange GR5 STL PLT 4 18 2192034 Sub Frame 09 SR 4016B PCBLK 1 19...

Page 24: ...24 1841488G April 2022 SR4020 Model 6 7 8 1 9 10 2 19 15 14 13 21 20 22 23 17 16 12 3 4 5 18 11 ...

Page 25: ...0 1643070 Nut 5 8 11 Nylock NE GR5 STL 1 11 1520370 Fitting 1 4 28 Thread Forming Grease 7 12 1581116 Serial No Plate Poly w Mask 1 13 1822332 Shaft Saddle Pivot 1 14 1653835 HHC Screw 1 2 13 X 4 GR5 PLT 2 15 1642984 Nut 1 2 13 Nylock NE GR8 STL 6 16 1822291 Plate Sub frame Body Guide 2 17 1577459 Bolt 1 2 13 X 1 1 2 FLG GR5 2 18 1857937 Pin 1 2 x 2 75 ZP Clevis 1 19 1654458 HHC Screw 1 2 13 UNC 2...

Page 26: ...26 1841488G April 2022 SR5020 Model 3 4 2 6 7 1 16 17 15 5 21 10 12 13 14 11 22 9 18 19 20 8 23 24 25 ...

Page 27: ...53835 HHC Screw 1 2 13 X 4 GR5 PLT 2 11 1642984 Nut 1 2 13 Nylock NE GR8 STL 2 12 1839407 Prop Body PCBLK 1 13 1857937 Pin 1 2 X 2 75 ZP Clevis 1 14 1653917 Pin 1 8 X 1 Cotter 1 15 1822289 Bracket SR Lift 2 16 1656191 Collar 2 25 Lock 2 17 1653845 Set Screw 3 8 16 X 5 8 SQR HD BLK 2 18 1831125 Plate Bolt On PCBLK Body Guide 2 19 1577459 Bolt 1 2 13 X 1 1 2 FLG GR5 4 20 1576016 Nut 1 2 13 Flange GR...

Page 28: ...mfg com Application Policy Capacity ratings features and specifications vary depending upon the model and type of service Application approvals must be obtained from Rugby Mfg Co contact your representative for application approval We reserve the right to change or modify our product specifications configurations or dimensions at any time without notice Quality ISO 9001 ...

Reviews: