background image

Hardware Installation and Reference Guide 


Product Installation 


2) 

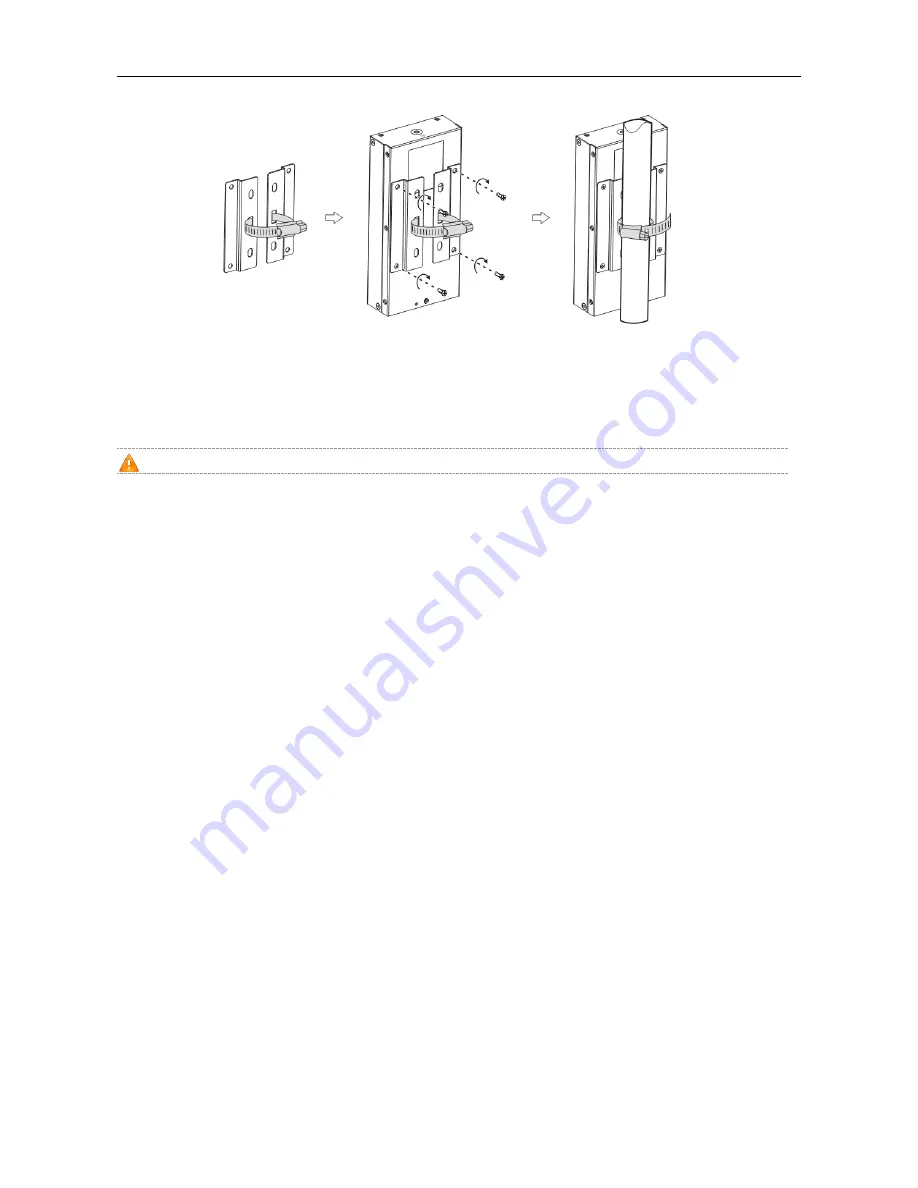
The following steps are the same as step 3)-7) for wall mounting.   

3.4  Installation Verification 


To avoid device damage or body injury, please ensure power is turned off before verifying the installation. 


Verify that the grounding cable has been connected. 


Verify that the cables have been properly connected. 


Verify that sufficient space has been left for air circulation. 

3.5  Cautions during Construction 

1.  To avoid delay in the engineering progress, unpredictable problems during construction should be reported to the 

engineering unit in good time, and solutions need to be provided to the unit for on-spot resolution.   

2.  Flaws in the engineering scheme observed during construction should be negotiated with the engineering unit in 

time and settled properly. 

3.  To guarantee quality, construction in some sites or sections should be checked before acceptance in a phase-wise 

and timely manner. 

4.  Make sure that power is off when installing or removing the power adapter or connecting cables to it. In the case of 

the RG-PBOX, it means to disconnect the input cable.   

5.  If the RG-PBOX produces smoke, stink or noise, please remove the input cable immediately and contact the 

distributor or service center. 

6.  When the RG-PBOX does not work, please contact the distributor or service center. Do not disassemble or modify 

the device in any way. (Ruijie assumes no responsibility for problems caused by unauthorized modification or 

repair.) 


Summary of Contents for RG-PBOX Series

Page 1: ...RG PBOX Series Power Adapter Hardware Installation and Reference Guide V1 01 ...

Page 2: ... or by any means without the prior written consent of Ruijie Networks is prohibited Exemption Statement This document is provided as is The contents of this document are subject to change without any notice Please obtain the latest information through the Ruijie Networks website Ruijie Networks endeavors to ensure content accuracy and will not shoulder any responsibility for losses and damages cau...

Page 3: ...jie Networks Website http www ruijienetworks com Service Email service_rj ruijienetworks com Technical Support http www ruijienetworks com service aspx Technical Support Hotline 86 4008 111 000 Related Documents Documents Description Configuration Guide Describes network protocols and related mechanisms that supported by the product with configuration examples Command Reference Describes the relat...

Page 4: ...odel RG PBOX DC12 Power Input voltage range 43 57V DC Output voltage 12VDC Rated current 5A Rated output power 60W Power Consumption 12 5W max Operating Temperature 20º C 50º C Storage Temperature 40º C 70º C Operating Humidity 10 90 RH non condensing Storage Humidity 10 90 RH non condensing Fan Fanless Temperature Alarm Not supported IP Rating IP40 EMI Standards GB 9254 2008 FCC Part 15 CISPR EN5...

Page 5: ...et ports and one 12V DC power port Figure 1 1 Appearance of RG PBOX DC12 Power Adapter Front Panel Figure 1 2 Front Panel of RG PBOX DC12 Power Adapter Note 12V DC Power Output port 12V DC Power Output indicator PoE Power In indicator Data Output port Power and Data Input port PoE Back Panel Figure 1 3 Back Panel of RG PBOX DC12 Power Adapter ...

Page 6: ...e with sufficient space 10cm at least for air circulation LED LED Identification on the panel Status Meaning Status LED Power in Off Abnormal PoE or no power supply Solid green Normal PoE detection Power out Off Abnormal 12VDC output or no power supply Solid green Normal 12VDC output 1 2 RG PBOX AC24 Specifications Model RG PBOX AC24 Power Input voltage range 43 57V DC Output voltage 24VAC Rated c...

Page 7: ...discharge 15kV IEC EN 61000 4 4 EFT communication line 1kV IEC EN 61000 4 5 Surge power cord cord cord 1kV power cord cord ground 2kV data cable cable ground 6kV GB4943 2011 Dimensions WxDxH 187 mm x 89 mm x 36 5 mm Weight 0 72 kg Product Appearance The RG PBOX AC24 power adapter provides two 10M 100M 1000M Ethernet ports and one 24V AC power port Figure 1 4 Appearance of RG PBOX AC24 Power Adapte...

Page 8: ...r Data Output port Power and Data Input port PoE Back Panel Figure 1 6 Back Panel of RG PBOX AC24 Power Adapter Note Grounding connector screw hole Power Supply The RG PBOX AC24 power adapter adopts PoE power supply input Input voltage range 43 57V DC Output voltage 24VAC Rated current 2 5A Rated output power 60W Heat Dissipation System ...

Page 9: ... ventilation the chassis should be mounted in a place with sufficient space 10cm at least for air circulation LED LED Identification on the panel Status Meaning status LED Power in Off Abnormal PoE or no power supply Solid green Normal PoE detection Power out Off Abnormal 24VAC output or no power supply Solid green Normal 24VAC output ...

Page 10: ...wer and disconnect all cables before removing the chassis 2 1 2 Safety Precautions for Removal Avoid moving the equipment frequently Turn off all power supplies and unplug all power cables before you remove the equipment Keep balance when moving the equipment and avoid injuring your leg and feet or spraining your waist 2 1 3 Electrical Safety Please observe local regulations and specifications whe...

Page 11: ...least for air circulation 2 2 2 Temperature and Humidity Requirements To ensure the normal operation and a prolonged useful life of the RG PBOX you must maintain an appropriate temperature and humidity in the equipment room Too high or low temperature or humidity for a long period of time may damage the equipment In an environment with high relative humidity the insulating material may have bad in...

Page 12: ...ment when the interference exceeds a certain limit Various interference sources from outside the system affect the working power adapter in the conductive ways such as capacitive coupling inductive coupling electromagnetic radiation common inpedance including the grounding system coupling and cables including the power signal and output cables Keep the equipment away from high power radio transmit...

Page 13: ...n between the source and the sensitive component along the cable the interference conducts from one unit to another Conducted interference often affects the power supply of the equipment but can be controlled by a filter Radiated interference may affect any signal path in the equipment and is difficult to shield Effective measures should be taken for the power system to prevent the interference fr...

Page 14: ...llation Procedure 3 2 Installation Verification Verify the following before installation The installation location is of a good air flow The installation location meets the temperature and humidity requirements of the equipment The related network cables have already been deployed at the installation location The selected power supply meets the system power 3 3 Installing RG PBOX Series Power Adap...

Page 15: ...s should be mounted in a place with sufficient space 10cm at least for air circulation Don t pile power adapters Avoid direct sunlight Keep the device away from high power radio transmitter radar transmitting station and high frequency large current device Measures must be taken to isolate static electricity For example use a shielded cable as the interface cable 3 3 1 Wall Mounting 1 Take out the...

Page 16: ...mended cable diameter is 18AWG Connect one end of the power cable to the power adapter and the other end to a terminal device such as a camera When installing a RG PBOX DC12 ensure that the positive end of the power adapter is connected to the positive end of the terminal device and that the negative end of the power adapter is connected to the negative end of the terminal device Fasten the screws...

Page 17: ...nect the uplink connected to any HPoE port network cable to the Data Power in port of the power adapter Figure 3 6 Connect Power Cable 2 Connect network cable 2 6 Install the anti loose bracket of the RJ45 connectors Only for cables without protective covers Install the anti loose bracket in the way as shown in the following figure and fix it with screws Figure 3 7 Installing the Anti loose Bracke...

Page 18: ...g screws and ensure proper grounding of the other end Figure 3 8 Connecting the Grounding Cable 3 3 2 Pole Mounting for V1 XX Products 1 Insert a hose clamp to the holes on the mounting brackets attach the mounting brackets to the power adapter using screws mount the mounting brackets to the pole and tighten the screw of the hose clamp using a socket wrench as shown in the following figures ...

Page 19: ...ded to the unit for on spot resolution 2 Flaws in the engineering scheme observed during construction should be negotiated with the engineering unit in time and settled properly 3 To guarantee quality construction in some sites or sections should be checked before acceptance in a phase wise and timely manner 4 Make sure that power is off when installing or removing the power adapter or connecting ...

Reviews: