


3
THE INSTRUCTIONS TABLE OF CONTENTS
-
The “Instructions for Use” leaflet;
-
“Safety Rules”;
-
Diagram showing individual elements of the machine.
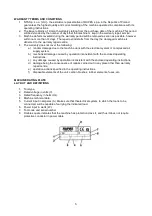
MACHINE COMPONENTS
1. Rating plate
2. Handle of power switch ON/OFF
3. Speed control knob
4. Working disk blocking button
5. Dust extraction rate adjustment ring
6. Dust extraction stub pipe, diameter 29mm
7. Velcro-fastened working disk, diameter 150mm
8. Motor ventilation gaps
INSTRUCTIONS FOR SAFETY AND ACCIDENT PREVENTION DURING WORK
Besides the rules discussed in the “Safety Instructions” leaflet, perform the following:
-
pull out the power supply plug from the mains socket before performing any service operations;
-
grip the machine firmly and keep it over the worked surface before switching on;
-
always use the machine with the heat shield fitted in place;
-
correctly fasten the abrasive paper;
-
connect the machine to an adapted and efficient dust extraction system.
WORKING DISK FITTING
1. Press blocking button (4);
2. Manually screw down the working disk - keep the blocking button pressed while doing this;
3. Proceed in the reverse order during disassembly.
FASTENING OF DISKS MADE OF ABRASIVE MATERIAL
Fix the disk of Velcro-fastened abrasive material, pressing it against the working disk.
Make sure that the holes in the abrasive material coincide with the dust extraction holes in the working disk.
BEFORE STARTING-UP
Make sure that:
-
the power source complies with the rated parameters of the machine;
-
the power cable and plug are in ideal condition;
-
the power switch works correctly (check with power cable plug removed from the socket);
-
all machine parts are installed properly and don’t show any damage;
-
ventilation gaps are not clogged;
-
the machine is connected to an appropriate and efficient dust extraction system.
START-UP
Switching on and off
-
Switching on: move switch (2) slide it forward and block it.
-
Switching off: release the slide or, if it has been blocked, press its rear part and wait until it returns to
OFF position.


