


7
WARNING: Never modify any parts of the power tool.
Damage or personal injury could result.
ASSEMBLING THE POLISHING MOP
Press the polishing mop to attach it to the back-up pad.
WARNING: To reduce the risk of injury, use only acces-
sories rated at least equal to the maximum speed mar-
ked on the tool.
BEFORE STARTING THE POLISHER
Ensure that:
• the power supply conforms with the characteristics of the
tool (see tab “Minimum Gauge for Cord Sets”);
• the power supply cable and plug are in perfect condition;
• the ON/OFF switch works properly though with the power
supply disconnected;
• all the parts of the tool have been assembled in the proper
manner and that there are no signs of damage;
• the ventilation slots are not obstructed.
FAILURE TO START
Should your tool fail to start, check to make sure the prongs
on
the cord plug are making good contact in the outlet. Also,
check
for blown fuses or open circuit breakers in the line.
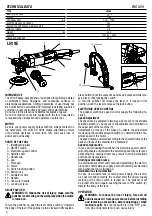
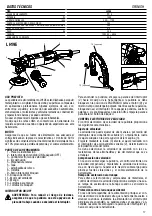
TOOL ASSEMBLY
Position the cap (6) on the gearbox such that the holes for mounting
the screws (5) are aligned with those on the gearbox (8).
Screw the side handle (5). Side handle may be positioned to
the right or to the left of the equipment.
Optional: position the handle (12) on the gearbox such that
holes for mounting the scews (13) are aligned with those on the
gearbox (14). Screw the handle (12).
ASSEMBLY / DISASSEMBLY OF ACCESSORIES
ASSEMBLY
PLATE PAD HOLDER
Screw plate pad holder (7) over spindle shaft (4) while
preventing it from moving or stop movement by enabling lock
button (10).
PAD
Apply pressure on polishing pad to join pad to plate.
DISASSEMBLY
PLATE PAD HOLDER
- Lock the spindle by pressing button (10), while at the same
time rotating the pad until it locks position.
- dismount the pad.
Never press the button to lock the pad or pas until the
tool has stopped moving and is perfectly stationary;
the gear box or the push button pin could be broken
and the guarantee would be invalidated.
- PAD
Tear off the worn pad and fit the new pad (see ASSEMBLY)
WARNING: To reduce the risk of injury, use only
accessories rated at least equal to the maximum
speed marked on the tool.
Press the polishing mop to attach it to the back-up pad.
MAINTENANCE
Maintenance and cleaning of the inner parts, like brushes, ball
bearings, gears etc. or others, must be carried out only by an
authorized customer service workshop.
WARNING: To reduce the risk of injury, turn unit off
and disconnect it from power source before installing
and removing accessories, before adjusting or when
making repairs. Be sure the switch is in the “OFF”
position. An accidental start-up can cause injury.
CLEANING
WARNING: Blow dirt and dust out of all air vents with
clean, dry air at least once a week.
To minimize the risk of eye injury, always wear ANSI
Z87.1 approved eye protection when performing this.
WARNING: Never use solvents or other harsh chemicals
for cleaning the non-metallic parts of the tool. These
chemicals may weaken the plastic materials used in
these parts. Use a cloth dampened only with water and
mild soap. Never let any liquid get inside the tool; never
immerse any part of the tool into a liquid.
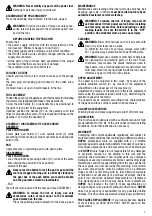
SPEED ADJUSTMENT
The speed can be adjusted in two ways: by means of the
variable actuation switch (2), by means of the adjustment
wheel fitted on the upper part of the machine (3)
Adjustment by means of the wheel (3) affects the adjustment
made using the variable actuation switch (2), determining the
maximum speed of the motor.
The speed must be selected according to the characteristics
of the pads and those of the material to be machined.
ALLOWED ACCESSORIES
Polishing foam and foam support pad up to Ø 200 mm max.
LUBRICATION
This tool has been lubricated with a sufficient amount of high
grade lubricant for the life of the unit under normal operating
conditions. No further lubrication is necessary.
WARRANTY
Complying with current applicable regulations and subject to
more favorable conditions that could apply in different countries,
RUPES professional tools are supplied with a 12 months
warranty against manufacturing defects from date of purchase.
Only Rupes original parts and accessories must be employed
with RUPES tools. Rupes is not responsible for any damages
or accidents caused by not abiding to this rule and the
warranty shall terminate if non-original parts are employed.
Damages caused by natural wear and tear, overloading, faulty
maintenance and tool usage differing from the one specified in
the user guide, are not covered by this warranty. A tool which
has been proven faulty must be delivered to an authorized
Rupes service center along with its fully filled out warranty
certification and document of purchase. Warranty shall be
void if tool should be delivered disassembled or tampered.
This warranty does not in any way imply tool’s replacement.
RUPES SpA reserves the right to make specifications or
design changes to its products without further notice. RUPES
does not accept any responsibility for any possible printing
mistake. This document supersedes all previously printed one.
FREE LABEL REPLACEMENT: If your labels become illegible
or are missing, cal 0039 02 94 694 1 RUPES spa for a free
replacement.
Summary of Contents for LH19E
Page 2: ......


