
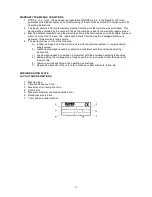


3
THE INSTRUCTIONS TABLE OF CONTENTS
-
The “Instructions for Use” leaflet;
-
“Safety Rules”;
-
Diagram showing individual elements of the machine.
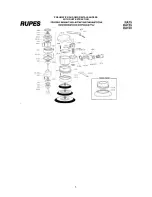
MACHINE COMPONENTS
1. Rating plate
2. Handle of power switch ON/OFF, which controls the compressed air valve
3. Speed control
4. Machine body
5. Velcro-fastened working plate
6. Compressed air inlet with ¼” thread
7. Caoutchouc shield
8. Rotating dust extraction stub pipe
9. Spanner
INSTRUCTIONS FOR SAFETY AND ACCIDENT PREVENTION DURING WORK
Besides the rules discussed in the “Safety Instructions” leaflet, perform the following:
-
cut off the compressed air to the machine supply before performing any service operations;
-
grip the machine firmly and keep it over the worked surface before switching on;
-
assemble the machine correctly, and place the abrasive material as required.
MACHINE ASSEMBLY
-
Install a compressed air coupling (not delivered), screwing it down in the place intended for this
purpose (6).
WORKING DISK REMOVAL AND FITTING
-
Insert spanner (9) and screw down plate (5) by hand, without moving the spanner;
-
While removing the disk insert spanner (9) and unscrew plate (5), without moving the spanner.
FASTENING OF DISKS MADE OF ABRASIVE MATERIAL
Fix the disk of Velcro-fastened abrasive material, pressing it against the working disk. Make sure that the
holes in the abrasive material coincide with the dust extraction holes in the working disk.
COMPRESSED AIR INLET COUPLING
The machine is not equipped with a compressed air supply coupling. The user is free to choose quick
connections and other appropriate couplings provided that they possess an air flow hole, diameter 8 mm.
In the case of a permanent connection, fix the compressed air hose to the coupling using a band clip.
BEFORE STARTING-UP
Make sure that:
-
the speed control (3) is set in MAX position;
-
the compressed air coupling and hose are in good condition;
-
the power switch and speed control work correctly with the power supply cut off;
-
all machine elements are installed properly and don’t show any damage.
START-UP
Switching on and off
-
Switching on: press control handle (2) against the machine body and hold it in this position.
-
Switching off: release the control handle.


