EN
9
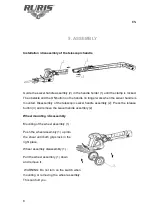
Battery mounting / disassembly.
Always release the On / Off switch before inserting or removing the battery. To detach
the battery, remove it from the instrument as you press the spring buttons on both sides
of the cartridge.
To insert the battery, align it on the battery cartridge with the groove in the housing and
slide it into position. Always insert it until it looks with a small click. Otherwise, it may fall
off the machine during use. Do not force when inserting the battery. If the cartridge does
not slip easily, it is not inserted correctly.
Connect the adapter feed plug (1) to a plug and adapter plug
(9) to the plug (4) at the charging station (3). At this time,
the battery charge control indicator (6) is on. Then insert the
battery into the charging station. The battery charge control
indicator indicates the progress of the charge. The indicator
illuminates red during charging. The battery is fully charged
when the indicator is green. Disconnect the charger from
the mains when not in use for longer periods.
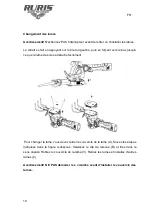
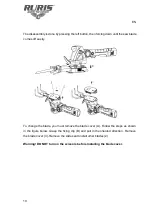
Changing blades
Warning!
DO NOT operate the switch before removing or mounting the slides.
Summary of Contents for F455
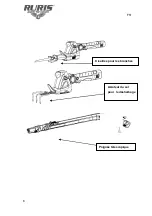
Page 1: ...RO FOARFECA ELECTRICĂ MULTIFUNCȚIONALĂ RURIS F455 ...
Page 6: ...RO 6 Foarfecă de crengi Aerator sol pentru combaterea buruienilor Mâner telescopic ...
Page 16: ...HU RURIS F455 MULTIFUNCIONÁLIS ELEKTROMOS NYÍRÓOLLÓ ...
Page 21: ...HU 6 Talajszellőztető gyomirtáshoz Teleszkópos fogantyú Ágvágó olló ...
Page 27: ...FR CISAILLES ELECTRIQUES MULTIFONCTIONS RURIS F455 ...
Page 32: ...FR 6 Aérateur du sol pour le désherbage Poignée télescopique Cisailles pour les branches ...
Page 38: ...EN MULTIFUNCTIONAL ELECTRIC VERY RURIS F455 ...
Page 49: ...BG ЕЛЕКТРИЧЕСКА МУЛТИФУНКЦИОНАЛНА НОЖИЦА RURIS F455 ...
Page 60: ...SRB Multifunkcionalna ELEKRIČNA ŠKARA RURIS F455 ...

