5
BEFORE FIRST USE
•
Carefully remove all contents from the box.
•
Take extreme care when unpacking and handling the sharp blades.
•
As some parts may be packed separately, check to ensure all items have been unpacked
before disposing of the packaging.
•
Dismantle and clean all parts as instructed in the "CARE AND CLEANING" section of this
manual.
THE LIGHT RING
Your Colour Control Multi Processor has been designed with the optimal number of speeds and
has been created to simplify use - each speed corresponds to a specific type of use.
This is displayed in a unique way with a “light ring” that illuminates and changes colour
according to the speed.
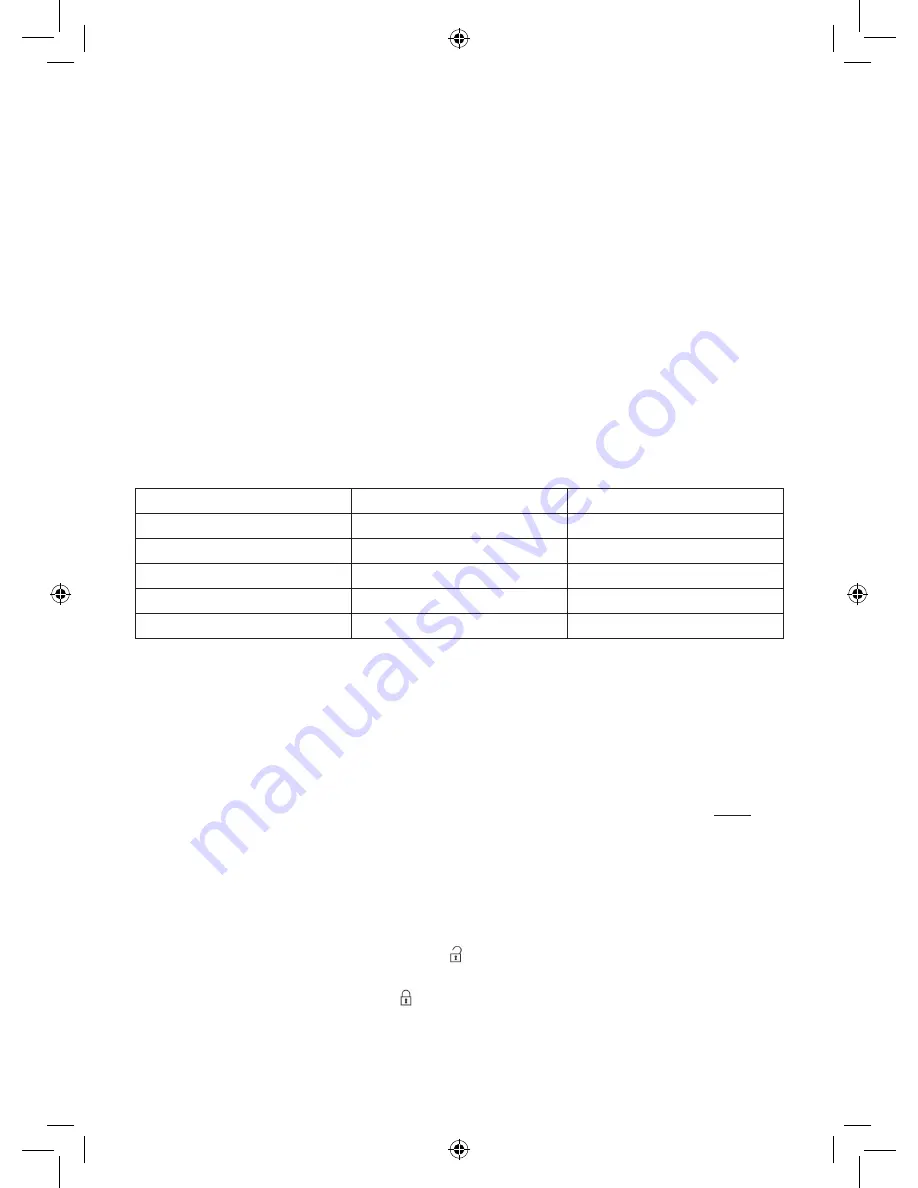
The light will change colour as the speed changes:
SPEED
COLOUR
USE
O
~
Off
1
Blue
Slicing/ shredding/ grating
2
Purple
Dough/ cakes/ cream
3
Green
Blending/ other
P
Red
Chopping/ smaller batches
Turning the speed control anti-clockwise to P will give you a short burst at high speed, for more
precise control. In this direction, the control is spring-loaded. When you let go, it will return to O.
NOTE: See section Speed Selection Guide on page 13 for more information on what
speed to uses for different tasks.
IMPORTANT ASSEMBLY INFORMATION
Due to the safety interlock features present in this food processor, the following parts
must
be
in position in order for the food processor to operate:
THE PROCESSOR BOWL MUST BE LOCKED INTO POSITION ON THE MOTOR UNIT
1. Fit the black spindle to the top of the motor unit so the notches are aligned.
2. Lower the processor bowl over the black spindle with the handle on the right, aligning
on the bottom of the processor bowl with on rim of the motor unit.
3. Ensure the processor bowl is seated correctly, hold the handle and rotate clockwise to
align
on the processor bowl with on the motor unit until it clicks firmly into place.
4. This must be correctly completed before moving to the next step.


