background image

5

REHEATING TOAST

Note: 

You must only reheat plain, “unbuttered” toast.

•  Place the bread into the slot, lower the bread carriage lever, then press the 

Reheat

   button

•   The light will come on and the toasting time will be altered automatically to give a short burst
 

of heat to reheat the toast.

HINTS AND TIPS

•  When toasting more than one slice of bread, use slices of similar size, thickness and 

freshness.

•   Old or thin bread will cook faster than fresh or thick bread, so use a lower setting.
•   Do not use torn, curled up, or misshapen slices of bread, as these may jam the ejection 

mechanism and could catch fire.

•   Sweet bread products (fruit loaf, etc.) brown much quicker than ordinary bread, so they 

should be toasted on a lighter setting.

•   Should the bread carriage become jammed during the toasting cycle, do not attempt
 

to release it. Unplug the toaster and allow it to cool down before carefully removing the 
bread.

•   Do not use a knife, fork or similar sharp instrument as these may damage the elements and 

present a danger of electric shock.

CRUMBS

Crumbs will collect in the base of the toaster. Letting them build up can cause a fire hazard 
so it is important to remove them frequently.

•  Switch off the power and remove the plug from the wall power outlet.
•   Open crumb tray door, located on the underside of the toaster by pulling the tray in the 

direction of the marked arrows and allow the door to swing open.

•   Wipe the tray clean with a damp cloth.
•   Dry thoroughly before crumb tray door is replaced and ensure this is hooked back into place.

CARE AND MAINTENANCE

•  Switch the power off and remove the plug from the wall power outlet.
•   Let the toaster cool down fully before attempting any cleaning operation or storing away.
•   Wipe the outer surfaces with a soft damp cloth. If necessary, use a little dish washing 

detergent.

•   Do not allow cleaning utensils, liquid or any foreign objects to enter the toasting slots, as this 

may damage the elements and present a danger of electric shock.

•   Remove, empty, clean and refit the crumb tray door.

•   Do not use harsh or abrasive cleaning agents or solvents.
•   Do not use alkaline cleaning agents when cleaning this appliance.
•   Do not immerse the toaster in water or any other liquid.

DISPOSAL/RECYCLING 

Legislation in some localities mandates that e-waste (anything with a plug, battery or cord) 

is disposed of through controlled recycling facilities and must not be disposed of in general 
household waste. For more information about recycling of electrical and battery operated 
appliances, please contact your local council or your local household waste disposal service.

Summary of Contents for Groove RHT722 Series

Page 1: ...1 GROOVE RHT722_IB_FA_300522 Part No T22 9002688 INSTRUCTIONS WARRANTY 2 SLICE TOASTER 2 YEAR WARRANTY RHT722 SERIES ...

Page 2: ...er toasting as it is hot 19 Always take care when removing food from the toaster as accessible surfaces may become hot during operation 20 Avoid contact with hot surfaces Accessible surfaces that become hot during toasting may remain hot for some time after toasting has finished 21 Do not attempt to toast items that do not properly fit into the toasting slots 22 Do not attempt to cook buttered bre...

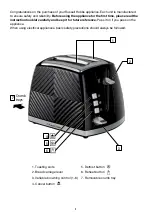
Page 3: ...please read the instruction booklet carefully and keep it for future reference Pass it on if you pass on the appliance When using electrical appliances basic safety precautions should always be followed Crumb trays 3 7 4 5 6 1 Toasting slots 2 Bread carriage lever 3 Variable browning control 1 6 4 Cancel button 5 Defrost button 6 Reheat button 7 Removable crumb tray 1 2 ...

Page 4: ... of heat Shorten the power cord by wrapping the excess cord around the clips underneath the toaster TOASTING BREAD Plug the power cord into the wall power outlet and switch it on Turn the browning control dial to the desired level 1 low setting to 6 high setting Place the bread into the toasting slots Operate the toaster by pressing the bread carriage lever down until it locks into place It will n...

Page 5: ...wer and remove the plug from the wall power outlet Open crumb tray door located on the underside of the toaster by pulling the tray in the direction of the marked arrows and allow the door to swing open Wipe the tray clean with a damp cloth Dry thoroughly before crumb tray door is replaced and ensure this is hooked back into place CARE AND MAINTENANCE Switch the power off and remove the plug from ...

Page 6: ... set out at the end of this warranty Supplier means the authorised distributor or retailer of the Goods that sold you the Goods in Australia or in New Zealand and You means you the original end user purchaser of the Goods 1 Our goods come with guarantees that cannot be excluded under the Australian Consumer Law or the CGA You are entitled to a replacement or refund for a major failure and compensa...

Page 7: ...anty Period accompanied with i the legible and unmodified original proof of purchase which clearly indicates the name and address of the Supplier the date and place of purchase the product name or other product serial number and ii this warranty 9 This warranty is immediately void if a Any serial number or appliance plate is removed or defaced b The Goods have been serviced or otherwise repaired b...

Page 8: ...ssellhobbs com au www russellhobbs co nz RUSSELL HOBBS and logo are Trade Marks of Spectrum Brands Inc or one of its subsidiaries Manufactured in China to Spectrum Brands specifications 2022 Spectrum Brands Inc ...

Reviews: