background image

6

SAFETY INSTRUCTIONS

READ CAREFULLY AND KEEP FOR FUTURE REFERENCE

WARNING

:

When heating food in plastic or paper containers, keep
an eye on the oven due to the possibility of ignition.

If materials inside the oven smoke or catch fire, keep the
oven door closed to stifle the flames, turn the oven off
at the wall switch, or shut the power off at the fuse or
circuit-breaker panel. If smoke is emitted , switch off or
unplug the appliance and keep the door closed in order
to stifle any flames.

Please remember that as food or liquids heat up, 
they will release steam or may be spitting. Never cover
any container fully, always leave a gap for steam to
escape.

Do not use plastic containers when heating or cooking 
foods that contain a lot of fat or sugar.

Always have the glass tray and turntable support in
place when using the microwave oven.

Do not cook food directly on the glass tray. Put food on
a suitable plate or in a bowl before putting it in the oven.

Summary of Contents for Honeycomb RHMM715

Page 1: ...del Number RHMM715 B Honeycomb Compact Manual Microwave User Guide PLEASE RETAIN FOR FUTURE REFERENCE For Customer Services Spare Parts please call 0345 209 7461 Or visit us at http mda russellhobbs c...

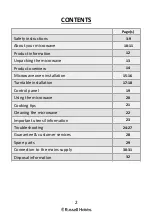
Page 2: ...w 14 Microwave oven installation 15 16 Turntable installation 17 18 Control panel 19 Using the microwave 20 Cooking tips 21 Cleaning the microwave 22 Important utensil information 23 Troubleshooting 2...

Page 3: ...gives protection against exposure to microwave energy Liquids and other foods must not be heated in sealed containers since they are liable to explode The appliance and its accessible parts may become...

Page 4: ...the outer case This appliance can be used by children aged from 8 years and above and persons with reduced physical sensory or mental capabilities or lack of experience and knowledge only if they are...

Page 5: ...d jars shall be stirred or shaken and the temperature checked before consumption in order to avoid burns Do not heat baby bottles with the teat left on Remove it if replacing the bottle back into the...

Page 6: ...l If smoke is emitted switch off or unplug the appliance and keep the door closed in order to stifle any flames Please remember that as food or liquids heat up they will release steam or may be spitti...

Page 7: ...may cause the dishes to crack or burn and will slow down the cooking speed Use only cookware and utensils that are approved for use in a microwave oven Do not use the microwave oven for heating utensi...

Page 8: ...in the oven in a clean condition could lead to deterioration of the surface that could adversely affect the life of the appliance and possibly result in a hazardous situation You should clean the outs...

Page 9: ...support and oven floor Simply wipe the bottom surface of the oven with mild detergent and water then dry You can wash the turntable support in mild soapy water Failure to maintain the oven in a clean...

Page 10: ...cooking time required by turning the easy to use dials found on the control panel The internal microwave light lets you know that cooking is in progress When the cooking cycle has finished the microwa...

Page 11: ...of the microwave piping hot when your utensils inside the oven stay much cooler The microwaves do not stay in the air or in the food when you open the microwave oven door The microwave oven will work...

Page 12: ...100W Rated Output Power Microwave 700W Oven Capacity 17L Turntable Diameter 25 5cm External Dimensions H x W x D 26 1 x 45 5 x 35 2 cm Net Weight Approx 11 Kg Number of Power Levels 5 including defros...

Page 13: ...th a damp cloth Do not remove place in a dishwasher 2 Check the oven after unpacking for any visual damage such as A misaligned door Damage to the door Dents or holes in the door window and screen Den...

Page 14: ...2 3 4 6 7 9 1 Safety interlock latches 2 Door assembly and window 3 Glass turntable 4 Microwave inside door frame 5 Power control dial 6 Turntable ring 7 Turntable coupling 8 Time control dial 9 Plast...

Page 15: ...he reception Plug the oven into a suitable 13 amp mains socket make sure the voltage is the same as on the rating label do not use extension cables or mains socket adaptors The microwave oven should b...

Page 16: ...Min85cm WARNING DO NOT install the oven over a cooker or other heat or steam producing appliance as this will damage the microwave oven The minimum installation height is 85cm A minimum clearance of 7...

Page 17: ...ray should align with the turntable coupling 17 TURNTABLE INSTALLATION Before first use check that any securing tape and all packaging has been removed from the glass tray and turntable ring assembly...

Page 18: ...king as shown below Do not place the food directly onto the glass tray always place on or in suitable microwaveable cookware Please check that crockery is microwave safe before using If the glass tray...

Page 19: ...t you that cooking has completed If you wish to set the time for less than two minutes turn the dial clockwise past the two minute mark and back anti clockwise to less than two minutes POWER control d...

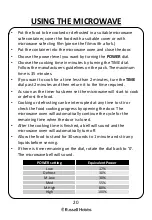
Page 20: ...n return it to the time required As soon as the timer has been set the microwave will start to cook or defrost the food Cooking or defrosting can be interrupted at any time to stir or check the food c...

Page 21: ...e of the dish and the thinner parts toward the centre spread out as evenly as possible Do not overlap food if possible as this could result in uneven cooking results Cooking length If you are unsure o...

Page 22: ...t Clean with a soft damp cloth Do not use detergents abrasives or spray on cleaners on the control panel If steam builds up inside or around the outside of the oven door wipe with a soft cloth This ma...

Page 23: ...e energy This may cause the dishes to crack or burn and will slow down the cooking speed Use only cookware that is approved to be used in a microwave oven Do not cook using a container with a restrict...

Page 24: ...od then the microwave should be returned to the retailer it was purchased from for a replacement or refund If the microwave power will not work 1 Door is not closed Make sure the door is securely clos...

Page 25: ...the microwave sparks again on first use after the waveguide has been replaced and the microwave cleaned please contact customer services for further advice 2 Metal or foil No metal or foil should be p...

Page 26: ...xcessive water to settle inside the microwave or the microwave to overheat The installation instructions in the instruction manual must be followed or the warranty will be void Paint damage peeling Ma...

Page 27: ...not fitted or fitted incorrectly Check that the coupling has be placed under the turntable and that it is position correctly 3 Glass turntable fitted incorrectly Check that the glass turntable has bee...

Page 28: ...e faulty product must be returned to the place of purchase Refund or replacement is at the discretion of the retailer The following conditions apply The product must be returned to the retailer with t...

Page 29: ...29 SPARE PARTS Glass turntable Turntable Ring Turntable coupling To check the availability of the following spare parts simply contact our friendly Customer Services on 0345 209 7461...

Page 30: ...k that the voltage marked on the product corresponds with your supply voltage This product is fitted with a 13A plug complying with BS1363 If this plug is unsuitable or needs to be replaced refer to c...

Page 31: ...inal marked with the letter N or coloured BLACK The BROWN wire is the LIVE wire and must be connected to the terminal marked with the letter L or coloured RED Always ensure that the plug cord grip is...

Page 32: ...e Only discard electrical electronic battery items in separate collection schemes which cater for the recovery and recycling of materials contained within Your co operation is vital to ensure the succ...

Reviews: