background image

- 12 -

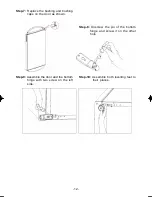
Step-7:

  Replace  the  bushing  and  bushing

caps  on  the  door  as  shown.

Step-8:

  Unscrew  the  pin  of  the  bottom

hinge  and  screw  it  on  the  other
hole.

Step-9:

 Assemble the door and the bottom

hinge  with  two  screw  on  the  left
side.

Step-10:

  Assemble  both  levelling  feet  to

their  places.

PDF created with pdfFactory Pro trial version 

www.pdffactory.com

Summary of Contents for RH115

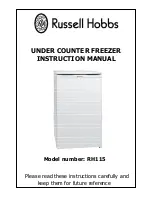
Page 1: ...UNDER COUNTER FREEZER INSTRUCTION MANUAL Model number RH115 Please read these instructions carefully and keep them for future reference...

Page 2: ......

Page 3: ...and Switching On The Appliance 4 THE PARTS OF THEAPPLIANCE 5 TEMPERATURE 6 Thermostat Setting 6 ARRANGING FOOD IN THE APPLIANCE 7 CLEANINGAND MAINTENANCE 8 Defrosting Freezer compartment 9 TRANSPORTAT...

Page 4: ...rator with a lock break or remove the lock as a safety measure before storing it to protect children while playing might lock themselves inside Old refrigerators and freezers contain insulation gases...

Page 5: ...d Do not plug the power supply with wet hands Do not place containers glass bottles or tin containers of liquids into the freezer especially gassy liquids as they could cause the container to burst du...

Page 6: ...sunlight Do not use in open air and shall not be exposed to rain Place the appliance far from heat sources and in a well ventilated position The freezer should be at least 50 cm from radiators gas or...

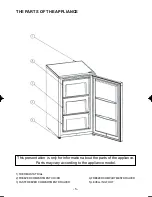
Page 7: ...STAT DIAL 2 FREEZERCOMPARTMENT COVER 3 FASTFREEZER COMPARTMENT DRAWER 4 FREEZERCOMPARTMENT DRAWER 5 LEVELLING FOOT This presentation is only for information about the parts of the appliance Parts may...

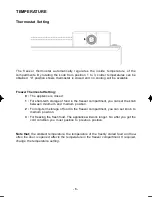
Page 8: ...erm storage of food in the freezer compartment you can set the knob between minimum and medium position 2 For long term storage of food in the freezer compartment you can set knob to medium position 3...

Page 9: ...robable that it has been previously stored at an unsuitable temperature and that the contents have deteriorated The storage life of frozen food depends on the room temperature thermostat setting how o...

Page 10: ...sories separately with soap and water Do not clean them in the washing machine Do not use abrasive products detergents or soaps After washing rinse with clean water and dry carefully When the cleaning...

Page 11: ...ore than 5 mm of frost on the shelves defrosting must be done Before defrosting operation place the frozen food in a cool place after wrapping them in sheets of newspaper in order to obtain its temper...

Page 12: ...he rules written on the corrugated box must be applied while transporting Before transporting or changing old installation position all the moving objects ie shelves crisper should be taken out or fix...

Page 13: ...der neath the appliance i e card towel etc Step 1 Dismantle both levelling feet Step 3 Unscrew the two screws which are fixing the bottom hinge Step 4 Dismantle the bottom hinge Step 5 After removing...

Page 14: ...shing caps on the door as shown Step 8 Unscrew the pin of the bottom hinge and screw it on the other hole Step 9 Assemble the door and the bottom hinge with two screw on the left side Step 10 Assemble...

Page 15: ...n if so set the thermostat dial suitable value 3 The doors are closed perfectly 4 There is no dust on the condenser 5 There is enough place at the rear and side walls If there is noise 1 The cooling g...

Page 16: ...s that the product batteries should not be disposed of with your general household waste Only discard electrical electronic battery items in separate collection schemes which cater for the recovery an...

Reviews: